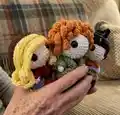
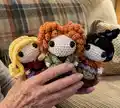
Make a set of charming witch amigurumi dolls featuring layered skirts, tiny capes, and playful hair textures. This pattern walks you through head, body, skirts, capes, hair and small details so you can create each sister in different colors. Youll enjoy detailed shaping and simple assembly that brings each little character to life.
Progress Tracker
0% Complete
— Pattern Notes :
Info :
I use the *ch 2, sc in second ch from hook* method to crochet in the round. You can substitute for the magic circle, it just isn't my preferred method. This pattern is written in US terms and is advanced beginner skill level. When working with amigurumi, be sure to crochet tightly unless otherwise specified in the pattern. When tying off ends, you should assume that you are leaving a long tail for sewing. Have fun!
— Head :
Info :
With Cream Yarn, ch 2, sc 6 in second ch from hook
Round R1 :
inc in each sc (12 sts)
Round R2 :
*sc, inc* x6 (18 sts)
Round R3 :
*sc 2, inc* x6 (24 sts)
Round R4 :
*sc 3, inc* x6 (30 sts)
Round R5 :
*sc 4, inc* x6 (36 sts)
Round R6-8 :
sc in each sc (36 sts per row)
Round R9 :
*sc 4, dec* x6 (30 sts)
Round R10 :
*sc 3, dec* x6 (24 sts)
Round R11 :
*sc 2, dec* x6 (18 sts)
Info :
Insert safety eyes between R7 and R8, about 7 stitches apart. You will want the eyes on the opposite side of the head from where the rows start so color changes are not on the front of the doll.
Info :
Begin stuffing head to medium firmness.
Round R12 :
*sc, dec* x6 (12 sts)
Round R13 :
*sc 2, dec* x6 (9 sts)
Info :
Do not tie off. Continue to Body.
— Body :
Info :
Switch to Dark Purple yarn
Round R14-18 :
sc in each sc (9 sts)
Round R19 :
inc x9 (18 sts)
Round R20 :
*sc, inc* x9 (27 sts)
Round R21-25 :
sc in each sc (27 sts per row) TIE OFF
— Body Base :
Info :
In Dark Purple Yarn, ch 2, sc 6 in second ch from hook
Round R1 :
inc x6 (12 sts)
Round R2 :
*sc, inc* x6 (18 sts)
Round R3 :
*sc 2, inc* x6 (24 sts) TIE OFF
Info :
Sew to the bottom of the body (stuffing before you finish), inside the last row of the skirt. Use the tail from the beginning to tug the center up into the body so it's a flat bottom.
— Cape Top :
Info :
In Olive Green Yarn, ch 15
Round R1 :
turn, in second ch from hook, sc across
Round R2 :
turn, *sc, ch 1* x14
Round R3 :
turn, *sc in gap, ch 1* x13, sc in last stitch TIE OFF
— Cape Bottom :
Info :
In Olive Green Yarn, ch 15
Round R1 :
turn *sc, ch 1* x14
Round R2 :
turn *sc, ch 1* x14
Round R3 :
turn *sc, ch 2* x14
Round R4 :
turn *sc, ch 2* x14
Round R5 :
turn *sc, ch 2* x13, sc. TIE OFF
Info :
To sew Cape top to body, line ch row along R19 of Body. Use the tail from the beginning to join the cape into a circle and stitch onto body piece. Use tail from end to tack down corresponding corner, sew through the body to tack down the other corner.
Info :
To sew Cape Bottom on, use tail from beginning to join cape into a circle around R20 of Body and tack to body. Weave in end tail.
— Hair :
Info :
In Orange Yarn, ch 31, turn *sc 2, sc 1* x15, tie off. Make 16
Info :
To attach hair, first sew 10 of the spirals evenly along the head like a wig cap, giving her a middle part. Sew tail straight through curl so it doesn’t lose its curliness and tack down curl at both ends. Then add 3 spirals to each side of her head as a second layer to create poofs.
— Sleeves :
Info :
*Make 2* In Olive Green Yarn, ch 2, sc 5 in second ch from hook
Round R1 :
sc in each sc (5 sts)
Round R2 :
inc x2, sc x3 (7 sts)
Round R3 :
sc, inc x2, sc x4 (9 sts)
Round R4 :
Sc in each sc (9 sts) TIE OFF
— Arms :
Info :
*Make 2* In Cream Yarn, ch 2, sc 4 in second ch from hook
Round R1-2 :
sc in each sc (4 sts per row) TIE OFF
Info :
Sew arms inside of sleeves so the ends pop out like hands. Then attach the arms to the sides of the body behind the folded cape front.
— Alternate Body & Head Variations (Black Haired Witch) :
Info :
Head rounds repeat as earlier with cream yarn; R1 inc in each sc (12 sts), R2 *sc, inc* x6 (18 sts), R3 *sc2, inc* x6 (24 sts), R4 *sc3, inc* x6 (30 sts), R5 *sc4, inc* x6 (36 sts), R6-10 sc in each sc (36 sts per row), R11 *sc4, dec* x6 (30 sts), R12 *sc3, dec* x6 (24 sts), R13 *sc2, dec* x6 (18 sts), insert safety eyes between R7 and R8, begin stuffing head to medium firmness, R14 *sc, dec* x6 (12 sts), R15 *sc2, dec* x6 (9 sts). Do not tie off. Continue to Body.
Info :
Body (Black haired witch): Switch to Dark Orange Yarn. R16 sc in each sc (9 sts), R17 *sc 2, inc* x3 (12 sts), R18 *sc, inc* x6 (18 sts), R19-20 sc in each sc (18 sts per row), R21 *sc, dec* x6 (12 sts). Switch to Burgundy Yarn. R22 *sc, inc* x6 (18 sts), R23 *sc2, inc* x6 (24 sts), R24 *sc3, inc* x6 (30 sts), R25 *sc4, inc* x6 (36 sts), R26-28 sc in each sc (36 sts per row) TIE OFF.
Info :
Body Base (Black haired witch) In Burgundy Yarn, ch 2, sc 6 in second ch from hook. R1 inc x6 (12 sts), R2 *sc, inc* x6 (18 sts), R3 *sc2, inc* x6 (24 sts), R4 *sc3, inc* x6 (30 sts), R5 *sc4, inc* x6 (36 sts) TIE OFF and leave a tail long enough for sewing.
— Cap (Black Yarn) :
Info :
With Black Yarn, ch 2, sc 4 into second ch from hook
Round R1 :
sc in each sc (4 sts)
Round R2 :
sc, inc, sc, inc (6 sts)
Round R3-4 :
sc in each sc (6 sts per row)
Round R5 :
inc x6 (12 sts)
Round R6-7 :
sc in each sc (12 sts per row)
Round R8 :
*sc, inc* x6 (18 sts)
Round R9-10 :
sc in each sc (18 sts per row)
Round R11 :
inc x18 (36 sts)
Round R12 :
sc in each sc (36 sts)
Round R13-15 :
9 sc, hdc, 25 dc, hdc (36 sts) On last row slip stitch after last hdc, then TIE OFF
— Texture :
Info :
With Black Yarn, ch 170, turn, sc in each ch. TIE OFF. NOTE: an alternative way to do this is to do a sc chainless foundation stitch; preferred if you want to add or subtract length. Sew this long piece around the cap in a swirl, starting in the back and spiraling up to the top.
— Purple Streak :
Info :
Using a long piece of light purple yarn, start at the top of the hair and weave in and out of the spiral until you reach the bottom, then weave back up to the top. Add as many streaks as you like.
— Arms (Black witch) :
Info :
*Make 2* With Cream Yarn, ch 2, sc 4 in second ch from hook
Round R1 :
sc in each sc (4 sts)
Info :
Switch to Bright Orange. R2 sc in each sc (4 sts), R2 inc x4 (8 sts), R3 sc in each sc (8 sts) TIE OFF. To attach to body, pinch R2 and use tail to sew arms to either side of body.
— Waist Wrap :
Info :
In Light Purple Yarn, ch 10. R1 starting in second ch from hook, sc in each ch. Ch 1, turn (9 sts). R2 (sc, ch 3, skip 1) x4, sc in last sc. Ch 3, turn. R3 (sc in gap, ch 3) x4, ch3, sc in last sc. TIE OFF.
Info :
In Olive Green Yarn, ch 10. R1 starting in second ch from hook, sc in each ch. Ch 1, turn (9 sts). R2 (sc, ch 3, skip 1) x4, sc in last sc. Ch 3, turn. R3 (sc in gap, ch 3) x4, ch3, sc in last sc. R4 (sc in gap, ch 3) x4, sc in last gap. TIE OFF. Sew the green wrap on first, layer purple on top, slightly off center for whimsical feel.
— Skirt Topper :
Info :
With Purple Yarn, ch 17. R1 In second ch from hook, sc, then continue sc until end, ch 1, turn. R2 *sc, ch 1* x16, turn. R3 *sc in gap, ch 1* x16, turn. R4 *sc in gap, ch 1* x15, sc, TIE OFF leaving a small tail for sewing. To attach to the body, sew ch row to body between R19 and R20.
— Belt :
Info :
With Black Yarn, ch 15, sew to waist along top of skirt topper. Adjust ch length if necessary.
— Blonde Witch Hair & Hood Sections :
Info :
Hair With Yellow Yarn ch 30. Turn *inc, sc* x10, sc 9 in last 9 sc. TIE OFF. With Yellow Yarn ch 30 turn *inc, sc* x10, sc, sc, hdc, dc, tc, tc, dc, hdc, sc. TIE OFF. With Yellow Yarn ch 20 Turn *inc, sc* x5, sc 9 in last 9 sc. TIE OFF make 2. (These produce different hair strip/textures for blonde curls)
Info :
Cape Hood With Burgundy Yarn, ch 2, sc 6 in second ch from hook. R1 inc in each sc (12 sts). R2 *sc, inc* x6 (18 sts). R3 *sc2, inc* x6 (24 sts). R4 *sc3, inc* x6 (30 sts). R5 *sc4, inc* x6 (36 sts). R6 sc 5, inc, *dc 5, inc* x4, sc 5, inc (42 sts). Note: In R6 & 7, increase using sc for the first and last increases, and increase using dc for the middle 4 increases. R7 sc 6, inc, *dc 6, inc* x4, sc 6, inc (48 sts). R8 sc 8, dc 32, sc 8 (48 sts). R9 sc 8, dc 32, hdc, sl st. TIE OFF leaving long enough tail for sewing.
— Cape Base (Blonde Hood) :
Info :
With Burgundy Yarn, ch 7. R1 Turn, sc, ch1 x6. R2 Turn, sc, ch1 x6. R3 Turn, sc, ch2 x6. R4 Turn, sc, ch2 x7. R5 Turn, sc, ch3 x6, sc TIE OFF.
Info :
Arms (Blonde set) Make 2. In Cream Yarn, ch 2, sc 4 into second ch from hook. Switch to Red yarn. R1 sc in each sc (4 sts). R2 sc in each sc (4 sts). R3 sc in each sc (4 sts). R4 sc in each sc (4 sts).
— Cape Base (General) :
Info :
To attach the hood sew the bottom of the hood (the side with only sc) to the base of the back of the head, then pull the yarn up through the middle of the head to tack the top of the hood down so it has a natural hood shape. To attach the cape, sew the initial ch7 to the base of the back of the head where you attached the bottom of the hood.
Create your own coven of tiny witchy sisters with this playful amigurumi pattern that is perfect for gifting or collecting. Each sister can be made unique with color choices and hair styles so your creativity really shines. Happy crocheting and may your yarn always be tangle-free! 🧶✨