🧢 Beautiful ✨ Detailed πŸ’ Adorable

Snowman Friends Amigurumi Pattern

Snowman Friends Amigurumi Pattern
4.6β˜… Rating
5-7 Hours Time Needed
1.3K Made This
βœ‚οΈ

Intermediate Level

Ideal for those with basic crochet experience, featuring slightly more advanced stitches and techniques to expand your skills.

⏱️

Weekend Treat

Takes 5-7 hours, making it an enjoyable project to finish over a couple of days.

🧸

Cute Companion

An adorable friend to cherish, handcrafted with love to bring comfort and joy for years to come.

About This Snowman Friends Amigurumi Pattern

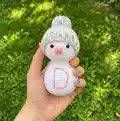
This pattern creates a delightful little snowman amigurumi about 5.6 inches tall, worked mostly in single crochet. It includes full instructions for a knit-style pom-pom hat, a small crocheted nose, and optional embroidered initials on the body. You can mix and match colors and add buttons or tiny accessories to personalize each snowman.

Snowman Friends Amigurumi Pattern crochet pattern - detailed view of completed project

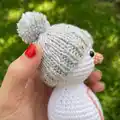
Head and body are worked in one piece from the top down, with clear step-by-step rounds and finishing notes. The hat instructions use double-pointed needles with metallic thread for a subtle twinkle effect.

Why You'll Love This Snowman Friends Amigurumi Pattern

I absolutely love this pattern because it blends simple amigurumi shaping with cozy little details like a knitted pom-pom hat and embroidered initials. I enjoy how quickly each snowman comes together β€” they are perfect for last-minute gifts or seasonal decor. The combination of crochet and a tiny knit hat makes the finished toy feel handmade and special. I also love how customizable they are; changing yarn colors or adding buttons gives each snowman a unique personality.

Snowman Friends Amigurumi Pattern step 1 - construction progress Snowman Friends Amigurumi Pattern step 2 - assembly progress Snowman Friends Amigurumi Pattern step 3 - details and accessories Snowman Friends Amigurumi Pattern step 4 - final assembly and finishing

Switch Things Up

I love how easy it is to customize these Snowman Friends β€” change the hat color for a whole new look.

You can make them larger by using a bulkier yarn and a larger hook for a chunky, cuddly version.

If you want tiny keychains, simply use a finer yarn and smaller hook to create a miniature snowman perfect for bags.

I often swap the peach nose for an orange tone to create a more classic carrot look or use felt for a flat nose option.

Try embroidering different initials or small motifs on the body to create personalized gifts or ornaments.

Use buttons down the front for a traditional snowman look, or keep them simple with just stitched features for a minimalist style.

I sometimes add tiny scarves or a loop for hanging to turn these into holiday tree ornaments.

For a sparkly finish, use metallic embroidery thread held with the hat yarn, or wrap a strand of sparkly yarn around the pom-pom.

If you prefer posable limbs, add thin wire inside the stuffing of the hat or body to manipulate small poses.

I recommend experimenting with eye placement and nose size to give each snowman a unique expression that reflects their personality.

Common Mistakes & How to Fix Them

βœ— Skipping a stitch marker at the start of each round can cause you to lose the beginning of the round; always place a stitch marker to keep track of your rounds. βœ— Understuffing or overstuffing the head and body will change the shape and stability of the snowman; stuff firmly and evenly, overstuff slightly before finishing and shape as you go. βœ— Forgetting to count stitches after increases or decreases leads to uneven shaping; count your stitches at the end of each round and correct mistakes immediately. βœ— Placing safety eyes too close or too far apart changes the facial expression; attach safety eyes between rounds 8 and 9, spacing them 4 stitches apart as directed. βœ— Tightening yarn too much when using double-strand metallic thread for the hat can make knitting uneven; hold the strands lightly and keep an even tension while knitting the rib and body.

Snowman Friends Amigurumi Pattern

Make a set of charming Snowman Friends perfect for gifts, decorations, or cozy winter displays. This pattern guides you through crocheting the head and body in one piece, making a tiny knitted pom-pom hat, and sewing on a sweet carrot nose. With clear rounds and finishing notes, you can customize colors and embroider initials to make each snowman uniquely yours.

Intermediate 5-7 Hours

Materials Needed for Snowman Friends Amigurumi Pattern

β€” Main Fabric

  • 01
    Paintbox Yarns Simply Aran Acrylic - Color A: Paper White (1 x 100g / 170 yd)
  • 02
    Paintbox Yarns Simply Aran Acrylic - Color B: Stormy Grey (1 x 100g / 170 yd)
  • 03
    Small amount of Peach or Pink yarn for nose (approx few grams)
  • 04
    3 ply metallic embroidery thread (small amount for hat detail)
  • 05
    Small amount of blue yarn or matching yarn for a pom-pom

β€” Tools Required

  • 01
    Crochet hook size 3.5 mm (US E)
  • 02
    Set of double pointed needles size 3.75 mm (US E) for hat
  • 03
    6 mm safety eyes (2 pieces per snowman)
  • 04
    Tapestry needle
  • 05
    Stitch marker
  • 06
    Polyester fiberfill stuffing
  • 07
    Scissors
  • 08
    Yarn needle for sewing and embroidery
  • 09
    Pins for assembly (optional)
  • 10
    Pom-pom maker or cardboard for pom-pom (optional)

Progress Tracker

0% Complete

β€” Head + Body :

Info :

Using the color A (Paper White) yarn and 3.5 mm crochet hook, begin with a MR.

Round 1 :

6 sc in MR [6]

Round 2 :

(inc in each st) x 6 [12]

Round 3 :

(1 sc; inc) x 6 [18]

Round 4 :

(2 sc; inc) x 6 [24]

Round 5 :

(3 sc; inc) x 6 [30]

Round 6 :

(4 sc; inc) x 6 [36]

Round 7-12 :

sc in each st around [36]

Round 13 :

(4 sc; dec) x 6 [30]

Round 14 :

(3 sc; dec) x 6 [24]

Info :

Attach safety eyes between rows 8 and 9, with 4 sts apart.

Round 15 :

(2 sc; dec) x 6 [18]

Round 16 :

(1 sc; dec) x 6 [12]

Round 17 :

(inc in each st) x 6 [24]

Round 18-19 :

(sc in each st) around [24]

Round 20 :

(3 sc; inc) x 6 [30]

Info :

Stuff the head as you continue to work.

Round 21 :

sc in each st around [30]

Round 22 :

(4 sc; inc) x 6 [36]

Round 23 :

sc in each st around [36]

Round 24 :

(5 sc; inc) x 6 [42]

Round 25-29 :

sc in each sts around [42]

Round 30 :

(5 sc; dec) x 6 [36]

Round 31 :

(4 sc; dec) x 6 [30]

Info :

Start stuffing the body.

Round 32 :

(3 sc; dec) x 6 [24]

Round 33 :

(sc in next 2 sts; dec) [18]

Round 34 :

(1sc; dec) x 6 [12]

Round 35 :

(dec) x 6 [6]

Info :

Fill the head and body with fiberfill firmly. F/O and thread tail end of yarn onto a tapestry needle, insert the needle in and out of the remaining sts, pull tight to close and weave in end.

β€” Nose :

Info :

Using your Peach or Pink color yarn, begin with an MR.

Round 1 :

4 sc in MR

Round 2 :

inc, sc in next 3 sts around [5]

Round 3 :

inc, sc in next 4 sts around [6]

Round 4 :

sc in each st around [6]

Info :

Sl st in next st and F/O leaving a tail for sewing.

β€” Pom-Pom Hat :

Info :

Using 3.75 mm double pointed needles, with color B (Stormy Grey) yarn and metallic embroidery thread, holding the two strands together cast on 36 sts. Divide sts evenly among 3 needles. Place marker and join (being careful not to twist) to work in the round.

Ribbing :

K1 P1 for 5 rounds

Body :

Knit 7 rounds

Shape Top - Round 1 :

(k4; k2tog) around [30 sts]

Shape Top - Round 2 :

knit

Shape Top - Round 3 :

(k3; k2tog) around [24]

Shape Top - Round 4 :

knit

Shape Top - Round 5 :

(k2; k2tog) around [18]

Shape Top - Round 6 :

(k1; k2tog) around [12]

Shape Top - Round 7 :

(k2tog) around [6]

Info :

Cut yarn leaving a tail. Thread tail end of yarn onto a tapestry needle, insert the needle through remaining sts and pull tight to close. Make a small pom-pom using blue yarn and metallic thread and attach to the top of the hat.

β€” Assembly :

Step 1 :

Stuff the nose lightly and sew it between the eyes beginning from the row 8.

Step 2 :

Use color Peach yarn to embroider the letters on the body (if desired). If using buttons, sew them on the body now.

Step 3 :

Place the knitted/crocheted hat on the head and attach pom-pom securely to the top of the hat if not already attached.

Step 4 :

Just place the heads and your Snowman Friends are ready to frolic in the snow!

Assembly Instructions

  • Stuff the nose lightly and sew it between the eyes beginning from row 8, positioning the nose centrally and securing with small stitches so it sits firmly.
  • Use Peach yarn to embroider initials or letters onto the body following your marked placement; if you prefer buttons, sew them onto the body now using strong thread.
  • Place and secure the hat on each head; if the pom-pom is separate, sew it to the top of the hat and secure knots on the inside so they are hidden.
  • Position the heads on the bodies and place them together for display, adjusting stuffing and shape as needed to make your snowmen stand neatly.

Important Notes

  • πŸ’‘Work in continuous rounds without joining the round with a slip stitch; do not turn at the end of each round.
  • πŸ’‘Use a stitch marker to keep track of the beginning of each round for accurate shaping and stitch counts.
  • πŸ’‘Head and body are worked in one piece beginning at the top of the head and working down the body for smooth shaping.
  • πŸ’‘Firmly stuff as you work and overstuff slightly before finishing each section so the stuffing fills out the shape after crocheting is done.

These Snowman Friends are a cozy little project designed to add handmade charm to your home or gift list. They are quick to make, easy to personalize, and sweet enough to warm anyone's heart. πŸ§Άβ„οΈ

You ask,

we answer.

FAQs

What size will the finished piece be?

Each Snowman is approximately 5.6 inches (14.22 cm) tall when made with the recommended yarn and hook sizes.

Can I use different yarn weights for this pattern?

Yes, you can use different yarn weights but the finished size will change; adjust your hook accordingly to match gauge and desired size.

Do I need prior crochet experience for this pattern?

This pattern is rated intermediate, so basic crochet skills like single crochet, increases, and decreases are recommended along with simple knitting skills for the hat if you choose the knit version.

How long does this project typically take to complete?

Most crafters complete one snowman in about 5-7 hours, depending on experience and whether you knit the hat or use the crochet hat alternative.

Is there a crochet alternative for the pom-pom hat if I do not knit?

Yes, the designer offers a free crochet pom-pom hat pattern in PDF format on LoveCrafts and Ravelry; the pattern notes mention the free crochet hat option in the final page.