🧢 Beautiful ✨ Detailed πŸ’ Adorable

The Office Appliques Pattern

The Office Appliques Pattern
4.4β˜… Rating
2-3 Hours Time Needed
3.0K Made This
βœ‚οΈ

Beginner Friendly Level

Perfect for those just starting their crochet journey, with clear instructions and simple techniques

⏱️

Bite-Sized Project

Finishes in 2-4 hoursβ€”perfect for an afternoon of creative relaxation.

🏑

Cozy Accent

A warm touch for your space that transforms ordinary corners into inviting nooks filled with handmade charm.

About This The Office Appliques Pattern

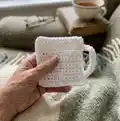
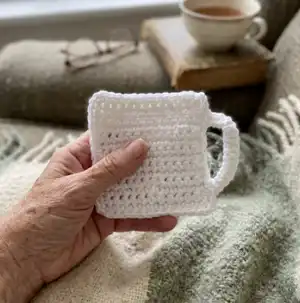
This pattern collection includes a variety of small appliques inspired by The Office β€” from the Worlds Best Boss mug to a chili pepper and a tiny dog. Each applique is designed to be quick to crochet using basic stitches and minimal yarn. Theyre perfect for customizing gifts, adding to cards, or decorating bags and scrapbooks.

The Office Appliques Pattern crochet pattern - detailed view of completed project

The instructions are written simply and include stitch counts for each step, making them ideal for beginners. No complicated shaping is required, and most pieces are completed in just a few rounds.

Why You'll Love This The Office Appliques Pattern

I absolutely love this pattern because it turns familiar, beloved icons into tiny handmade keepsakes you can make quickly. I enjoy how each applique is compact, allowing me to try several designs in one sitting without a big commitment. I appreciate that the stitches are simple but the finished pieces still have great character and charm. I love gifting these as little extras β€” theyre thoughtful, personal, and always well received.

The Office Appliques Pattern step 1 - construction progress The Office Appliques Pattern step 2 - assembly progress The Office Appliques Pattern step 3 - details and accessories The Office Appliques Pattern step 4 - final assembly and finishing

Switch Things Up

I love how easy these appliques are to customize; change yarn colors to match your decor or favorite characters and have fun mixing and matching.

I often make the pieces larger by using bulkier yarn and a bigger hook for a chunkier, more tactile applique perfect for cushions.

If you want mini keychains, use thinner yarn and a smaller hook to create tiny versions that fit on a bag or keyring.

I like to embroider faces or lettering on top of the base shapes to add personality and detail that machine-made motifs dont have.

Try adding a small backing circle of felt and hand-stitching the applique to it to create a durable patch you can sew onto garments or bags.

I sometimes join a string of several appliques to make a garland; alternate colors and shapes for a fun festive display.

Use metallic or variegated yarn for a sparkly or vintage look; the texture adds an extra layer of interest to simple shapes.

For a more polished finish, block flat appliques gently with steam or a damp cloth to even out edges and stitches.

If you want a 3D effect, lightly stuff the center of an applique before sewing it closed to give it a puffed appearance.

I also recommend experimenting with embroidered outlines around edges to make each motif pop and look more defined on any surface.

Common Mistakes & How to Fix Them

βœ— Skipping the magic ring for circular pieces can create a hole in the center; use an adjustable/magic ring to start rounds securely and pull tight when needed. βœ— Not counting stitches after increases or decreases leads to uneven shapes and misaligned edges; count your stitches at the end of each round to confirm the stitch count. βœ— Cutting yarn between connected elements can leave tails and make assembly messy; follow directions to keep yarn attached between head and ears when instructed to move on without cutting. βœ— Pulling chains or stitches too tightly when forming handles or loops causes a stiff, distorted shape; maintain relaxed, consistent tension when working chains and joining loops. βœ— Forgetting to tie off and weave in ends neatly can cause unraveling or sloppy edges; always tie off securely and weave ends into the back of the applique for a clean finish.

The Office Appliques Pattern

Youll love these small, theme-inspired appliques based on The Office β€” perfect for adding personality to gifts, bags, or home projects. Each motif is worked quickly using basic stitches and minimal yarn, making them great stash-busting projects. Clear step-by-step instructions are included so you can make a whole set in an afternoon.

Beginner Friendly 2-3 Hours

Materials Needed for The Office Appliques Pattern

β€” Main Fabric

  • 01
    Worsted weight yarn (#4) - small amounts of main colors: white, black, blue, red, green, gray, cream, brown (approximately 10-25g each for small appliques)
  • 02
    White yarn - approx 10-20g for Worlds Best Boss Mug
  • 03
    Black yarn - small amount for lettering/details
  • 04
    Blue yarn - approx 15-30g for Nard Dog body and Tuna
  • 05
    Red yarn - approx 10-20g for Chili Pepper body
  • 06
    Green yarn - small amount for Chili Pepper stem and accents
  • 07
    Gray yarn (two shades) - approx 15-30g for Michael's Plasma TV border and screen
  • 08
    Cream yarn - small amount for small body accents

β€” Tools Required

  • 01
    Crochet hook size 4.0mm (G) - recommended for worsted weight yarn
  • 02
    Crochet hook size 3.5mm (E) - optional for tighter stitches or smaller details
  • 03
    Scissors
  • 04
    Yarn needle for sewing and weaving in ends
  • 05
    Stitch markers (optional)
  • 06
    Tapestry needle and embroidery yarn or floss for lettering/details
  • 07
    Pins for blocking/assembly (optional)

Progress Tracker

0% Complete

β€” World's Best Boss Mug :

Info :

Ch13

Round 1-15 :

SC across (12sc)

Info :

SC around 3 sides (SC, ch1, SC in corners)

Info :

On 4th side, SC in first 4 stitches. Ch8, sk 7 stitches, SC in last 4 st

Info :

Turn, sl st across 4 SC just made. Work 12 SC across ch 8 loop. Sl st to end.

β€” Nard Dog :

Info :

Head

Round 1 :

In adjustable/magic ring, SC 10

Round 2 :

2 DC in each stitch, around (20 DC)

Info :

Do not cut yarn, move onto first ear instructions.

Item Name (P1) :

1st Ear

Round 1 :

Ch8, DC in 2nd ch from hook, DC, HDC, 2 SC, sl st to head. (First ear finished)

Info :

Do not cut yarn, move on to 2nd ear instructions.

Item Name (P1) :

2nd Ear

Round 1 :

Sl st in 8 stitches (across what will be the top of the head)

Round 2 :

Repeat instructions for 1st ear.

Info :

Cut yarn and tie off.

β€” Body :

Round 1 :

In 4th st down from last ear, join blue yarn and work 4 SC (there should be an even number of space between the four blue stitches and each ear). Tie off.

Info :

Join cream colored yarn.

Round 2 :

2HDC in first st, 1 SC in next 2 sts, 2HDC in last stitch (6 sts)

Round 3 :

2HDC in first st, 1 HDC in next 4 sts, 2 HDC in last stitch (8 sts) Tie off.

Info :

Join blue yarn.

Round 4-7 :

HDC across (8 sts) Tie off.

β€” Feet :

Info :

Join brown yarn about 3 rows up on the side of the body.

Round 1 :

Work 2 HDC down side then sl st in corner.

Round 2 :

Ch 4, work 3 sc down chain

Round 3 :

Work 8 SC across bottom of blue.

Round 4 :

Ch 4, work 3 SC down chain, sl in corner of blue

Round 5 :

2 HDC up side. Tie off.

β€” Chili Pepper :

Info :

In red,

Round 1 :

Ch 16

Round 2 :

2 SC, 3 HDC, 3 DC, 3 TC, 3 QC, ch 3, sl st in last st.

Info :

With green

Round 1 :

Sl in last QC

Round 2 :

In ch 3 sp work 3 SC, ch 3 (sl down 2 stitches of the chain 3), 3 SC, sl st. Tie off.

β€” Michael's Plasma TV :

Info :

Ch 13

Round 1 :

HDC across

Round 2-7 :

HDC across

Info :

For border switch to lighter gray and HDC around (HDC, ch2, HDC in each corner)

β€” Christmas Lights :

Info :

Image shown; no written instructions on this page.

Assembly Instructions

  • For Nard Dog head and ears: do not cut yarn after completing the head; move directly into the 1st ear instructions and attach the ears by slip stitching back to the head as directed.
  • When creating the Worlds Best Boss mug handle, work the ch8 loop and then sl st across the 4 SC just made to close the handle securely and stitch the handle to the mug edge.
  • After completing feet for Nard Dog, tie off and weave in ends at the base of the body so the feet sit flush against the bottom edge.
  • For Michael's Plasma TV, switch to the lighter gray and work HDC around, placing HDC, ch2, HDC in each corner to square the corners and create a neat border.
  • For small details or lettering, use a tapestry needle and embroidery yarn to stitch letters or accents onto the finished applique; secure ends on the back and weave in thoroughly.

Important Notes

  • πŸ’‘Use consistent tension throughout each applique to ensure all pieces are a similar size and shape.
  • πŸ’‘Keep long tails when youre instructed not to cut yarn between pieces so you can join elements smoothly without additional sewing.
  • πŸ’‘Weave in ends behind the applique and secure embroidery stitches to prevent unraveling during use or washing.
  • πŸ’‘When switching yarn colors for borders or accents, fasten off and weave ends neatly before continuing to avoid bulky joins.

This applique collection brings The Office to life in small, handmade pieces you can finish in an afternoon. Add them to gifts, cards, or home decor for an extra personal touch. Theyre quick, charming, and perfect for using scraps of yarn. 🧢✨

You ask,

we answer.

FAQs

What size will the finished pieces be?

Most appliques measure approximately 3-6 cm across depending on yarn and hook size; for example, the TV and mug are worked from Ch13 and will be small, palm-sized pieces.

Can I use different yarn weights for these appliques?

Yes, you can use different yarn weights but this will affect the final size; use a hook appropriate to your yarn and expect a proportional size change.

Do I need to know advanced stitches to make these?

No, these appliques use basic stitches like SC, HDC, and DC; some pieces reference TC or QC for taller stitches, but the patterns remain beginner-friendly.

How long does it take to complete one applique?

Most appliques can be completed in 10-45 minutes each depending on complexity; making a small set typically takes 2-3 hours total.