🧢 Beautiful ✨ Detailed πŸ’ Adorable

Ragdoll Pocket Whale Amigurumi Pattern

Ragdoll Pocket Whale Amigurumi Pattern
4.6β˜… Rating
2-3 Hours Time Needed
2.5K Made This
βœ‚οΈ

Beginner Friendly Level

Perfect for those just starting their crochet journey, with clear instructions and simple techniques

⏱️

Bite-Sized Project

Finishes in 2-4 hoursβ€”perfect for an afternoon of creative relaxation.

🧸

Cute Companion

An adorable friend to cherish, handcrafted with love to bring comfort and joy for years to come.

About This Ragdoll Pocket Whale Amigurumi Pattern

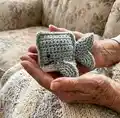
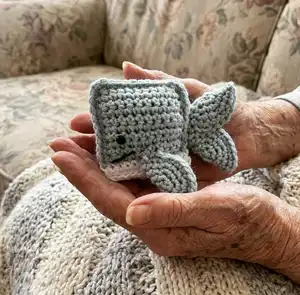
This pattern creates a small, pocket-sized whale with a contrasting white belly and tiny flippers. You will work two small rectangular body panels, join them together, and add simple round flippers and a tail. The finished whale is compact, quick to make, and perfect for keyrings or little gifts.

Ragdoll Pocket Whale Amigurumi Pattern crochet pattern - detailed view of completed project

Designed in US crochet terms with helpful step-by-step photos at the end, this pattern is beginner friendly. It uses mostly single crochet stitches and basic seaming techniques for assembly.

Why You'll Love This Ragdoll Pocket Whale Amigurumi Pattern

I absolutely love this pattern because it transforms simple stitches into a tiny, characterful whale that you can finish in an afternoon. I enjoy how portable the project is β€” it makes the perfect last-minute handmade gift or keyring charm. The design is forgiving, so I can easily customize colors and add small details like an embroidered mouth. Working through the neat little seaming and color-change for the belly always feels satisfying and gives a polished finish.

Ragdoll Pocket Whale Amigurumi Pattern step 1 - construction progress Ragdoll Pocket Whale Amigurumi Pattern step 2 - assembly progress Ragdoll Pocket Whale Amigurumi Pattern step 3 - details and accessories Ragdoll Pocket Whale Amigurumi Pattern step 4 - final assembly and finishing

Switch Things Up

I love customizing this pattern by swapping colors for different looks; try pastel shades for a soft nursery toy or bright colours for a playful charm.

I sometimes use cotton yarn instead of acrylic for a firmer finishβ€”this works nicely if you want a more stable keyring charm.

If you want a larger whale, I change to a bulkier yarn and a bigger hook to scale the whole project up while keeping the same stitch counts.

I like to replace safety eyes with embroidered eyes for baby-safe toys or to give a different expression to the whale.

To make a keyring, I leave a longer tail when sewing the top seam and attach a keyring before closing completely so it sits securely.

I often add a tiny embroidered smile with black embroidery thread which can completely change the character of the whale.

Try adding a small felt or crocheted heart on the side to personalize it for gifts or special occasions.

For a textured version, experiment with different stitches for the main panels, such as moss stitch, while maintaining the same finishing steps.

I sometimes add a little loop to the top so the whale can be hung as an ornament or clipped to a bag for a cute accessory.

When gifting, I like to create a family set in coordinating colours so each whale feels unique but matches as a group.

Common Mistakes & How to Fix Them

βœ— Not counting your foundation chain can make the body panels too short or too long; count the starting CH and recount after the first row to ensure you have the correct number of stitches. βœ— Changing color incorrectly at the edge will create a visible jog or loose loop; pull up the loop in the last stitch of the previous color and join the new yarn with a single crochet as instructed. βœ— Forgetting to place safety eyes before closing the seam can make eye placement impossible later; insert the safety eyes just before you reach the white section so they sit evenly. βœ— Overstuffing the whale can distort the shape and make seaming difficult; add small amounts of stuffing gradually and shape as you close the seam to maintain a flat pocket look.

Ragdoll Pocket Whale Amigurumi Pattern

Make a tiny, squishy Ragdoll Pocket Whale that fits in the palm of your hand. This charming amigurumi design uses simple single crochet rows, easy color change for the belly, and small sewn flippers and tail. Perfect for gifting or attaching to a keyring, this pattern walks you through every stitch and assembly step.

Beginner Friendly 2-3 Hours

Materials Needed for Ragdoll Pocket Whale Amigurumi Pattern

β€” Main Fabric

  • 01
    DK acrylic yarn (main colour) - small amount (project uses scraps or small skein)
  • 02
    White DK or contrast yarn for belly - small amount for one row of contrast
  • 03
    Black embroidery thread for mouth and detailing
  • 04
    Polyester fibrefill or scraps of yarn for stuffing

β€” Tools Required

  • 01
    Crochet hook size 3.5mm
  • 02
    2mm safety eyes (2 pieces) or suitably sized safety eyes
  • 03
    Stitch markers
  • 04
    Scissors
  • 05
    Metal yarn needle for sewing and weaving ends
  • 06
    Keyring (optional for attaching finished whale)

Progress Tracker

0% Complete

β€” Body :

Info :

-slipknot, CH 12 and turn – this is the foundation row

Round 1 :

R1 – SC in the 2nd CH from hook and then SC until the end of row, CH 1, turn

Round 2 :

R2 – SC in each ST of the row, CH 1, turn

Round 3-9 :

R3 to R9 – SC in each ST of the row, CH 1, turn

Round 10 :

R10 – SC in each ST of the row, at the last ST pull up a loop and join the white yarn with a SC, then CH 1 and turn

Round 11 :

R11 – now working with the white yarn, SC in each ST of the row, CH 1, turn

Round 12 :

R12 –SC in each ST of the row, fasten and cut yarn

Infos :

Bring the 2 sides together. Starting from the right side of your main colour, join new yarn in the same colour and start to SC along all 3 sides. At every corner ST you will need to do 2 SC. Before reaching the white part, you need to insert the safety eyes. Join the white yarn and continue to SC the last side – here you can tuck all the yarn ends inside and use some extra stuffing as well, but not much is needed. Fasten yarn and weave in ends.

β€” FLIPPERS and TAIL (MAKE 4) :

Info :

-Slipknot, CH 2

Round 1 :

R1 – SC 6 times in the 2nd CH from hook

Round 2 :

R2 – SC 2 times in each ST around (12 sts total)

Round 3 :

R3 – SC 1, INC – all around (18 sts total)

Round 4 :

R4 – SC 2, INC - all around (24 sts total), don’t fasten

Infos :

Fold circle, turn it with the rounded part to face your left hand and start to SC the sides together. Tuck inside the starting yarn tail. Fasten and leave length of yarn for attaching to the body.

Info :

For the tail you need to sew the bottom edges, overlapping, with rounded sides facing each other.

Infos :

Attach tail to the middle of the back side. Attach flippers to either side right above the white stitches. You can either sew on a mouth or not. If you do add a mouth make sure to knot the ends, tuck in and cut remaining yarn.

Assembly Instructions

  • Bring the two rectangular body panels together and SC along three sides starting from the right side of the main colour, doing 2 SC in each corner to secure the shape.
  • Insert safety eyes before closing the final side, placing them just above the white belly row so they are evenly spaced and aligned.
  • Add a small amount of stuffing inside the whale pocket before finishing the last side, tucking in yarn tails and using extra stuffing sparingly for shape.
  • Sew the tail to the middle of the back side, overlapping the tail edges as instructed so the rounded sides face each other for a neat finish.
  • Attach the flippers to either side of the body just above the white belly stitches, securing with a length of yarn left from the flippers and weaving ends into the body.

Important Notes

  • πŸ’‘Use stitch markers to mark the start and end of rows and to keep your turning rows consistent throughout the body panels.
  • πŸ’‘Stuff the whale lightly and evenly - overstuffing can distort the pocket shape while under stuffing can make the whale floppy.
  • πŸ’‘Weave in all ends neatly and tuck yarn tails inside the body as you join pieces to hide them and keep the finish tidy.

This pocket whale is a tiny bundle of handcrafted joy, perfect for gifting or keeping as a small comfort companion. It sews up quickly and lets you practice neat rows, color change, and simple seaming. Happy crocheting and enjoy your new little whale! πŸ§ΆπŸ§΅πŸ‹

You ask,

we answer.

FAQs

What size will the finished piece be?

The finished whale will be pocket-sized and fit in the palm of your hand when made with DK yarn and a 3.5mm hook.

Can I use different yarn weights for this pattern?

Yes, you can use different yarn weights but this will change the final size; adjust your hook accordingly for the chosen yarn.

Do I need prior crochet experience for this pattern?

This pattern is beginner friendly and uses basic single crochet stitches and simple joining techniques, so basic crochet experience is helpful.

How long does this project typically take to complete?

Most crafters finish this pocket whale in about 2-3 hours, though time may vary depending on experience and finishing details.