🧢 Beautiful ✨ Detailed πŸ’ Adorable

The Little Sheep Amigurumi Pattern

The Little Sheep Amigurumi Pattern
4.6β˜… Rating
2-3 Hours Time Needed
3.8K Made This
βœ‚οΈ

Intermediate Level

Ideal for those with basic crochet experience, featuring slightly more advanced stitches and techniques to expand your skills.

⏱️

Bite-Sized Project

Finishes in 2-4 hoursβ€”perfect for an afternoon of creative relaxation.

🧸

Cute Companion

An adorable friend to cherish, handcrafted with love to bring comfort and joy for years to come.

About This The Little Sheep Amigurumi Pattern

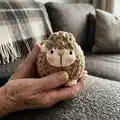
This pattern creates a tiny, textured Little Sheep amigurumi worked with chunky velvet-style yarn for a plush finish. It features bobble stitch texture for the fleece and a small sewn-on head with embroidered facial details. The instructions include both written rounds and helpful photo guidance so you can assemble a neat, charming toy.

The Little Sheep Amigurumi Pattern crochet pattern - detailed view of completed project

Perfect for gifting or shelf display, the finished sheep measures approximately 7 cm tall. Techniques used include bobble stitches, front loop shaping, and simple embroidery for the face.

Why You'll Love This The Little Sheep Amigurumi Pattern

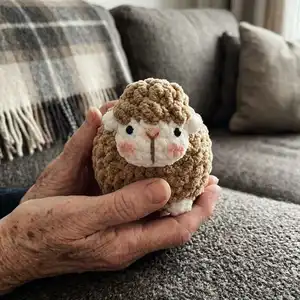
I absolutely love this pattern because it transforms simple stitches into a fluffy, tactile sheep full of personality. I enjoy the contrast between the bobble-textured body and the smooth, embroidered faceβ€”it gives the toy a delightful expression. The pattern is compact yet detailed, so I can make several in different colors quickly for gifts. I also love that the instructions include video links and clear assembly tips to make finishing stress-free.

The Little Sheep Amigurumi Pattern step 1 - construction progress The Little Sheep Amigurumi Pattern step 2 - assembly progress The Little Sheep Amigurumi Pattern step 3 - details and accessories The Little Sheep Amigurumi Pattern step 4 - final assembly and finishing

Switch Things Up

I love experimenting with colors, and this pattern is perfect for trying different palettes β€” make the fleece soft pastels or bold, playful colors.

I often change yarn weight and hook size to create different sizes; using thinner yarn and a smaller hook will give a tiny keychain-sized sheep.

Try substituting textured or boucle yarns for a more realistic fleece effect; just test tension so the fabric stays dense.

I sometimes embroider different facial expressions or change eye placement to give each sheep a unique personality.

I like to add tiny crocheted accessories, like a little scarf or flower, to make each piece more giftable and special.

For a posable toy, I have experimented with adding pipe cleaners or floral wire inside the limbs to adjust posture.

I also replace safety eyes with French knots or embroidered eyes for a baby-safe version suitable for very young children.

I recommend trying different bobble stitch sizes (bo2, bo4) to vary the fleece texture and play with the pattern rhythm.

I sometimes sew on felt or add surface embroidery details to the face for a softer, handcrafted look.

I enjoy creating a set of sheep in coordinating colors to display as a nursery mobile or seasonal decor β€” mix creams, greys and warm browns for a cozy collection.

Common Mistakes & How to Fix Them

βœ— Skipping the invisible decrease technique when closing shapes makes seams look uneven; use invisible decreases as instructed to create a smooth finish. βœ— Forgetting to add stuffing gradually will result in lumps or overstuffed sections; stuff little by little and shape as you go for an even, rounded form. βœ— Not keeping stitches close together will allow stuffing to show through the loops; use appropriate hook size and tighter tension for a dense, tidy fabric. βœ— Misplacing safety eyes will alter the sheep's expression and balance; place the 4.5mm eyes between rounds 3 and 4, four stitches apart, and double-check spacing before securing. βœ— Pulling yarn too tightly when weaving the tail through front loops can distort the piece; gently pull and shape while closing to maintain the round silhouette.

The Little Sheep Amigurumi Pattern

Make this adorable Little Sheep amigurumi using soft chunky yarn and simple shaping techniques. You will enjoy creating textured bobble stitches and a sweet embroidered face for a charming handmade toy. The pattern is concise and photo-supported so you can follow along easily and finish a delightful gift-ready sheep. Perfect for gifting or decorating a nursery with a cozy, handmade touch.

Intermediate 2-3 Hours

Materials Needed for The Little Sheep Amigurumi Pattern

β€” Main Fabric

  • 01
    Chunky yarn size 4-5mm (E.g: Himalaya Velvet, Himalaya Dolphin Baby ....) - cream and white (used in pattern)
  • 02
    Toy stuffing (fiberfill)

β€” Tools Required

  • 01
    Crochet hook size 4mm
  • 02
    4.5mm toy safety eyes (2 pieces)
  • 03
    Needle for sewing (yarn needle)
  • 04
    Toy stuffing (fiberfill)
  • 05
    Stitch marker
  • 06
    Scissors
  • 07
    Powder blush for cheeks (optional)

Progress Tracker

0% Complete

β€” Body :

Info :

Start in white yarn. (Note: Use cream yarn in pink word, white yarn in black word)

Rnd 1 :

8sc in MR [8]

Rnd 2 :

8inc [16]

Rnd 3 :

(sc, inc) x 8 [24]

Rnd 4 :

(3sc, inc) x 6 [30]

Rnd 5 :

11sc, bo4, 4sc, bo4, 13 sc [30]

Rnd 6 - 9 :

(4 rounds) 30sc [30]

Rnd 10 :

11sc, bo4, 4sc, bo4, 13 sc [30]

Rnd 11 :

(3sc, dec) x 6 [24]

Rnd 12 :

(sc, dec) x 8 [16]

Info :

Stuff the body firmly with fiberfill.

Rnd 13 :

8dec [8]

Info :

Fasten off, leaving the yarn tail. Using the yarn needle, weave the yarn tail through the front loop of each remaining stitch and pull it tight to close.

Info :

~ How to weave in the yarn end on a stuffed piece: https://youtu.be/amYifc37uSs

β€” Head :

Info :

Start in cream yarn. Ch 4. Stitches are worked in both sides of the foundation chain.

Rnd 1 :

Skip the first ch on the hook, inc in next ch, sc in next ch, 4sc in next ch. Continue on the other side of the foundation chain, sc in next ch, inc in next ch [10]

Rnd 2 :

2inc, sc, 4inc, sc, 2inc [18]

Rnd 3 :

18sc [18]

Rnd 4 :

(ch 4, skip 3 ch from the hook, slst in next ch), sc in next st of the base, dec, (sc, dec) x 2, (ch 4, skip 3 ch from the hook, slst in next ch), sc in next st of the base, dec, (sc, dec) x 2 [12]

Info :

Change to white yarn.

Rnd 5 :

(sc, bo2) x 6 [12]

Info :

Stuff the head firmly with fiberfill.

Rnd 6 :

6dc-dec [6]

Info :

Fasten off, leaving the yarn tail. Using the yarn needle, weave the yarn tail through the front loop of each remaining stitch and pull it tight to close.

Info :

Insert the 4.5mm safety eyes between rounds 3 and 4, 4 stitches apart. Embroider the nose with brown threads. Sew the head to the body. Use powder blush for the cheeks.

Info :

Video tutorials: ~ How to crochet the sheep's head (from rnd 4 to 6): https://youtu.be/85tKbY9tJMk

Info :

~ How to embroider the sheep's face: https://youtu.be/_t3-pnZa54M

Info :

~ How to sew the head to the body: https://youtu.be/LIMfpMLDcvU

Assembly Instructions

  • Insert the 4.5mm safety eyes between rounds 3 and 4 of the head, spacing them four stitches apart before securing the back washers.
  • Embroider the nose with brown thread, following the photos for placement and stitch length to create a small vertical nose and mouth.
  • Sew the head to the body securely, matching the seam positions and using a whipstitch or mattress stitch to create a neat join.
  • Use powder blush on the cheeks to add a soft, rosy finish; apply lightly and build up color gradually.
  • Weave the final yarn tail through the front loop of each remaining stitch on closed pieces, pull tight and secure to close openings neatly.

Important Notes

  • πŸ’‘Make the invisible decrease stitches to have a better results; practice invisible decreases to keep round shapes smooth and professional.
  • πŸ’‘Add toy stuffing according to instruction of each part; stuff gradually and check the shape often to avoid lumps.
  • πŸ’‘Stitches should be close together so that when the finished toy is stuffed, the stuffing doesn't come out through gaps in the stitches; use a smaller hook if needed for denser fabric.
  • πŸ’‘The pattern includes color change techniques, bobble stitch technique and the X stitch technique for single crochet stitch; master these techniques to ensure the finished product resembles the pattern.
  • πŸ’‘Finished size: the finished toy is approximately 7cm (~ 2.75 inch) high, so adjust yarn weight or hook size to change the final dimensions.

This Little Sheep pattern is a sweet, quick-to-make amigurumi perfect for gifting or decorating a nursery. It uses plush chunky yarn and simple shaping to create an irresistibly squishy friend. Happy crocheting and enjoy bringing this tiny sheep to life! πŸ§ΆπŸ‘

You ask,

we answer.

FAQs

What size will the finished piece be?

The finished toy is approximately 7 cm (~2.75 inches) high when using the recommended chunky yarn and a 4mm hook.

Can I use different yarn weights for this pattern?

Yes, you can use different yarn weights but this will change the final sizeβ€”use an appropriate hook for your chosen yarn and expect a smaller or larger sheep.

Do I need prior crochet experience for this pattern?

This pattern is rated intermediate because it uses bobble stitches, front-loop shaping and invisible decreases; basic knowledge of single crochet, increases and decreases is recommended.

How long does this project typically take to complete?

Most crocheters finish this pattern in about 2-3 hours, depending on experience and how quickly you work through the bobble stitch texture.