About This The Finley Blanket Pattern
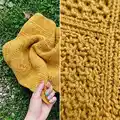
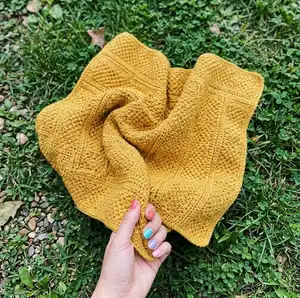
The Finley Blanket creates a warm, textured throw worked lengthwise to produce vertical stripes using the bean stitch and half double crochet. It has a modern, cozy texture that feels substantial yet soft for everyday use. The pattern includes a foundation row, clear row-by-row instructions, photo guides, and border instructions to finish your blanket neatly.
This pattern uses worsted weight yarn (Lion Brand Pound of Love) and a J/6.0 mm hook, and is worked to a finished size of approximately 45" x 53". Adjust the starting chain (odd number) and number of rows to customize length and width.
Why You'll Love This The Finley Blanket Pattern
I absolutely love this pattern because it combines two simple stitches to create a beautifully textured surface that looks much more complicated than it actually is. I enjoy how the vertical stripes form when you work lengthwise — it gives a fresh, modern look to a classic throw. The bean stitch adds a cozy, squishy texture that feels wonderful to wrap up in, and the steady rhythm of the repeats makes this a relaxing project. I also appreciate that it's easily customizable: you can change the length by chaining any odd number and adjust the width simply by adding more rows. The included photos and reference to the bean stitch tutorial make it approachable and satisfying to complete.
Switch Things Up
I love how easy it is to customize this pattern by changing yarn color — try tonal stripes or alternating a contrasting color for every 8 rows to make bold vertical panels.
You can make the blanket wider by adding more repeats of rows 1-8 and 9-12 sequences or simply by increasing the starting chain by any odd number to keep stitch counts correct.
For a smaller lap blanket or baby version, use a DK weight yarn and a smaller hook for a softer, more delicate fabric, or use bulky yarn with a larger hook for a chunky, quick-to-make version.
I often swap the border style: instead of simple hdcs, try a round of reverse single crochet for a twisted rope edge or a picot border for a decorative finish.
For texture variations, experiment with replacing some hdc rows with rows of sc or even a row of puff stitches for added interest while keeping the bean columns intact.
Consider making coordinating pillow covers by working shorter strips using the same stitch pattern and seaming them to pillow form dimensions for a matching set.
If you want a reversible look, practice placing your bean stitches and hdc rows with consistent tension and test a small swatch to ensure the back shows the texture you like.
I sometimes add embroidered details or small crochet appliques along one edge to personalize a blanket for a gift recipient — initials or simple shapes look lovely on the maize color.
To vary the drape, block your finished blanket lightly or skip blocking for a more relaxed, squishy finish — I prefer a gentle block to even out the edges.
Finally, try substituting a different worsted yarn brand or a blend (wool/acrylic) to change warmth and hand feel — always make a gauge swatch and adjust hook size if needed.
Common Mistakes & How to Fix Them
✗ Skipping the third back bump on the foundation chain can distort the edge; be sure to insert your first hdc in the 3rd back bump from the hook exactly as written.
✗ Forgetting that ch 2 does not count as a stitch during hdc rows can change your stitch count; always count stitches after turning to confirm you have 169 stitches.
✗ Not securing the bean stitch with the ch-1 at the end of the row may cause the beans to pull out of alignment; remember you are chaining 1 to secure the bean stitch (which effectively makes chaining 2 at the end when noted).
✗ Working uneven tension on bean stitches creates inconsistent texture across the blanket; maintain even tension and practice bean stitches on a swatch before starting the full project.