๐Ÿงถ Beautiful โœจ Detailed ๐Ÿ’ Adorable

The Festive Lights Amigurumi Pattern

The Festive Lights Amigurumi Pattern
4.5โ˜… Rating
5-7 Hours Time Needed
2.3K Made This
โœ‚๏ธ

Intermediate Level

Ideal for those with basic crochet experience, featuring slightly more advanced stitches and techniques to expand your skills.

โฑ๏ธ

Weekend Treat

Takes 5-7 hours, making it an enjoyable project to finish over a couple of days.

๐ŸŽ

Tiny Treasure

Small, sweet, and gift-worthy creations that fit perfectly in the palm of your hand with detailed charm.

About This The Festive Lights Amigurumi Pattern

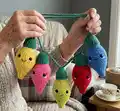
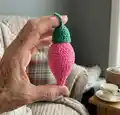
This pattern makes a set of adorable crochet lightbulb amigurumi and matching sockets to form a garland of festive lights. You will crochet the bulb body, a screw-like cap, and a snug socket that twists the bulb into place. The design uses continuous rounds and a simple cord-joining method to assemble the string. It is written with clear round-by-round instructions for consistent results.

The Festive Lights Amigurumi Pattern crochet pattern - detailed view of completed project

Perfect for using up vibrant blanket yarn and making a cheerful decoration or handmade gift. The bulbs can be personalized with faces, blush, or left plain to suit your style.

Why You'll Love This The Festive Lights Amigurumi Pattern

I absolutely love this pattern because it takes a classic holiday idea and makes it soft, squishy, and endlessly customizable. I enjoy how quick each bulb is to make, which makes it perfect for batch-making in lots of colors. The twist-in cap and snug socket give a satisfying interactive element when assembling the garland. I also love seeing different faces and personalities emerge when stitchers add simple embroidered features.

The Festive Lights Amigurumi Pattern step 1 - construction progress The Festive Lights Amigurumi Pattern step 2 - assembly progress The Festive Lights Amigurumi Pattern step 3 - details and accessories The Festive Lights Amigurumi Pattern step 4 - final assembly and finishing

Switch Things Up

I love customizing these bulbs by changing colors and facial expressions to match different themes and seasons.

I sometimes make mini versions using thinner yarn and a smaller hook for tiny keychain lights.

I also like to experiment with different eye sizes or embroidered faces to create unique personalities.

To make a chunkier look, I use a bulkier yarn and a larger hook which creates a more statement garland.

I often add metallic or sparkly yarn for a festive shimmer on special occasion versions.

If I want a more vintage style, I pick muted tones and add small embroidered stitches for character.

I occasionally attach tiny felt accessories like bows or hats to make seasonal characters.

I recommend swapping the socket spacing by CHing different lengths between sockets to control the garland density.

I sometimes add a looped yarn at each end to make hanging the garland from nails or hooks easier.

For a playful twist, I create sets of matching bulbs and tiny presents or stars to hang alongside the lights.

Common Mistakes & How to Fix Them

โœ— Skipping the stitch marker when working in continuous rounds will cause you to lose track of the start of the round; use a marker and move it each round to maintain stitch count consistency. โœ— Overstuffing the bulb tip makes shaping difficult and creates lumps; stuff gradually and fill the tip first, then add small amounts evenly around the body. โœ— Placing safety eyes too close together can look odd; position safety eyes between rows 15 and 16 about five stitches apart to achieve balanced facial placement. โœ— Not checking tension for the socket will cause bulbs to be too loose or too tight; make a test socket and adjust hook size or tension so bulbs twist in snugly. โœ— Failing to secure the front-loop coil for the cap will cause the screw detail to unravel; mark the start and end front loops and SLST through each front loop to complete the coil securely.

The Festive Lights Amigurumi Pattern

Create a string of cheerful, plush lightbulb amigurumi to brighten any room or celebration. This pattern guides you step-by-step through crocheting bulbs, caps, and sockets so you can assemble a charming garland. You will learn how to shape the bulb, add a twist-in cap, and join sockets with a crocheted cord. It is a delightful, colorful project perfect for gifting or seasonal decor.

Intermediate 5-7 Hours

Materials Needed for The Festive Lights Amigurumi Pattern

โ€” Main Fabric

  • 01
    Bernat Blanket Yarn (Size 6) - Main Part of Bulb: Approx. 48g each
  • 02
    Bernat Blanket Yarn (Size 6) - Top of Bulb (cap): Approx. 10g each
  • 03
    Bernat Blanket Yarn (Size 6) - Socket: Approx. 15g each
  • 04
    Assorted colors for multiple bulbs - approx quantities above per bulb
  • 05
    16 mm Safety Eyes (Black) - 2 per bulb for those adding eyes

โ€” Tools Required

  • 01
    Crochet hook size 6.0 mm (J)
  • 02
    Scissors
  • 03
    Yarn needle for sewing and weaving ends
  • 04
    Stitch markers
  • 05
    16 mm Safety Eyes (Black)
  • 06
    Polyester stuffing (polyfill)
  • 07
    Extra yarn for embroidery or facial details

Progress Tracker

0% Complete

โ€” Lightbulb :

Round 1 :

MR 6 SC [6]

Round 2 :

(SC, INC) x 3 [9]

Round 3 :

SC around [9]

Round 4 :

(2 SC, INC) x 3 [12]

Round 5 :

SC around [12]

Round 6 :

(SC, INC) x 6 [18]

Round 7 :

SC around [18]

Round 8 :

(2 SC, INC) x 6 [24]

Round 9 :

SC around [24]

Round 10 :

(3 SC, INC) x 6 [30]

Round 11 :

SC around [30]

Round 12 :

(4 SC, INC) x 6 [36]

Round 13-16 :

SC around [36]

Info :

If placing safety eyes, place between rows 15 and 16 about 5 stitches apart.

Info :

Start stuffing, making sure to fill the tip of your bulb and work the fill evenly around your bulb.

Round 17 :

(4 SC, DEC) x 6 [30]

Round 18-19 :

SC around [30]

Round 20 :

(3 SC, DEC) x 6 [24]

Round 21 :

SC around [24]

Round 22 :

(2 SC, DEC) x 6 [18]

Info :

Switch to Cap Colour for Bulb.

โ€” Cap :

Round 23 :

IN BLO SC, place a secondary stitch marker colour in front loop of this stitch to leave behind as you continue around. This will be the start of your screw later. Continue around IN BLO SC [18]

Round 24 :

IN BLO SC around [18]

Round 25 :

IN BLO SC around, in very last stitch place another stitch marker in the front loop, marking it as the end of your screw.

Round 26 :

IN BLO DEC x 9 around [9]

Info :

Fasten off, leaving tail, but do not close opening yet.

Info :

Using the same yarn colour for the cap of your bulb, go back to the first front loop that was marked with a stitch marker. SLST your yarn and continue around SLSTing in every front loop until you reach the last stitch marker. Remove last stitch marker, place one more SLST and fasten off weaving in both ends of the coil you just created.

Info :

Continue stuffing your bulb, making sure the bulb and cap are on the firmer side. Close up opening and weave in tail.

Info :

Now you can give your light bulbs some personality and faces by adding cheeks, mouth, eyebrows, whatever you would like. You can also leave them as they are with or without eyes.

โ€” Socket and Cord :

Round 1 :

MR 9 SC [9]

Round 2 :

INC x 9 around [18]

Round 3 :

IN BLO SC around [18]

Round 4-8 :

SC around [18]

Info :

SLST, then Fasten off, weaving in your tail ends. Make as many sockets as required for joining all your lights together.

Info :

To chain the sockets together, start by CHing 30, then taking a socket, SC through the top on one side of the MR, where the first row was made. Move to the other side of the MR, opposite of the SC you just made, place another SC through the top of your socket. This will keep your lightbulb even while hanging. CH 20 and repeat the process of attaching sockets until you have reached the last one, keeping even distance between your bulbs. After attaching the last socket, CH 30 so you have extra length on ends and fasten off. You can weave in your ends or leave them to help hang your lights.

Info :

Place your bulbs in the sockets. They will be a very snug fit, turning the bulb helps the light shimmy in its socket.

Assembly Instructions

  • Place safety eyes between rounds 15 and 16 about five stitches apart before stuffing the bulb firmly and evenly.
  • Stuff the bulb starting at the tip and add filling gradually around the body, then close the opening after attaching the cap coil and weave in tail.
  • Attach sockets to the crocheted cord by CHing 30 for the starting lead, SC through the top of the socket on one side of the MR, then SC on the opposite side and CH 20 between sockets; repeat until all sockets are attached and finish with CH 30 for tail length.
  • Insert each finished bulb into a socket and twist slightly so the cap coil seats into the socket for a snug fit; adjust tension of socket if needed for a tighter or looser hold.
  • Weave in all tails neatly and arrange bulbs evenly along the cord, trimming any excess yarn and securing joins with extra stitches if desired.

Important Notes

  • ๐Ÿ’กPlease read through the pattern before starting to ensure you understand each section and materials required.
  • ๐Ÿ’กThis pattern is worked in a continuous round; use a stitch marker to keep track of round starts and shape changes.
  • ๐Ÿ’กMake sure to make all pieces in the same type of yarn and hook size to keep consistent sizing across bulbs and sockets.
  • ๐Ÿ’กYarn type, tension, and hook size may slightly change the look of your lightbulb; make a small sample if you want to adjust size or fit.

Bring a little handmade cheer to your home with these soft festive lights that brighten any room! ๐ŸŽ„ Make a colourful garland to hang across mantels, windows, or doorways and gift a string of happiness to someone special. ๐ŸŽ Have fun personalizing faces, colours, and lengths to match your holiday or party theme!

You ask,

we answer.

FAQs

What size will the finished bulb be?

A finished bulb measures approximately the size shown when using Bernat Blanket yarn (Size 6) and a 6.0 mm hook; size may vary slightly with tension.

Can I use different yarn weights for this pattern?

Yes, you can use different yarn weights but this will alter the final size and density; adjust your hook size accordingly and make a sample socket to test fit.

Do I need advanced crochet skills to make these lights?

This pattern is rated intermediate; you should be comfortable with magic ring, increases, invisible decreases, working in BLO, and continuous rounds.

How long will it take to make a set of lights?

Most crocheters can complete several bulbs and sockets for a garland in 5-7 hours total, depending on number of bulbs and your speed.