๐Ÿงถ Beautiful โœจ Detailed ๐Ÿ’ Adorable

The Elephant Queen Amigurumi Pattern

The Elephant Queen Amigurumi Pattern
4.1โ˜… Rating
5-7 Hours Time Needed
3.1K Made This
โœ‚๏ธ

Intermediate Level

Ideal for those with basic crochet experience, featuring slightly more advanced stitches and techniques to expand your skills.

โฑ๏ธ

Weekend Treat

Takes 5-7 hours, making it an enjoyable project to finish over a couple of days.

๐Ÿฅ

Charming Critter

Delightful animal designs with sweet details that capture the essence of your favorite woodland and farmyard friends.

About This The Elephant Queen Amigurumi Pattern

This pattern creates a sweet amigurumi elephant with oversized ears, a soft trunk, and rounded body. You will work in continuous rounds with color changes for inner ears and details. The pattern includes clear shaping rounds and assembly photos to help you finish with a polished look.

The Elephant Queen Amigurumi Pattern crochet pattern - detailed view of completed project

Make two legs, two arms, a trunk/head assembly, ears and optional mouth piece for a complete toy. The instructions walk you through sewing and placement for professional results.

Why You'll Love This The Elephant Queen Amigurumi Pattern

I absolutely love this pattern because it balances adorable proportions with straightforward construction. I enjoy the oversized earsโ€”they give so much personality and are fun to assemble. The trunk-to-head continuation keeps shaping smooth and satisfying as you crochet. Sewing the ears and features into place always brings the elephant to life, and I love seeing the transformation from pieces to a finished friend.

The Elephant Queen Amigurumi Pattern step 1 - construction progress The Elephant Queen Amigurumi Pattern step 2 - assembly progress The Elephant Queen Amigurumi Pattern step 3 - details and accessories The Elephant Queen Amigurumi Pattern step 4 - final assembly and finishing

Switch Things Up

I love how versatile this elephant pattern is for customization; you can easily change colors to create a whole herd of unique friends.

Try pastel shades for a nursery-friendly version or bold jewel tones for a modern toyโ€”switching yarn color gives a fresh personality.

If you want a larger elephant, use a bulkier yarn and a larger hook; for a mini keychain, use fingering weight yarn and a smaller hook.

I often add embroidered eyelashes or a little blush with yarn paint to give more expression to the face.

Swap the safety eyes for embroidered eyes if you want a fully child-safe toy, especially for babies and toddlers.

Consider adding a bendable wire inside the trunk or limbs for posability, or leave it soft and floppy for a cuddle-friendly toy.

I like to make tiny outfits or floral crowns to accessorize the elephant for seasonal or gift-ready looks.

Mix yarn texturesโ€”use a fluffy yarn for the inner ear or a linen-blend for a rustic finish to create tactile contrast.

Try surface crochet or duplicate stitch to add spots, stripes, or initials to personalize each elephant.

I also recommend experimenting with different eye sizes (smaller or larger) to dramatically change the character's expression and charm.

For extra sturdiness when gifting, add extra stuffing at the base of the body and secure seams well during assembly.

Common Mistakes & How to Fix Them

โœ— Working in joined rounds by mistake can create visible seams; always work in a continuous spiral unless the pattern explicitly tells you to join. โœ— Forgetting to use a stitch marker will make it hard to find the start of each round; place a marker at the beginning of every round and move it as you work. โœ— Not stuffing gradually leads to lumps or an oddly shaped head; stuff a little at a time and shape as you go, especially when shaping the trunk and head. โœ— Placing safety eyes too late or in the wrong round changes facial expression; follow the exact eye placement instructions between the specified rounds and check spacing before fastening. โœ— Closing limbs without pinching and matching stitch counts can make sewing awkward; pinch the opening together, sc stitches to close, and leave a long tail for secure sewing.

The Elephant Queen Amigurumi Pattern

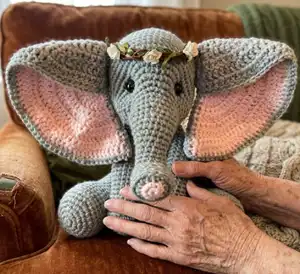
Make your own cuddly Elephant Queen with this detailed amigurumi pattern. You will create a sweet, poseable elephant complete with large ears, trunk, and tiny details. The pattern uses simple rounds and clear assembly instructions so you can enjoy stitching and stuffing as you go. Perfect for gifting or keeping as a charming handmade friend.

Intermediate 5-7 Hours

Materials Needed for The Elephant Queen Amigurumi Pattern

โ€” Main Fabric

  • 01
    I Love This Yarn (Any 4ply yarn will do) - Gray (main color)
  • 02
    I Love This Yarn (Any 4ply yarn will do) - Light Pink (inner ear and nose detail)
  • 03
    Fiberfill stuffing - as needed for head, body, legs and arms

โ€” Tools Required

  • 01
    Crochet hook size 3.5mm (E)
  • 02
    15mm Safety Eyes (2)
  • 03
    Stitch Marker
  • 04
    Scissors
  • 05
    Yarn needle for sewing
  • 06
    Fiberfill stuffing
  • 07
    Pins for assembly (optional)

Progress Tracker

0% Complete

โ€” Trunk :

Info :

Start with Pink: Lightly stuff with poly-fil as you go!!

Round 1 :

MR-6sc (6)

Round 2 :

INC x6 (12) CHANGE COLOR- Gray

Round 3 :

(Hdc, Hdc INC) x6 (18)

Round 4 :

Sc in BLO each st around (18)

Round 5 :

(4sc, Dec) x3 (15)

Round 6 :

Sc each st around (15)

Round 7 :

(3sc, Dec) x3 (12)

Round 8-12 :

Sc each st around (12) 5 rounds

Round 13 :

(3sc, INC) x3 (15)

Round 14 :

Sc each st around

Round 15 :

(4sc, INC) x3 (18)

Round 16-17 :

Sc each st around (18) 2 rounds

Round 18 :

(4sc, INC) x3, Sc next 3st (21)

Round 19 :

Sc each st around (21)

Round 20 :

(5sc, INC) x3, Sc next 3st (24)

Round 21 :

Sc each st around (24)

Round 22 :

(6sc, INC) x3, Sc next 3st (27)

Round 23 :

(7sc, INC) x3, Sc next 3st (30)

Info :

This completes the trunk. DO NOT FASTEN OFF. Continue to head ->

โ€” Head :

Info :

(Continued from trunk)

Round 24 :

6sc, (2sc, INC) x6, 6sc (36)

Round 25 :

6sc, (3sc, INC) x6, 6sc (42)

Round 26 :

6sc, (4sc, INC) x6, 6sc (48)

Round 27 :

6sc, (5sc, INC) x6, 6sc (54)

Round 28-35 :

Sc each st around (54) 8 rounds

Info :

At this time place safety eyes between rounds 25 & 26, before the 2nd INC and after the 5th INC, 18st apart. From this point on stuff with poly-fil accordingly!

Round 36 :

(7sc, Dec) x6 (48)

Round 37 :

Sc each st around (48)

Round 38 :

(6sc, Dec) x6 (42)

Round 39 :

(5sc, Dec) x6 (36)

Round 40 :

(4sc, Dec) x6 (30)

Round 41 :

(3sc, Dec) x6 (24)

Round 42 :

(2sc, Dec) x6 (18)

Info :

Finish stuffing firmly!

Round 43 :

(1sc, Dec) x6 (12)

Round 44 :

Dec x6 (6)

Info :

F/O. Cinch up the opening and weave in end.

โ€” Legs :

Info :

Make 2. Gray

Round 1 :

MR-6sc (6)

Round 2 :

INC each st (12)

Round 3 :

(1sc, INC) x6 (18)

Round 4 :

(2sc, INC) x6 (24)

Round 5 :

(3sc, INC) x6 (30)

Round 6 :

(4sc, INC) x6 (36)

Round 7 :

Sc BLO each st around (36)

Round 8-9 :

Sc each st around (36) 2 rounds

Round 10 :

(4sc, Dec) x6 (30)

Round 11 :

Sc each st around (30)

Round 12 :

(3sc, Dec) x6 (24)

Round 13 :

Sc each st around (24)

Round 14 :

(2sc, Dec) x6 (18)

Round 15-24 :

Sc each st around (18) 10 rounds

Info :

Stuff firmly with poly-fil until about round 20! Pinch opening together and Sc stitches together to close. F/O. Leave tail for sewing to body.

โ€” Arms :

Info :

Make 2. Gray

Round 1 :

MR- 6sc (6)

Round 2 :

INC each st around (12)

Round 3 :

(1sc, INC) x6 (18)

Round 4 :

(2sc, INC) x6 (24)

Round 5 :

(3sc, INC) x6 (30)

Round 6 :

Sc BLO each st around (30)

Round 7 :

Sc each st around (30)

Round 8 :

(3sc, Dec) x6 (24)

Round 9 :

Sc each st around (24)

Round 10 :

(2sc, Dec) x6 (18)

Round 11 :

Sc each st around (18)

Round 12 :

Dec, Sc next 16st (17)

Round 13-14 :

Sc each st around (17) 2 rounds

Round 15 :

Dec, Sc next 15st (16)

Round 16-17 :

Sc each st around (16) 2 rounds

Round 18 :

Dec, Sc next 14st (15)

Round 19 :

(3sc, Dec) x3 (12)

Round 20-23 :

Sc each st around (12) 4 rounds

Round 24 :

(2sc, Dec) x3 (9)

Round 25-28 :

Sc each st around (9) 4 rounds

Info :

Stuff firmly with poly-fil until about round 24!! Pinch opening together and Sc stitches together to close. F/O. Leave tail for sewing to body.

โ€” Body :

Info :

Gray

Round 1 :

MR- 6sc (6)

Round 2 :

INC each st around (12)

Round 3 :

(1sc, INC) x6 (18)

Round 4 :

(2sc, INC) x6 (24)

Round 5 :

(3sc, INC) x6 (30)

Round 6 :

(4sc, INC) x6 (36)

Round 7 :

(5sc, INC) x6 (42)

Round 8 :

(6sc, INC) x6 (48)

Round 9 :

(7sc, INC) x6 (54)

Round 10 :

(8sc, INC) x6 (60)

Round 11-14 :

Sc each st around (60) 4 rounds

Round 15 :

(8sc, Dec) x6 (54)

Round 16-17 :

Sc each st around (54) 2 rounds

Round 18 :

15sc, (2sc, Dec) x6, 15sc (48)

Round 19-20 :

Sc each st around (48) 2 rounds

Round 21 :

15sc, (1sc, Dec) x6, 15sc (42)

Round 22-23 :

Sc each st around (42) 2 rounds

Round 24 :

15sc, Dec x6, 15sc (36)

Round 25-26 :

Sc each st around (36) 2 rounds

Round 27 :

(4sc, Dec) x6 (30)

Round 28 :

Sc each st around (30)

Round 29 :

(3sc, Dec) x6 (24)

Round 30 :

Sc each st around (24)

Round 31 :

(2sc, Dec) x6 (18)

Round 32-33 :

Sc each st around (18) 2 rounds

Info :

F/O. Leave long tail for sewing the body to the head. Stuff firmly with poly-fil!!

โ€” Ears :

Info :

Make 4. 2 pink-inner earpieces, 2 Gray- Outer earpieces

Round 1 :

MR- ch3, 5Dc (6)

Round 2 :

Ch1, Turn, 2 Dc each st around (12)

Round 3 :

Ch1, Turn, (1Dc, Dc INC) x6 (18)

Round 4 :

Ch1, Turn, (2Dc, Dc INC) x6 (24)

Round 5 :

Ch1, Turn, (3Dc, Dc INC) x6 (30)

Round 6 :

Ch1, Turn, (4Dc, Dc INC) x6 (36)

Round 7 :

Ch1, Turn, (5Dc, Dc INC) x6 (42)

Round 8 :

Ch1, Turn, (6Dc, Dc INC) x6 (48)

Round 9 :

Ch1, Turn, (7Dc, Dc INC) x6 (54)

Info :

** F/O inner earpieces & cut short tail.

Info :

**Do NOT F/O outer earpieces. Continue using working yarn to sew the inner and outer earpieces together. See "Assembly" section for directions!!

โ€” Tail :

Round 1 :

MR-6sc (6)

Round 2 :

INC x6 (12)

Round 3-14 :

Sc each st around (12) 10 rounds

Info :

Do not stuff with poly-fil. Attach to bum between rounds 10 & 11.

โ€” Mouth :

Info :

Gray (Optional Piece)

Round 1 :

MR- 6sc (6)

Round 2 :

INC x6 (12)

Round 3-4 :

Sc each st around (12) 2 rounds

Info :

Fold, match up stitches, sc the opening shut and attach under the trunk between rounds 23 & 24.

Assembly Instructions

  • Head/Body: Sew the Head to the Body!! Make sure head is centered over the opening of the body. Also, make sure the trunk is centered over the belly!!
  • Assembling the Ears: Match 1 inner earpiece to 1 outer earpiece. Sc all the way around the two pieces using the working yarn from the outer earpiece, then fold the top of the ear down to the center. Left and right ears will be folded over at opposite ends. Attach ears to the side of the head slightly up from the eyes between rounds 32 & 33, with the folds at the top.
  • Legs: Sew the closed end of the legs to the sides of the body between rounds 10-16, spacing them evenly and securing with whipstitch for stability.
  • Arms: Sew the closed end of the arms to the seam between the head and the body directly above the legs, matching both arm positions for symmetry.
  • Tail: Sew the tail to the bum between rounds 10 & 11 and do not stuff the tail before attaching.
  • Finishing: Weave in all ends, cinch and close openings securely, and adjust stuffing as needed to achieve smooth rounded shapes.

Important Notes

  • ๐Ÿ’กDo NOT join rounds unless stated; work in continuous spiral for seamless shaping.
  • ๐Ÿ’กUse a stitch marker to mark the beginning of each round to maintain accurate stitch counts.
  • ๐Ÿ’กAll stitches are worked in both loops unless stated otherwise; follow BLO instructions when specified.
  • ๐Ÿ’กPlace safety eyes between rounds 25 and 26 as instructed and check spacing (18 stitches apart) before securing permanently.

This adorable Elephant Queen pattern brings a sweet, handmade friend to life with oversized ears and a gentle trunk. Perfect for gifting or brightening your home with a handmade touch. Create one today and enjoy the cozy, calming rhythm of crochet. ๐Ÿงถ๐Ÿ˜

You ask,

we answer.

FAQs

What size will the finished piece be?

The finished amigurumi measures approximately a medium plush size depending on your yarn and hook choice; using the recommended 4ply yarn and 3.5mm hook will yield a similarly sized elephant as pictured.

Can I use different yarn weights for this pattern?

Yes, you can use different yarn weights, but this will affect the final size. Use a larger hook for bulkier yarn or a smaller hook for a tighter, smaller amigurumi and adjust stuffing accordingly.

Do I need prior crochet experience for this pattern?

This pattern is rated intermediate, so basic knowledge of single crochet, increases, decreases, and working in continuous rounds is recommended for best results.

How long does this project typically take to complete?

Most crocheters complete this project in 5-7 hours, though time may vary based on experience level, customization, and assembly time.

Where should I place the safety eyes?

Place the safety eyes between rounds 25 and 26, before the 2nd INC and after the 5th INC, approximately 18 stitches apart; check alignment before fastening.