— Tulip :
Tulip - Leaves (make 2, green yarn) :
Ch 11, starting the 2nd ch from hook, crochet in the back ridge of the ch, sl st, sc in next 2 ch, hdc in next 2 ch, dc in next 2 ch, hdc in next ch, sc in next ch, sl st in next ch. Fasten off, leaving a tail for sewing.
Tulip - Petals (make 3, purple yarn) - Rnd 1 :
Ch 8, starting the 2nd ch from hook, inc, hdc in next ch, dc in next 3 ch, hdc in next ch, {3 sc} in the last ch; working in unused loops on other side of starting ch, hdc in next ch, dc in next 3 ch, hdc in next ch, sc in next ch [16]
Tulip - Petals (make 3, purple yarn) - Rnd 2 :
sc in next st, inc in next st, sc in next 6 st, inc in next st, sc in next 6 st, inc in next st [19]
Tulip - Petals :
Rnd 2: sc in next st, inc in next st, sc in next 6 st, inc in next st, sc in next 6 st, inc in next st [19]. Fasten off, leaving a tail for sewing.
Tulip - Stem (green to purple yarn) - Rnd 1 :
sc 5 into a magic ring [5]
Tulip - Stem (green to purple yarn) - Rnds 2-15 :
sc in each st around [5]
Tulip - Stem - Color change and shaping :
At the end of rnd 15, change to purple yarn, fasten off the green yarn. Rnd 16: inc in each st around [10]. Rnd 17: (sc in next st, inc in next st) repeat 5 times [15]. Rnds 18-20 (3 rnds): sc in each st around [15]. Stuff the flower lightly. Rnd 21: (sc in next st, dec) repeat 5 times [10]. Rnd 22: (sc in next 3 st, dec) repeat 2 times [8]. Fasten off and close the remaining st, weaving in the ends. Sew the petals and the leaves on the stem.
— Sunny Kitty :
HEAD AND BODY (begin with brown yarn) - Rnd 1 :
sc 8 into a magic ring [8]
HEAD AND BODY - Rnd 2 :
inc in each st around [16]
HEAD AND BODY - Rnd 3 :
(sc in next st, inc in next st) repeat 8 times [24]
HEAD AND BODY - Rnd 4 :
(sc in next 2 st, inc in next st) repeat 3 times, (brown yarn: sc in next 2 st; dark brown yarn: inc in next st) repeat 3 times, brown yarn: (sc in next 2 st, inc in next st) repeat 2 times [32]
HEAD AND BODY - Rnd 5 :
(sc in next 3 st, inc in next st) repeat 3 times, (brown yarn: sc in next 2 st; dark brown yarn: sc in next st, inc in next st) repeat 3 times, brown yarn: (sc in next 3 st, inc in next st) repeat 2 times [40]
HEAD AND BODY - Rnd 6 :
sc in next st, inc in next st, (sc in next 4 st, inc in next st) repeat 3 times, (dark brown yarn: sc in next 3 st; brown yarn: sc in next st, inc in next st) repeat 3 times, sc in next 4 st, inc in next st, sc in next 3 st [48]
HEAD AND BODY - Rnds 7-8 :
(2 rnds): sc in next 21 st, (dark brown yarn: sc in next 3 st; brown yarn: sc in next 3 st) repeat 3 times, sc in next 9 st [48]
HEAD AND BODY - Rnd 9 :
sc in next 22 st; dark brown yarn: sc in next st; brown yarn: sc in next 4 st; dark brown yarn: sc in next 3 st; brown yarn: sc in next 4 st; dark brown yarn: sc in next st, brown yarn: sc in next 13 st [48]
HEAD AND BODY - Rnd 10 :
sc in next 28 st; dark brown yarn: sc in next st; brown yarn: sc in next 19 st [48]
HEAD AND BODY :
Fasten off the dark brown yarn, continue with brown yarn.
HEAD AND BODY - Rnd 11 :
(sc in next 7 st, inc in next st) repeat 6 times [54]
HEAD AND BODY - Rnds 12-15 :
(4 rnds): sc in each st around [54]
HEAD AND BODY - Rnd 16 :
(sc in next 8 st, inc in next st) repeat 6 times [60]
HEAD AND BODY - Rnd 17 :
sc in each st around [60]
Info :
Insert the eyes between rnds 15 & 16, 8 st apart. Make sure the eyes are in the center of the face (photo 1). Start stuffing the head firmly, adding more as you go.
HEAD AND BODY - Rnd 18 :
(sc in next 8 st, dec) repeat 6 times [54]
HEAD AND BODY - Rnd 19 :
sc in next 3 st, dec, (sc in next 7 st, dec) repeat 5 times, sc in next 4 st [48]
HEAD AND BODY - Rnd 20 :
(sc in next 6 st, dec) repeat 6 times [42]
HEAD AND BODY - Rnd 21 :
sc in next 2 st, dec, (sc in next 5 st, dec) repeat 5 times, sc in next 3 st [36]
HEAD AND BODY - Rnd 22 :
(sc in next 4 st, dec) repeat 6 times [30]
HEAD AND BODY - Rnd 23 :
sc in next st, dec, (sc in next 3 st, dec) repeat 5 times, sc in next 2 st [24]
HEAD AND BODY - Rnd 24 :
sl st in each st around [24]
HEAD AND BODY - Rnd 25 :
(sc in next 2 st, inc in next st) repeat 8 times [32]
HEAD AND BODY - Rnd 26 :
sc in next 28 st; dark brown yarn: sc in next 4 st [32]
HEAD AND BODY - Rnd 27 :
sc in next 13 st; brown yarn: sc in next 15 st; dark brown yarn: sc in next 4 st [32]
HEAD AND BODY - Rnd 28 :
(sc in next 3 st, inc in next st) repeat 3 times, sc in next st; brown yarn: sc in next 2 st, inc in next st, (sc in next 3 st, inc in next st) repeat 4 times [40]
HEAD AND BODY - Rnds 29-30 :
(2 rnds): sc in each st around [40]
HEAD AND BODY - Rnd 31 :
(sc in next 4 st, inc in next st) repeat 6 times, sc in next 4 st; dark brown yarn: inc in next st, sc in next 4 st, inc in next st [48]
HEAD AND BODY - Rnd 32 :
sc in next 21 st; brown yarn: sc in next 19 st; dark brown yarn: sc in next 8 st [48]
HEAD AND BODY - Rnd 33 :
sc in next 21 st; brown yarn: sc in next 27 st [48]
HEAD AND BODY - Rnd 34 :
(sc in next 11 st, inc in next st) repeat 4 times [52]
HEAD AND BODY - Rnd 35 :
sc in each st around [52]
HEAD AND BODY - Rnd 36 :
sc in next 44 st; dark brown yarn: sc in next 8 st [52]
HEAD AND BODY - Rnd 37 :
sc in next 21 st; brown yarn: sc in next 23 st; dark brown yarn: sc in next 8 st [52]
HEAD AND BODY - Rnd 38 :
sc in next 21 st; brown yarn: sc in next 31 st [52]
HEAD AND BODY :
Fasten off the dark brown yarn, continue with brown yarn.
HEAD AND BODY - Rnd 39 :
(sc in next 11 st, dec) repeat 4 times [48]
HEAD AND BODY - Rnd 40 :
sc in each st around [48]
HEAD AND BODY - Rnd 41 :
(sc in next 4 st, dec) repeat 8 times [40]
HEAD AND BODY - Rnd 42 :
sc in next st, dec, (sc in next 3 st, dec) repeat 7 times, sc in next 2 st [32]
HEAD AND BODY - Rnd 43 :
(sc in next 2 st, dec) repeat 8 times [24]
HEAD AND BODY - Rnd 44 :
(sc in next st, dec) repeat 8 times [16]
HEAD AND BODY - Rnd 45 :
dec 8 times [8]
HEAD AND BODY - Finish :
Finish stuffing. Fasten off and close the remaining st, weaving in the ends. Using thread, embroider a nose between the eyes. Embroider whiskers under each eye, and the eyebrow over each eye. Using a small makeup brush, apply blusher to the cheeks (photos 1,2,3,4).
ARMS (make 2, brown yarn) - Rnd 1 :
sc 8 into a magic ring [8]
ARMS - Rnd 2 :
(inc in next st, sc in next st) repeat 4 times [12]
ARMS - Rnds 3-8 :
(6 rnds): sc in each st around [12]
ARMS - Finish :
Stuff the arm lightly. Flatten the opening of the arm (photo 5) and sc in next 6 st through both layers to close the opening. Fasten off, leaving a long tail for sewing. Using thread and needle, embroider 3 straight lines (for claws) at rnd 2 of each arm (photo 6).
LEGS (make 2, begin with dark brown yarn) - Rnd 1 :
sc 8 into a magic ring [8]
LEGS - Rnd 2 :
inc in each st around [16]
LEGS - Color change :
At the end of rnd 2, change to brown yarn. Fasten off the dark brown yarn.
LEGS - Rnd 3 :
sc in next st, inc in next st, sc in next 5 st, inc in next 2 st, sc in next 5 st, inc in next st, sc in next st [20]
LEGS - Rnd 4 :
sc in each st around [20]
LEGS - Rnd 5 :
sc in next 6 st, dec 4 times, sc in next 6 st [16]
LEGS - Rnd 6 :
[sc in next 4 st, dec] repeat 2 times, sc in next 4 st [14]
LEGS - Rnd 7 :
sc in next 6 st, dec, sc in next 6 st [13]
LEGS - Rnd 8 :
sc in next 6 st, inc in next st, sc in next 6 st [14]
LEGS - Finish :
Stuff the leg lightly. Flatten the opening of the leg and sc in next 7 st through both layers to close the opening. Fasten off, leaving a long tail for sewing. Using thread and needle, embroider 3 straight lines (for claws) at rnd 3 of each leg (photo 7).
EARS (make 2, begin with brown yarn) - Rnd 1 :
sc 6 into a magic ring [6]
EARS - Rnd 2 :
(inc in next st, sc in next st) repeat 3 times [9]
EARS - Rnd 3 :
inc in next st, sc in next 2 st, inc in next st; dark brown yarn: sc in next st; brown yarn: sc in next st, inc in next st, sc in next 2 st [12]
EARS - Rnd 4 :
sc in next 5 st; dark brown yarn: sc in next 3 st; brown yarn: sc in next 4 st [12]
EARS - Rnd 5 :
sc in next 3 st, inc in next st, sc in next st; dark brown yarn: sc in next 2 st, inc in next st; brown yarn: sc in next 3 st, inc in next st [15]
EARS - Rnd 6 :
sc in next 4 st, inc in next st, sc in next st; dark brown yarn: sc in next 3 st, inc in next st; brown yarn: sc in next 4 st, inc in next st [18]
EARS - Finish :
Fasten off, leaving a long tail for sewing (photo 8).
TAIL (begin with dark brown yarn) - Rnd 1 :
sc 6 into a magic ring [6]
TAIL - Rnd 2 :
(inc in next st, sc in next st) repeat 3 times [9]
TAIL - Rnds 3-6 :
(4 rnds): sc in each st around [9]
TAIL - Color change :
At the end of rnd 6, change to brown yarn. Fasten off the dark brown yarn. Start stuffing the tail, adding more as you go.
TAIL - Rnds 7-26 :
(20 rnds): sc in each st around [9]
TAIL - Finish :
Flatten the opening of the tail and sc in next 4 st through both layers to close the opening. Fasten off, leaving a long tail for sewing (photo 9).
ASSEMBLY :
Position the ears on either side of the head (between rnds 4 & 10) and sew in place (photos 10, 11, 12). Position the arms on either side of the body (photos 13, 14), below the head. Using long tails and yarn needle, sew them in place. Position and sew the legs on either side of the body (photos 15, 16). Position and sew the tail to center back at base of the body. Tack a few rounds of the tail to the body (photos 17, 18).
— Cloudy Kitty :
HEAD AND BODY (begin with grey yarn) - Rnd 1 :
sc 8 into a magic ring [8]
HEAD AND BODY - Rnd 2 :
inc in each st around [16]
HEAD AND BODY - Rnd 3 :
(sc in next st, inc in next st) repeat 8 times [24]
HEAD AND BODY - Rnd 4 :
(sc in next 2 st, inc in next st) repeat 8 times [32]
HEAD AND BODY - Rnd 5 :
sc in next st, inc in next st, (sc in next 3 st, inc in next st) repeat 7 times, sc in next 2 st [40]
HEAD AND BODY - Rnd 6 :
(sc in next 4 st, inc in next st) repeat 8 times [48]
HEAD AND BODY - Rnds 7-10 :
(4 rnds): sc in each st around [48]
HEAD AND BODY - Rnd 11 :
(sc in next 7 st, inc in next st) repeat 2 times, sc in next 7 st; white yarn: inc in next st; grey yarn: (sc in next 7 st, inc in next st) repeat 3 times [54]
HEAD AND BODY - Rnds 12-14 :
(3 rnds): sc in next 24 st; white yarn: sc in next 4 st; grey yarn: sc in next 26 st [54]
HEAD AND BODY - Rnd 15 :
sc in next 22 st; white yarn: sc in next 8 st; grey yarn: sc in next 24 st [54]
HEAD AND BODY - Rnd 16 :
(sc in next 8 st, inc in next st) repeat 2 times, sc in next 2 st; white yarn: sc in next 6 st, inc in next st, sc in next 5 st; grey yarn: sc in next 3 st, inc in next st, (sc in next 8 st, inc in next st) repeat 2 times [60]
HEAD AND BODY - Rnd 17 :
sc in each st around [60]
Info :
Insert the eyes between rnds 15 & 16, 8 st apart. Make sure the eyes are in the center of the face. Start stuffing the head firmly, adding more as you go.
HEAD AND BODY - Rnd 18 :
(sc in next 8 st, dec) repeat 6 times [54]
HEAD AND BODY - Rnd 19 :
sc in next 3 st, dec, (sc in next 7 st, dec) repeat 5 times, sc in next 4 st [48]
HEAD AND BODY - Rnd 20 :
(sc in next 6 st, dec) repeat 6 times [42]
HEAD AND BODY - Rnd 21 :
sc in next 2 st, dec, (sc in next 5 st, dec) repeat 5 times, sc in next 3 st [36]
HEAD AND BODY - Rnd 22 :
(sc in next 4 st, dec) repeat 6 times [30]
HEAD AND BODY - Rnd 23 :
sc in next st, dec, (sc in next 3 st, dec) repeat 5 times, sc in next 2 st [24]
HEAD AND BODY - Rnd 24 :
sl st in each st around [24]
HEAD AND BODY - Rnd 25 :
(sc in next 2 st, inc in next st) repeat 8 times [32]
HEAD AND BODY - Rnd 26 :
white yarn: sc in next 20 st; grey yarn: sc in next 12 st [32]
HEAD AND BODY - Rnd 27 :
sc in next 14 st; white yarn: sc in next 4 st; grey yarn: sc in next 14 st [32]
HEAD AND BODY - Rnd 28 :
(sc in next 3 st, inc in next st) repeat 4 times; white yarn: sc in next 2 st; grey yarn: sc in next st, inc in next st, (sc in next 3 st, inc in next st) repeat 3 times [40]
HEAD AND BODY - Rnd 29 :
sc in next 21 st; white yarn: sc in next st; grey yarn: sc in next 18 st [40]
HEAD AND BODY - Finish :
Fasten off the white yarn, continue with grey yarn. Rnd 30: sc in each st around [40]. Rnd 31: (sc in next 4 st, inc in next st) repeat 8 times [48]. Rnds 32-33 (2 rnds): sc in each st around [48]. Rnd 34: (sc in next 11 st, inc in next st) repeat 4 times [52]. Rnds 35-38 (4 rnds): sc in each st around [52]. Rnd 39: (sc in next 11 st, dec) repeat 4 times [48]. Rnd 40: sc in each st around [48]. Rnd 41: (sc in next 4 st, dec) repeat 8 times [40]. Rnd 42: sc in next st, dec, (sc in next 3 st, dec) repeat 7 times, sc in next 2 st [32]. Rnd 43: (sc in next 2 st, dec) repeat 8 times [24]. Rnd 44: (sc in next st, dec) repeat 8 times [16]. Rnd 45: dec 8 times [8]. Finish stuffing. Fasten off and close the remaining st, weaving in the ends. Using thread, embroider a nose between the eyes. Embroider whiskers under each eye, and the eyebrow over each eye. Using a small makeup brush, apply blusher to the nose and cheeks (photos 1,2).
ARMS (make 2, grey yarn) - Rnd 1 :
sc 8 into a magic ring [8]
ARMS - Rnd 2 :
(inc in next st, sc in next st) repeat 4 times [12]
ARMS - Rnds 3-8 :
(6 rnds): sc in each st around [12]
ARMS - Finish :
Stuff the arm lightly. Flatten the opening of the arm (photo 3) and sc in next 6 st through both layers to close the opening. Fasten off, leaving a long tail for sewing. Using thread and needle, embroider 3 straight lines (for claws) at rnd 2 of each arm (photo 4).
LEGS (make 2, begin with white yarn) - Rnd 1 :
sc 8 into a magic ring [8]
LEGS - Rnd 2 :
inc in each st around [16]
LEGS - Rnd 3 :
sc in next st, inc in next st, sc in next 5 st, inc in next 2 st, sc in next 5 st, inc in next st, sc in next st [20]
LEGS - Rnd 4 :
sc in each st around [20]
LEGS - Finish :
At the end of rnd 4, change to grey yarn. Fasten off the white yarn. Rnd 5: sc in next 6 st, dec 4 times, sc in next 6 st [16]. Rnd 6: [sc in next 4 st, dec] repeat 2 times, sc in next 4 st [14]. Rnd 7: sc in next 6 st, dec, sc in next 6 st [13]. Rnd 8: sc in next 6 st, inc in next st, sc in next 6 st [14]. Stuff the leg lightly. Flatten the opening of the leg and sc in next 7 st through both layers to close the opening. Fasten off, leaving a long tail for sewing. Using thread and needle, embroider 3 straight lines (for claws) at rnd 3 of each leg (photo 5).
EARS (make 2, begin with grey yarn) - Rnd 1 :
sc 6 into a magic ring [6]
EARS - Rnd 2 :
(inc in next st, sc in next st) repeat 3 times [9]
EARS - Rnd 3 :
inc in next st, sc in next 2 st, inc in next st; white yarn: sc in next st; grey yarn: sc in next st, inc in next st, sc in next 2 st [12]
EARS - Rnd 4 :
sc in next 5 st; white yarn: sc in next 3 st; grey yarn: sc in next 4 st [12]
EARS - Rnd 5 :
sc in next 3 st, inc in next st, sc in next st; white yarn: sc in next 2 st, inc in next st; grey yarn: sc in next 3 st, inc in next st [15]
EARS - Rnd 6 :
sc in next 4 st, inc in next st, sc in next st; white yarn: sc in next 3 st, inc in next st; grey yarn: sc in next 4 st, inc in next st [18]
EARS - Finish :
Fasten off, leaving a long tail for sewing (photo 6).
TAIL (begin with white yarn) - Rnd 1 :
sc 6 into a magic ring [6]
TAIL - Rnd 2 :
(inc in next st, sc in next st) repeat 3 times [9]
TAIL - Rnds 3-6 :
(4 rnds): sc in each st around [9]
TAIL - Color change :
At the end of rnd 6, change to grey yarn. Fasten off the white yarn. Start stuffing the tail, adding more as you go.
TAIL - Rnds 7-26 :
(20 rnds): sc in each st around [9]
TAIL - Finish :
Flatten the opening of the tail and sc in next 4 st through both layers to close the opening. Fasten off, leaving a long tail for sewing (photo 7).
ASSEMBLY :
Position the ears on either side of the head (between rnds 3 & 10) and sew in place (photos 8, 9). Position the arms on either side of the body, below the head. Using long tails and yarn needle, sew them in place. Position and sew the legs on either side of the body (photos 10). Position and sew the tail to center back at base of the body. Tack a few rounds of the tail to the body (photos 11).
— Windy Kitty :
HEAD AND BODY (begin with black yarn) - Rnd 1 :
sc 8 into a magic ring [8]
HEAD AND BODY - Rnd 2 :
inc in each st around [16]
HEAD AND BODY - Rnd 3 :
(sc in next st, inc in next st) repeat 8 times [24]
HEAD AND BODY - Rnd 4 :
(sc in next 2 st, inc in next st) repeat 8 times [32]
HEAD AND BODY - Rnd 5 :
sc in next st, inc in next st, (sc in next 3 st, inc in next st) repeat 7 times, sc in next 2 st [40]
HEAD AND BODY - Rnd 6 :
(sc in next 4 st, inc in next st) repeat 8 times [48]
HEAD AND BODY - Rnd 7 :
sc in next 23 st, white yarn: sc in next st; black yarn: sc in next 24 st [48]
HEAD AND BODY - Rnd 8 :
sc in next 22 st; white yarn: sc in next 3 st; black yarn: sc in next 23 st [48]
HEAD AND BODY - Rnd 9 :
sc in next 21 st; white yarn: sc in next 5 st; black yarn: sc in next 22 st [48]
HEAD AND BODY - Rnd 10 :
sc in next 20 st; white yarn: sc in next 7 st; black yarn: sc in next 21 st [48]
HEAD AND BODY - Rnd 11 :
(sc in next 7 st, inc in next st) repeat 2 times, sc in next 3 st; white yarn: sc in next 4 st, inc in next st, sc in next 4 st; black yarn: sc in next 3 st, inc in next st, (sc in next 7 st, inc in next st) repeat 2 times [54]
HEAD AND BODY - Rnd 12 :
sc in next 20 st; white yarn: sc in next 12 st; black yarn: sc in next 22 st [54]
HEAD AND BODY - Rnd 13 :
sc in next 19 st; white yarn: sc in next 14 st; black yarn: sc in next 21 st [54]
HEAD AND BODY - Rnd 14 :
sc in next 17 st; white yarn: sc in next 17 st; black yarn: sc in next 20 st [54]
HEAD AND BODY - Rnd 15 :
sc in next 15 st; white yarn: sc in next 21 st; black yarn: sc in next 18 st [54]
HEAD AND BODY - Rnd 16 :
sc in next 8 st, inc in next st, sc in next 4 st; white yarn: sc in next 4 st, inc in next st, (sc in next 8 st, inc in next st) repeat 2 times, sc in next 2 st; black yarn: sc in next 6 st, inc in next st, sc in next 8 st, inc in next st [60]
HEAD AND BODY - Rnd 17 :
sc in next 12 st; white yarn: sc in next 48 st [60]
Info :
Fasten off the black yarn, continue with the white yarn. Insert the eyes between rnds 15 & 16, 8 st apart. Make sure the eyes are in the center of the face. Start stuffing the head firmly, adding more as you go.
HEAD AND BODY - Rnd 18 :
(sc in next 8 st, dec) repeat 6 times [54]
HEAD AND BODY - Rnd 19 :
sc in next 3 st, dec, (sc in next 7 st, dec) repeat 5 times, sc in next 4 st [48]
HEAD AND BODY - Rnd 20 :
(sc in next 6 st, dec) repeat 6 times [42]
HEAD AND BODY - Rnd 21 :
sc in next 2 st, dec, (sc in next 5 st, dec) repeat 5 times, sc in next 3 st [36]
HEAD AND BODY - Rnd 22 :
(sc in next 4 st, dec) repeat 6 times [30]
HEAD AND BODY - Rnd 23 :
sc in next st, dec, (sc in next 3 st, dec) repeat 5 times, sc in next 2 st [24]
HEAD AND BODY - Continue :
Rnd 24: sl st in each st around [24]. Rnd 25: (sc in next 2 st, inc in next st) repeat 8 times [32]. Rnd 26: white yarn: sc in next 24 st; black yarn: sc in next 8 st [32]. Rnd 27: sc in next 11 st; white yarn: sc in next 11 st; black yarn: sc in next 10 st [32]. Rnd 28: (sc in next 3 st, inc in next st) repeat 3 times; white yarn: (sc in next 3 st, inc in next st) repeat 2 times; black yarn: (sc in next 3 st, inc in next st) repeat 3 times [40]. Rnd 29: sc in next 17 st; white yarn: sc in next 6 st; black yarn: sc in next 17 st [40]. Rnd 30: sc in next 19 st; white yarn: sc in next 2 st; black yarn: sc in next 19 st [40]. Rnd 31: (sc in next 4 st, inc in next st) repeat 4 times; white yarn: sc in next st; black yarn: sc in next 3 st, inc in next st, sc in next 3 st, inc in next st (repeat) [48]. Fasten off the white yarn, continue with black yarn. Rnds 32-33 (2 rnds): sc in each st around [48]. Rnd 34: (sc in next 11 st, inc in next st) repeat 4 times [52]. Rnds 35-38: sc in each st around [52]. Rnd 39: (sc in next 11 st, dec) repeat 4 times [48]. Rnd 40: sc in each st around [48]. Rnd 41: (sc in next 4 st, dec) repeat 8 times [40]. Rnd 42: sc in next st, dec, (sc in next 3 st, dec) repeat 7 times, sc in next 2 st [32]. Rnd 43: (sc in next 2 st, dec) repeat 8 times [24]. Rnd 44: (sc in next st, dec) repeat 8 times [16]. Rnd 45: dec 8 times [8]. Finish stuffing. Fasten off and close the remaining st, weaving in the ends. Using black thread and pink yarn, embroider a nose between the eyes. Embroider whiskers under each eye, and the eyebrow over each eye. Using a small makeup brush, apply blusher to the cheeks (photos 1,2).
ARMS (make 2, begin with white yarn) - Rnd 1 :
sc 8 into a magic ring [8]
ARMS - Rnd 2 :
(inc in next st, sc in next st) repeat 4 times [12]
ARMS - Rnd 3 :
sc in each st around [12]
ARMS - Color change :
At the end of rnd 3, change to black yarn, fasten off the white yarn.
ARMS - Rnds 4-8 :
(5 rnds): sc in each st around [12]
ARMS - Finish :
Stuff the arm lightly. Flatten the opening of the arm (photo 3) and sc in next 6 st through both layers to close the opening. Fasten off, leaving a long tail for sewing. Using thread and needle, embroider 3 straight lines (for claws) at rnd 2 of each arm (photo 4).
LEGS (make 2, begin with pink yarn) - Rnd 1 :
sc 8 into a magic ring [8]
LEGS - Rnd 2 :
inc in each st around [16]
LEGS - Color change :
At the end of rnd 2, change to white yarn. Fasten off the pink yarn.
LEGS - Rnd 3 :
sc in next st, inc in next st, sc in next 5 st, inc in next 2 st, sc in next 5 st, inc in next st, sc in next st [20]
LEGS - Rnd 4 :
sc in each st around [20]
LEGS - Rnd 5 :
sc in next 6 st, dec 4 times, sc in next 6 st [16]
LEGS - Rnd 6 :
[sc in next 4 st, dec] repeat 2 times, sc in next 4 st [14]
LEGS - Finish :
At the end of rnd 6, change to black yarn. Fasten off the white yarn. Rnd 7: sc in next 6 st, dec, sc in next 6 st [13]. Rnd 8: sc in next 6 st, inc in next st, sc in next 6 st [14]. Stuff the leg lightly. Flatten the opening of the leg and sc in next 7 st through both layers to close the opening. Fasten off, leaving a long tail for sewing. Using thread and needle, embroider 3 straight lines (for claws) at rnd 3 of each leg (photo 5).
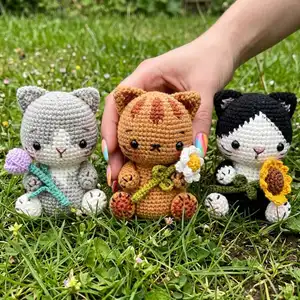
This adorable cats and flowers collection combines small, charming amigurumi kitties with tiny floral accessories to create a delightful handmade set. Perfect for gifts, shelf decor, or cute companions, the pattern includes detailed shaping, colorwork and assembly guidance. Each kitty is full of personality and is quick to make — enjoy creating these sweet characters! 🧶🐱🌸