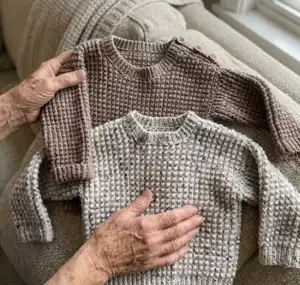
Make a cozy, knit-look textured ribbed sweater using a reversible two-stitch textured pattern and yarn-over slip stitch ribbing. This pattern includes full instructions for front and back panels, sleeves, button/buttonhole bands and clear shaping directions for multiple child sizes. Youll get precise row-by-row instructions and helpful construction notes so you can create a polished handmade sweater for babies and children.
Progress Tracker
0% Complete
— Construction Notes :
Info :
The sweater is worked from side to side (the length of the row is the length of the sweater) with a textured stitch which is worked by alternating between a half double crochet stitch and a slip stitch in the back loop only, and a yarn over slip stitch ribbing for the bottom, neck and cuff ribbing. Front and back panels are made separately. The bottom ribbing is completed at the same time as the front and back panels. Front bottom ribbing is slightly shorter than on the back side and is not connected on the sides. The left shoulder has a placket made from yarn over slip stitch ribbing with three buttonholes for an easier fit for babies heads. Modifications are provided to complete the shoulder without the button opening. After the shoulders are connected, the neck ribbing is completed. The sleeves have several short rows. Sleeves are connected to the shoulders with a tapestry needle. Then the sides of the sleeves and front and back panels are seamed with a crochet hook.
Infos :
A turning chain is worked at the beginning of all rows, including short rows. The turning chain doesn't count as a stitch throughout this pattern. Instructions apply for all sizes, except when details are listed for a specific size. Increases are created by chaining an extra chain and working it as an additional st. Decreases are created by leaving the last stitch(s) of the row unworked. Increases and decreases are used to shape the top edge of the sweater. The bottom edge is always flat with the same number of stitches worked for the ribbing.
— Front Panel :
Item Name (P1) :
Right Shoulder Shaping (Front): Points B to C, Fig. 4. Please refer to the video that goes over right shoulder shaping. This section is written for the largest size. For smaller sizes complete less rows as instructed below. Ch (54, 60, 62, 66), (78, 86, 90, 96). Continuing from the beginning of the chain (Point A, Fig. 4), place a marker in the (6, 6, 8, 8), (8, 10, 10, 10)th ch. That will be the beginning of ribbing. For all sizes complete (11, 17, 19, 20), (20, 25, 25, 27) rows of this section, then continue to Neck Shaping - starting with Neckline decreases (Row 1, page 6).
Round 1 :
Row 1: Sl st in the second ch from the hook, [hdc in next ch, sl st in next ch] repeat [ ] to marker. Work yo sl st in ea of last (6, 6, 8, 8), (8, 10, 10, 10) ch. Turn. Continue moving the marker to the (6, 6, 8, 8), (8, 10, 10, 10)th st of every new row.
Round 2 :
Row 2: Ch 1, yo sl st in blo of next (6, 6, 8, 8), (8, 10, 10, 10) sts, [sl st in blo of next st, hdc in blo of next st] repeat [ ] to last st of the row, sl st in blo of last st. Turn.
Round 3 :
Row 3: Ch 1, [sl st in blo, hdc in blo of next st] repeat [ ] to one st before marker, sl st in blo of next st. Work yo sl st in blo of ea of last (6, 6, 8, 8), (8, 10, 10, 10) sts. Turn.
Round 4 :
Row 4: Repeat row 2.
Round 5 :
Row 5: Ch 2, hdc in 2nd ch from the hook, [sl st in blo of next st, hdc in blo of next st] repeat [ ] to one st before marker, sl st in blo of next st. Work yo sl st in blo of ea of last (6, 6, 8, 8), (8, 10, 10, 10) sts. Turn. 1 st increased.
Round 6 :
Row 6: Ch 1, yo sl st in blo of next (6, 6, 8, 8), (8, 10, 10, 10) sts, sl st in blo of next st, [hdc in blo of next st, sl st in blo of next st] repeat [ ] to last st of the row, hdc in blo of last st. Turn.
Round 7 :
Row 7: Ch 1, hdc in 1st st, [sl st in blo, hdc in blo] repeat [ ] to one st before marker, sl st in blo of next st. Work yo sl st in blo of ea of last (6, 6, 8, 8), (8, 10, 10, 10) sts. Turn.
Round 8 :
Row 8: Repeat Row 6.
Round 9 :
Row 9: Ch 2, sl st in second ch from the hook, [hdc in blo of next st, sl st in blo of next st] repeat [ ] to marker. Work yo sl st in blo of ea of last (6, 6, 8, 8), (8, 10, 10, 10) sts. Turn. 1 st increased.
Round 10 :
Row 10: Repeat Row 2.
Round 11 :
Row 11: Repeat Row 3.
Round 12 :
Row 12: Repeat Row 2.
Round 13 :
Row 13: Repeat Row 5. 1 st increased.
Round 14 :
Row 14: Repeat Row 6.
Round 15 :
Row 15: Repeat Row 7.
Round 16 :
Row 16: Repeat Row 6.
Round 17 :
Row 17: Repeat Row 9. 1 st increased.
Round 18 :
Row 18: Repeat Row 2.
Round 19 :
Row 19: Repeat Row 3.
Round 20 :
Row 20: Repeat Row 2.
Round 21 :
Row 21: Repeat Row 5. 1 st increased.
Round 22 :
Row 22: Repeat Row 6.
Round 23 :
Row 23: Repeat Row 7.
Round 24 :
Row 24: Repeat Row 6.
Round 25 :
Row 25: Repeat Row 9. 1 st increased.
Round 26 :
Row 26: Repeat Row 2.
Round 27 :
Row 27: Repeat Row 3.
— Neck Shaping (Front) :
Info :
Please refer to the video that demonstrates neckline shaping. Front panel neckline section is (16, 16, 18, 20), (20, 20, 22, 26) rows total, and instructions are broken into three parts: -decrease rows - 3 rows for all sizes; -flat section (no increases /decreases) - (10, 10, 12, 14), (14, 14, 16, 20) rows; -increase rows - 3 rows for all sizes.
Round 1 :
Neckline Decreases: points C to D, Fig. 4. Row 1: Ch 1, yo sl st in blo of next (6, 6, 8, 8), (8, 10, 10, 10) sts, sl st in blo of next st, [hdc in blo of next st, sl st in blo of next st] repeat [ ] to last 8 sts. Leave these 8 sts unworked. Turn. 8 sts decreased.
Round 2 :
Row 2: Ch 1, [sl st in blo of next st, hdc in blo of next st] repeat [ ] to one st before marker, sl st in blo of next st. Work yo sl st in blo of ea of last (6, 6, 8, 8), (8, 10, 10, 10) sts. Turn.
Round 3 :
Row 3: Ch 1, yo sl st in blo of next (6, 6, 8, 8), (8, 10, 10, 10) sts, sl st in blo of next st, [hdc in blo of next st, sl st in blo of next st] repeat [ ] to last 2 sts. Leave these 2 sts unworked. Turn. 2 sts decreased.
Round 4 :
Neckline Flat Section: Points D to E, Fig. 4. Row 4: Repeat Row 2.
Round 5 :
Row 5: Ch 1, yo sl st in blo of next (10, 10, 12, 12), (12, 14, 14, 14) sts, sl st in blo of next st, [hdc in blo of next st, sl st in blo of next st] repeat [ ] to the end of the row. Turn. Next work (8, 8, 10, 12), (12, 12, 14, 18) more rows in pattern without increases and decreases alternating between Rows 2 & 5 (4, 4, 5, 6), (6, 6, 7, 9) times.
Round 24 :
Neckline Increases: Points D1 to C1, Fig. 4. Row 24: Ch 3, sl st in second ch from the hook, hdc in next ch, [sl st in blo of next st, hdc in blo of next st] repeat [ ] to one st before marker, sl st in blo of next st. Work yo sl st in blo of ea of last (10, 10, 12, 12), (12, 14, 14, 14) sts. Turn. 2 sts increased.
Round 25 :
Row 25: Repeat Row 5.
Round 26 :
Row 26: Ch 3, [sl st in second ch from the hook, hdc in next ch] repeat [ ] 2 times, [sl st in blo of next st, hdc in blo of next st] repeat { } to one st before marker, sl st in blo of next st. Work yo sl st in blo of ea of last (10, 10, 12, 12), (12, 14, 14, 14) sts. Turn. 2 sts increased.
— Left Shoulder Shaping (Front) :
Info :
Left Shoulder Shaping Points F to G, Fig. 4. Please refer to the video that demonstrates left shoulder shaping. Complete (10, 16, 18, 20), (22, 24, 24, 26) rows listed below. ***Only complete a number of rows listed for your size above. All 26 rows are for the largest size only.***
Round 1 :
Row 1: Ch 1, yo sl st in blo of next (6, 6, 8, 8), (8, 10, 10, 10) sts, sl st in blo of next st, [hdc in blo of next st, sl st in blo of next st] repeat [ ] to the end of the row. Turn.
Round 2 :
Row 2: Ch 1, [sl st in blo, hdc in blo] repeat [ ] to one st before marker, sl st in blo of next st. Work yo sl st in blo of ea of last (6, 6, 8, 8), (8, 10, 10, 10) sts. Turn.
Round 3 :
Row 3: Ch 1, [sl st in blo, hdc in blo of next st] repeat [ ] to one st before marker. Continue to follow the row repeats as listed for the Front Panel Right Shoulder to reach the required total number of rows for your size.
— Back Panel :
Info :
Please refer to the video that goes over the back panel. The back panel is worked the same way as the front, except: a) Ribbing is slightly longer on the back side (additional 4 sts); b) if you are making the button opening, the first shoulder worked is the left shoulder and it has fewer sts (it was the opposite for the front panel - the last worked shoulder was the left shoulder and had fewer sts); If you fold the finished panel in half, the shoulders will be parallel, but one is lower than another; c) the neckline is not as deep as the front. The base chain is starting at point A and point H1 towards G1 (Fig. 4), then turns, and Row 1 is moving towards the bottom edge of the Back panel (Fig. 4).
Round 1 :
Attention, two options on how many base chains to start with! a) without the shoulder button opening: Ch (58, 64, 66, 70), (82, 90, 94, 100). b) with the shoulder button opening: left shoulder is a little shorter than the right to allow for button band Ch (56, 62, 64, 68), (80, 88, 92, 98). Next, for all options: continuing from the beginning of the chain (Point A, Fig. 4), place a marker in the (10, 10, 12, 12), (12, 14, 14, 14)th ch. That indicates the beginning of ribbing.
Round 2 :
Left Shoulder shaping (back panel) Points G1 to F1, Fig. 6. For all sizes complete (11, 17, 19, 20), (20, 25, 25, 27) rows of Front Panel Right Shoulder section, but keep the ribbing 4 sts longer for ea size: (10, 10, 12, 12), (12, 14, 14, 14).
Round 3 :
For Size 3-4 complete row 19 one more time and continue to Neck Shaping - Row 1, page 6. For Size 5-6 complete three more rows by repeating rows 19, 20 and 19 again.
Round 4 :
Neck shaping (Back): The back panel neckline section is (16, 16, 18, 20), (20, 20, 22, 26) rows total, and instructions are broken into three parts: -decrease rows - 3 rows for all sizes; -flat section (no increases/decreases) - (10, 10, 12, 14), (14, 14, 16, 20) rows; -increase rows - 3 rows for all sizes.
Round 5 :
Neckline Decreases: Points F1 to E1, Fig. 4. Row 1: Attention, two options here! a) without the shoulder button opening: Ch 1, yo sl st in blo of next (10, 10, 12, 12), (12, 14, 14, 14), sl st in blo of next st, [hdc in blo of next st, sl st in blo of next st] repeat [ ] to 2 last sts. Leave these 2 sts unworked. Turn. 2 sts decreased. b) with the shoulder button opening: left shoulder is a little shorter than the right to allow for button band Ch 1, yo sl st in blo of next (10, 10, 12, 12), (12, 14, 14, 14), sl st in blo of next st, [hdc in blo of next st, sl st in blo of next st] repeat [ ] to end of the row. Turn.
— Sleeves (Make Two) :
Info :
Similar to the Front and Back Panels, the instructions for Sleeves are broken into 3 sections: 1) short rows to shape the left edge, 2) flat section (no increases/decreases), 3) short rows to shape the right edge of the sleeve to be symmetrical to the left side. This YouTube video demonstrates sleeve construction and short rows.
Round 1 :
Total number of rows for ea sleeve is (40, 42, 46, 54), (54, 58, 64, 66), which includes: - Short rows: (7, 7, 9, 11), (11, 11, 13, 13). - Full rows (no increases/no decreases): (26, 28, 28, 32), (32, 36, 38, 40). - Short rows: (7, 7, 9, 11), (11, 11, 13, 13).
Round 2 :
Ch (32, 38, 44, 50), (52, 58, 66, 74). Row 1: Starting with the second ch from the hook, yo sl st in blo of next (6, 6, 8, 8), (8, 10, 10, 10) ch (place marker in (6, 6, 8, 8), (8, 10, 10, 10)th st of yo sl st worked), [sl st in blo of next ch, hdc in blo of next ch] repeat [ ] to last ch, sl st in last ch. Turn. A marker in the (6, 6, 8, 8), (8, 10, 10, 10)th st from the edge is indicating the beginning of ribbing (ribbing is (6, 6, 8, 8), (8, 10, 10, 10) sts, plus one turning ch).
Round 3 :
Short Rows: Row 2: Ch 1, [sl st in blo of next st, hdc in blo of next st] repeat [ ] (3, 3, 3, 3), (4, 4, 4, 4) times, sl st in blo of last st. Turn. (7, 7, 7, 7), (9, 9, 9, 9) sts worked.
Round 4 :
Row 3: Ch 1, [sl st in blo of first st*, hdc in blo of next st] repeat [ ] (2, 2, 3, 3), (4, 4, 4, 4) times, sl st in blo of last st. Turn.
Round 5 :
Row 4: Ch 1, [sl st in blo of next st, hdc in blo of next st] repeat [ ] (3, 3, 3, 3), (4, 4, 4, 4) times, sl st in blo of last st of Row 3 and the last worked st of Row 1. Now start working into the Row 1 base**: [hdc in blo of next st, sl st in blo of next st] (3, 3, 3, 3), (3, 3, 4) times. Turn. (6, 6, 6, 6), (6, 6, 6, 8) sts increased.
Round 6 :
Row 5: Ch 1, [sl st in blo of next st, hdc in blo of next st] repeat [ ] to last st of the row, sl st in blo of last st. Turn.
Round 7 :
Row 6: Ch 1, [sl st in blo of next st, hdc in blo of next st] repeat [ ] to last st of Row 5, sl st in blo of last st of Row 5 and the last worked st of the base row. Continue following the sleeve instructions; repeat rows and progress to Full Rows section and then the final short rows as indicated for your size. Leave a yarn tail to sew sleeve to the shoulder before starting the base chains.
— Full Rows (Sleeve) :
Round 1 :
Row 1 (Full Rows): Ch 1, [sl st in blo of next st, hdc in blo of next st] repeat [ ] to the last st of previous short row, sl st in blo of last st of previous short row and the last worked st of Row 1. Now start working into the base foundation row: [hdc in blo of next st, sl st in blo of next st] to marker. Work yo sl st in blo of ea of next (6, 6, 8, 8), (8, 10, 10, 10) sts. Turn.
Round 2 :
Continue working pattern alternating Rows 2 and 3 for the number of times indicated for your size. Last Row: Repeat Row 2. Fasten off. Leave yarn attached or a long tail of about (2, 2, 2 1/2, 3), (3, 3 1/4, 3 3/4, 4 1/4) yd to use to connect the seam.
— Connecting Right Shoulder :
Info :
Please refer to the video that demonstrates how to connect shoulders. Lay front and back panels flat, with the right side facing you and the V of stitches facing up*. Then flip the front panel on top of the back (like closing the book) so the wrong side of Front panel is facing you. Align shoulders and neckline: Point B to B1, C to C1, F to F1, G to G1 (Fig. 8).
Round 1 :
With a long strand of yarn threaded on a tapestry needle, sew Right shoulders together (Points B/B1 and C/C1) using a mattress stitch. For best results try to align and connect the vertical ribs of front and back as best as you can.
— Connecting Left Shoulder :
Info :
If you are not making the button opening on left shoulder, connect it at points F/F1 and G/G1 the same way as the right. Then continue to neckline ribbing. For the shoulder button opening follow the button band and buttonhole band instructions before completing neckline ribbing.
— Button Band (Left Shoulder) :
Round 1 :
Points F to G, Fig. 8. With right side facing you, attach yarn to the top right outer edge of the shoulder on the Front Panel (Point G, Fig. 8). Row 1: Ch1, yo sl st in ea vertical rib of shoulder's edge, plus one extra st at the end of the shoulder. (12, 18, 20, 22), (24, 26, 26, 28) sts total. Turn.
Round 2 :
Row 2: Ch 1, yo sl st in blo of every st of the row. Turn.
Round 3 :
Rows 3, 4, 5, and 6: Repeat Row 2. Fasten off. Break the yarn.
— Buttonhole Band :
Item Name (P1) :
Attach yarn to the Back Panel: with the right side facing you, attach yarn at the marker placed when you completed the first shoulder, at the top edge by the neckline. (two rows of the neckline will be remaining at the edge).
Round 1 :
Work Rows 1-3 of the button band instructions above. Row 4: make buttonholes: Ch 1, yo sl st in blo of next (3, 5, 5, 6), (6, 7, 7, 8) sts, ch (2, 2, 3, 3), (3, 3, 3, 3), sk (2, 2, 3, 3), (3, 3, 3, 3) sts, yo sl st in blo of next (3, 5, 5, 5), (6, 7, 7, 7) sts, ch (2, 2, 3, 3), (3, 3, 3, 3), sk (2, 2, 3, 3), (3, 3, 3, 3) sts, yo sl st in blo of next (2, 4, 4, 5), (6, 6, 6, 7) sts. Turn.
Round 2 :
Rows 5: repeat Row 2 of the button band instructions above, count each ch for the buttonhole as a st. Row 6: repeat Row 2 of the button band instructions above. Do not break the yarn. You will use it to work the neckline ribbing.
— Neckline Ribbing :
Info :
Please refer to the video that demonstrates how to complete neckline ribbing: with a shoulder button opening and without. The neckline ribbing is (4, 4, 5, 5), (5, 6, 6, 6) sts wide and is worked in yarn over slip stitch in blo of every stitch, like the rest of the ribbing.
Round 1 :
If making a sweater without a shoulder button opening, join yarn at the mid back or one of the sides with the sweater's wrong side facing you. Ch (5, 5, 6, 6), (6, 7, 7, 7). Turn. Compete Rows 1 & 2 (see next page). For Row 3 work Row 5. Then continue alternating between rows 2 and 5 until you cover the circumference of the neckline. Connect both sides of the ribbing with a row of yo sl st. Fasten off. Break the yarn.
— Connecting Sleeves and Sides :
Info :
Lay the Front and the Back flat. Align the sleeves and the front/back panels so the V-sts of the ribbing are directed upwards for all pieces (the right side of all four pieces are facing you). Align the middle of top edge of each sleeve with the shoulder seam. Make sure the buttonhole band is on top of the button band on the right side of the sweater, Fig. 9. The distance between A to A1 and B to B1 (Fig. 11) should measure about: (8 3/4, 9 1/2, 10 1/4, 11 3/4), (11 3/4, 12 1/2, 14 1/4, 15) in / (22, 24, 26, 30), (30, 32, 36, 38) cm.
Round 1 :
With the long yarn tail left when starting the sleeve threaded in to a tapestry needle, connect sleeves to the body using the mattress stitch. For best results, pick up the back loops only or the base chains of the back and front panels to keep the integrity of the last rib columns. Please refer to the video that demonstrates how to connect sleeves.
— Connect the Sides with a Crochet Hook :
Round 1 :
Join yarn at the beginning of the bottom ribbing (points A, Fig. 12). **Sweater is designed to have side slits. Sides of the bottom ribbing are not connected** Connect the sides with a crochet hook: Work a row alternating between sl st and hdc. a) Start with a sl st. Insert the hook into both loops of the last st of the front panel's ribbing edge, then into both loops of the last st on the back panel's ribbing edge. Work a sl st. b) Insert the hook into the back loop of the base chain of the front panel's edge, then into back loop of a sl st on the back panel's edge and use both loops as a base st. Work a sl st. c) Insert the hook into the back loop of the base chain of the front panel's edge, then into back loop of hdc on the back panel's edge and use both loops as a base st. Work an hdc. Continue working the sl st and hdc using the edges of both panels as the base sts.
Round 2 :
After you connect the side from point A to B, fasten off and connect the sleeve from cuff towards the armpit (from point C to B, Fig. 12). Join yarn at the cuff (Point C (Fig. 12). Connect cuff ribbing sides with yo sl st using back loop of the yo sl st on one edge and the base chain on the other edge. Then connect both edges of the sleeve by following instructions b) and c) listed above from point C to B. Work additional sl st or two if needed to make sure there are no holes at the armpit. Fasten off. Break the yarn. Connect the second side and the sleeve the same way. Join yarn at point A1, work sl st/hdc row to connect from point A1 to B1. Then connect the sleeve from point B1 to C1 (Fig. 12) and use yo sl st to connect the cuff ribbing.
— Finishing :
Info :
Weave in all ends on the wrong side of the garment. For the sweater with a button opening attach 3 buttons to the shoulder button band. Wet-block finished garment.
This textured ribbed sweater pattern gives you a knit-look finish with crochet techniques and beautiful stitch definition. Perfect for making cozy handmade sweaters for babies and kids with neat ribbed edges and optional shoulder button opening. Follow the step-by-step instructions and video links to master the construction and finishing. 🧶✨