🧢 Beautiful ✨ Detailed πŸ’ Adorable

Teddy Bear in Suitcase Amigurumi Pattern

Teddy Bear in Suitcase Amigurumi Pattern
4.4β˜… Rating
8-10 Hours Time Needed
1.4K Made This
βœ‚οΈ

Intermediate Level

Ideal for those with basic crochet experience, featuring slightly more advanced stitches and techniques to expand your skills.

⏱️

All-Day Adventure

Requires 8-10 hours, ideal for a full day of immersive crocheting.

🧸

Cute Companion

An adorable friend to cherish, handcrafted with love to bring comfort and joy for years to come.

About This Teddy Bear in Suitcase Amigurumi Pattern

Create a tiny teddy bear that fits perfectly into its own crocheted suitcase, complete with blanket, pillow, dress and accessories. The pattern includes step-by-step instructions for each piece and clear assembly photos to guide you. Youll learn small amigurumi shaping, simple jacquard for the blanket and how to insert cardboard for structure.

Teddy Bear in Suitcase Amigurumi Pattern crochet pattern - detailed view of completed project

This pattern uses sport weight yarn and a 2 mm hook for a firm, compact finish. The finished suitcase measures approximately 14 cm x 8 cm and the bear is about 11 cm tall.

Why You'll Love This Teddy Bear in Suitcase Amigurumi Pattern

I absolutely love this pattern because it combines a classic amigurumi teddy with a delightful miniature suitcase β€” it feels like making a tiny world. The level of detail is satisfying but not overwhelming, so I can enjoy both crocheting and simple hand-sewing. I also love how customizable it is: change the yarn colors to suit your style or make a travel-themed set. Finally, the finished piece is an ideal gift that looks handcrafted and special.

Teddy Bear in Suitcase Amigurumi Pattern step 1 - construction progress Teddy Bear in Suitcase Amigurumi Pattern step 2 - assembly progress Teddy Bear in Suitcase Amigurumi Pattern step 3 - details and accessories Teddy Bear in Suitcase Amigurumi Pattern step 4 - final assembly and finishing

Switch Things Up

I love customizing this pattern by changing yarn colors to suit a theme β€” try neutral tones for a vintage look or bright pastels for a playful version.

I sometimes make the bear slightly larger by using DK yarn and a 2.5 mm hook; the same pattern works but the proportions will be a bit bigger.

I often substitute felt for embroidered facial details for a different finish β€” cut tiny felt pieces for the nose and secure them with fabric glue or small stitches.

For a more durable suitcase, I reinforce the cardboard with a second piece or use thin plastic packaging instead of cardboard.

I like to add tiny accessories like a mini luggage tag or a tiny amigurumi toy friend tucked into the suitcase to create a set.

To vary texture, I sometimes work the suitcase sides in BLO or FLO for ribbing effects that mimic suitcase panels.

If you prefer a softer suitcase, skip the cardboard and add extra stuffing between layers for a padded look that is still cute and cuddly.

I also enjoy making matching outfits for the bear β€” a tiny hat, scarf, or mittens using leftover yarn is an easy way to personalize the set.

Change the blanket jacquard pattern to create initials or a small motif in contrasting colors to gift the set to someone special.

Finally, experiment with button styles and metallic accents on the suitcase for a more realistic or decorative finish β€” small wooden, black or metallic buttons all change the final character.

Common Mistakes & How to Fix Them

βœ— Skipping the stitch marker at the start of rounds results in lost row counts and shaping errors; place a marker at the start of every round and move it after each round to stay accurate. βœ— Under-stuffing limbs makes them floppy and loose; stuff small pieces gradually and firmly with fiberfill, checking the shape as you go to avoid lumps. βœ— Not weaving in tails securely makes seams come undone during assembly; leave long tails for sewing and weave them through several stitches before trimming. βœ— Crocheting too loosely when you need firm fabric for the suitcase causes sagging; use the recommended 2 mm hook and maintain even tension to achieve compact stitches. βœ— Forgetting to cut cardboard to a precise size weakens the suitcase structure; measure and cut the cardboard carefully so it fits flat between the covers before stitching the edges. βœ— Skipping the step to tighten cheeks (facial shaping) can make the face look flat; follow the cheek tightening photos and technique to shape the face naturally.

Teddy Bear in Suitcase Amigurumi Pattern

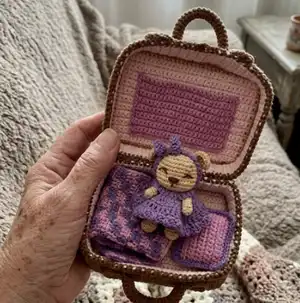
Make a tiny, travel-ready teddy bear tucked inside a crocheted suitcase. This pattern guides you through the bear, a cozy blanket and a detailed suitcase with cardboard inserts. Youll enjoy sewing the pieces together and adding charming finishing touches like a headband and tiny dress. Perfect as a handmade gift or a collectible mini toy.

Intermediate 8-10 Hours

Materials Needed for Teddy Bear in Suitcase Amigurumi Pattern

β€” Main Fabric

  • 01
    Sport weight 4ply yarn Yarn Art Jeans (50g / 160m) - N07 beige (main body and suitcase)
  • 02
    Sport weight 4ply yarn Yarn Art Jeans (50g / 160m) - N18 light pink (suitcase interior and details)
  • 03
    Sport weight 4ply yarn Yarn Art Jeans (50g / 160m) - N20 pink (pillow and blanket base)
  • 04
    Sport weight 4ply yarn Yarn Art Jeans (50g / 160m) - N50 purple (dress, headband, blanket accents)
  • 05
    Sport weight 4ply yarn Yarn Art Jeans (50g / 160m) - N40 brown (suitcase edges, straps and decorations)
  • 06
    Cardboard rectangle for suitcase inserts (cut to fit between bottom and upper cover)
  • 07
    2 small buttons for fastenings (one for the bear dress, one for suitcase fastener)

β€” Tools Required

  • 01
    Crochet hook size 2.0 mm
  • 02
    Scissors
  • 03
    Needle for sewing pieces and yarn needle
  • 04
    Stitch markers
  • 05
    Polyester stuffing (fiberfill)
  • 06
    Cardboard for suitcase inserts (cut to size)
  • 07
    2 Buttons for fastening the pieces and the dress
  • 08
    Pins for assembly (optional)

Progress Tracker

0% Complete

β€” Teddy Bear - Arms :

Round 1 :

6sc in MR

Info :

Place row marker here.

Round 2-6 :

6sc (5 rounds)

Info :

Stuff the arms with fiberfill.

Info :

Fasten off, cut the yarn, weave in the yarn ends.

β€” Teddy Bear - Legs :

Round 1 :

6sc in MR

Info :

Place row marker here.

Round 2 :

6inc (12)

Round 3 :

3sc, 3dec, 3sc (9)

Round 4 :

(1sc, dec) *3 (6)

Round 5-9 :

6sc (5 rounds)

Info :

Stuff the legs with fiberfill.

Info :

Fasten off, cut the yarn, weave in the yarn ends.

β€” Teddy Bear - Ears :

Round 1 :

6sc in MR

Info :

Place row marker here.

Round 2 :

6inc (12)

Round 3 :

12sl st

Info :

Leave long tail for sewing.

β€” Teddy Bear - Tail :

Round 1 :

6sc in MR

Info :

Place row marker here.

Round 2 :

6inc (12)

Round 3 :

6dec (6)

Info :

Stuff the tail with fiberfill.

Info :

Leave long tail for sewing.

β€” Body - Head :

Body Round 1 :

6sc in MR

Info :

Place row marker here.

Body Round 2 :

6inc (12)

Body Round 3 :

(1sc, inc) *6 (18)

Body Round 4 :

(2sc, inc) *6 (24)

Body Round 5-8 :

24sc (4 rounds)

Body Round 9 :

(2sc, dec) *6 (18)

Body Round 10 :

18sc

Body Round 11 :

(1sc, dec) *6 (12)

Body Round 12 :

12sc

Info :

Stuff the body with fiberfill.

β€” Head :

Round 13 :

12inc (24)

Round 14 :

(3sc, inc) *6 (30)

Round 15-21 :

30sc (7 rounds)

Round 22 :

(3sc, dec) *6 (24)

Info :

Stuff the head with fiberfill.

Round 23 :

(2sc, dec) *6 (18)

Round 24 :

(1sc, dec) *6 (12)

Round 25 :

6dec (6)

Info :

Fasten off, cut the yarn, weave in the ends.

β€” Assembly :

Info :

Fasten the legs and arms with a thread mount. Attach the legs and arms using long needle and thread (look at the pictures below).

Info :

Tighten cheeks following the pictures below (use needle and thread to pull cheeks slightly to shape the face).

Info :

Sew the ears to the head.

Info :

Sew the tail to the body.

Info :

Embroider the eyes, nose and eyebrows with brown yarn.

β€” Headband :

Info :

With purple yarn. Chain 45. Start in the second chain from the hook: 1sl st, 1sc, 3dc, 1sc, 32sl st, 1sc, 3dc, 1sc, 1sl st.

Info :

Cut the yarn and fasten off. Tie the headband on the head.

β€” Dress :

Round 1 :

With purple yarn. Work in rows. Chain 19. From the second chain on the hook: 18sc, turn (18)

Round 2 :

ch1, 3sc, ch4, (skip 4 sc, start from the next stitch), 4sc, ch4, (skip 4 sc, start from the next stitch), 3sc, turn (18)

Round 3 :

ch2, 18dcinc, turn (36)

Round 4 :

ch2, 36dc, turn (36)

Round 5 :

ch2, (dcinc, sc) *18

Info :

Cut the yarn. Make a fastener on the dress (sew a button on one side, make a button loop on the other). Put the dress on the bear.

β€” Pillow :

Round 1 :

Crochet 2 pieces in pink color. Chain 15. Start in the second chain from the hook: 14sc, turn (14)

Round 2-11 :

Ch1, 14sc, turn (10 rows)

Info :

Cut the yarn. Apply the pink part and crochet with purple yarn: 14sc, inc in the corner, 11sc, inc in the corner, 14sc, inc in the corner, 11sc, inc in the corner.

Info :

Fasten off, cut the yarn, weave in the yarn ends.

β€” Blanket :

Round 1 :

With pink yarn. Work in rows. Ch 31. Start in the second chain from the hook: 30sc, turn (30)

Round 2 :

Attention! Crochet in jacquard technique from Row 2 to 11. Add purple yarn (these stitches are highlighted in red). ch2, (3dc, 3dc) *5, turn (30)

Round 3-11 :

ch2, (3dc, 3dc) *5, turn (30) (repeat for rows 3 through 11 following jacquard color chart)

Round 12 :

With pink yarn. Ch1, 30sc. Fasten off, cut the yarn, weave in the yarn ends.

β€” Suitcase - Side parts (make 2) :

Round 1 :

Crochet 2 pieces in light pink and 2 pieces in beige color. Work in rows. Chain 7. From the second chain on the hook: 6sc, turn (6)

Round 2-107 :

Ch1, 6sc, turn (106 rows)

Info :

Fold in half and make 6sl st through both sides. Cut the yarn.

β€” Suitcase - Connect the pieces (make 2) :

Info :

Put the light pink detail inside the beige one.

Info :

Apply the beige part and crochet with beige yarn: 108sc. Cut the yarn.

Info :

Connect on the other side of the side with brown yarn: 108 reserve sc. Cut the yarn.

β€” Suitcase - Bottom cover :

Round 1 :

Crochet 1 pieces in light pink and 1 pieces in beige color. Work in rows. Chain 33. Start from the second chain on the hook: inc, 30sc, inc, turn (34)

Round 2-22 :

Ch1, 34sc, turn (21 rows) (34)

Round 23 :

ch1, dec, 30sc, dec (32)

Info :

Continue crocheting from one beige piece.

Info :

Cut a rectangle from the cardboard and put it between the parts.

Info :

Apply the beige part and crochet with beige yarn: 108sc. Fasten off, cut the yarn, weave in the ends.

β€” Suitcase - Attach bottom pieces :

Info :

Attach the pieces to the bottom cover in a circle. Attach the bottom cover to the side part with brown yarn by crocheting 108 reserve sc. Fasten off, cut the yarn, weave in the ends.

β€” Suitcase - Upper cover :

Round 1 :

Crochet 1 pieces in light pink and 1 pieces in beige color. Work in rows. Chain 33. Start from the second chain on the hook: inc, 30sc, inc, turn (34)

Round 2-22 :

Ch1, 34sc, turn (21 rows) (34)

Round 23 :

ch1, dec, 30sc, dec (32)

Info :

Fasten off, cut the yarn, weave in the yarn ends.

β€” Suitcase - Attach upper pieces :

Info :

Attach the pieces to the upper cover in a circle. Attach the upper cover to the side part with brown yarn by crocheting 108 reserve sc. Fasten off, cut the yarn, weave in the ends.

Info :

Fold together the upper with the bottom. On the long side, make a seam with a brown thread connecting the parts.

β€” Suitcase - Decoration (make 2) :

Round 1 :

With brown yarn. Chain 82. Start in the third chain from the hook: 80dc, turn (80)

Round 2 :

ch2, 80dc (80)

Info :

Leave long tail for sewing. Sew the decoration to the suitcase.

β€” Suitcase - Handle :

Round 1 :

With brown yarn. 6sc in MR

Info :

Place row marker here.

Round 2-24 :

6sc (23 rounds)

Info :

Leave long tail for sewing.

Info :

Sew the handle to the suitcase.

Info :

Make a fastener on the suitcase (sew a button on one side, make a button loop on the other). Fasten.

β€” Finishing :

Info :

Congrats your Teddy bear in Suitcase is ready!!!

Assembly Instructions

  • Attach head to body by aligning the neck area of the head with the opening at the top of the body and sew securely using a yarn needle and matching yarn, weaving several times for a strong join.
  • Fasten legs and arms using a thread mount method; attach the legs to the bottom of the body and the arms to the sides with a long needle and strong thread, checking positions with photos before tightening.
  • Sew ears to the head using the long tails left from the ears, positioning them symmetrically at the top sides of the head and stitching through several rounds for stability.
  • Insert cardboard between the bottom and upper cover parts of the suitcase before finally stitching the edges together, then crochet beige edging around the join to hide the seam.
  • Sew the handle and brown decorative straps to the suitcase using long tails and a needle; attach buttons and make a button loop fastener on the suitcase top.
  • Position pillow, blanket and dress on the bear after assembly; add embroidered eyes, nose and eyebrows with brown yarn as shown in the photos.

Important Notes

  • πŸ’‘Use a 2 mm hook and sport weight yarn to achieve the compact fabric required for the tiny bear and the structured suitcase.
  • πŸ’‘Leave long yarn tails where indicated to make sewing and assembly easier and more secure.
  • πŸ’‘Insert carefully-cut cardboard into the suitcase covers before stitching them closed to ensure a flat, rigid structure.
  • πŸ’‘Work with consistent tension and count stitches at the end of each round to avoid mistakes when shaping small parts.

This petite Teddy Bear in Suitcase makes a delightful handmade gift and a tiny keepsake to treasure. The pattern includes full instructions for the bear, clothing, miniature blanket and a structured suitcase with cardboard inserts. Create a charming set in your favorite colors and enjoy every small finishing detail. πŸ§Έβœ‚οΈπŸ§Ά

You ask,

we answer.

FAQs

What size will the finished piece be?

The finished suitcase measures approximately 14 cm x 8 cm and the teddy bear is approximately 11 cm tall when using the recommended yarn and 2.0 mm hook.

Can I use a different yarn weight to make the bear larger or smaller?

Yes, using a different yarn weight and a larger or smaller hook will change the final sizeβ€”use a larger hook for a chunkier version and a smaller hook or thinner yarn for minis; expect to adjust stuffing and cardboard accordingly.

Do I need advanced skills to follow this pattern?

This pattern is rated intermediateβ€”basic amigurumi shaping, increases, decreases and some simple colorwork are required, plus hand sewing for assembly.

How do I make the suitcase rigid?

Cut a cardboard rectangle to fit the bottom and upper cover pieces and insert it between the crocheted layers before stitching the edging; this gives the suitcase a firm structure.