🧶 Beautiful ✨ Detailed 💝 Adorable

Striped Crochet Tunic Pattern

Striped Crochet Tunic Pattern
4.0★ Rating
12-15 Hours Time Needed
3.9K Made This
✂️

Beginner Friendly Level

Perfect for those just starting their crochet journey, with clear instructions and simple techniques

⏱️

Multi-Day Project

A rewarding 12+ hour journey—perfect for dedicated crafters who love detailed work.

👕

Casual Chic

Relaxed style with a modern twist, perfect for everyday wear while maintaining that handcrafted uniqueness.

About This Striped Crochet Tunic Pattern

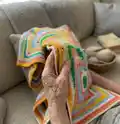
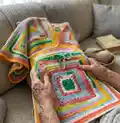
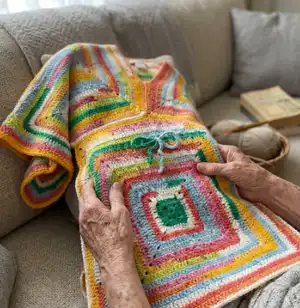
This pattern creates a colorful striped crochet tunic worked from joined square motifs to form a roomy, flattering top. You will make four large granny-style squares for the body and two for the top, then seam them together and add a waist drawstring. The tunic features easy stripe changes that are perfect for using variegated or cake yarns.

Striped Crochet Tunic Pattern crochet pattern - detailed view of completed project

Beginner-friendly stitches are used throughout with clear shaping and finishing instructions. The tunic is sized from XS/S to 4/5XL with notes for larger sizes included.

Why You'll Love This Striped Crochet Tunic Pattern

I absolutely love this pattern because it turns simple stitch repeats into a stunning wearable piece with minimal seaming. I enjoy how the stripe pattern showcases variegated cake yarns for effortless color transitions. The construction is clever and beginner-friendly, so you get a professional-looking finish without complicated shaping. Sewing the squares together and adding the drawstring gives you lots of ways to customize the fit and style. Making this tunic feels fast and rewarding — a great project to brighten your wardrobe.

Striped Crochet Tunic Pattern step 1 - construction progress Striped Crochet Tunic Pattern step 2 - assembly progress Striped Crochet Tunic Pattern step 3 - details and accessories Striped Crochet Tunic Pattern step 4 - final assembly and finishing

Switch Things Up

I love how easily you can customize this tunic by swapping the cake yarn for solids and creating your own color sequence.

To make the tunic longer or shorter, simply repeat or skip repeats of the 2nd rnd in the square to change the finished square size before joining.

If you want a slimmer fit, reduce the number of squares across the body or choose a smaller size according to the finished chest measurements.

Try using a bulkier yarn with a larger hook for a chunkier, warmer tunic, or use sport weight yarn and a smaller hook for a delicate, lighter version.

I often add embroidered or crocheted motifs to the center square for a unique focal point—experiment with flowers, initials, or geometric shapes.

Consider adding short or full-length sleeves by altering how much of the top you seam closed for the sleeve openings.

Swap the drawstring for a braided cord, leather tie, or ribbon for an instant style change and different drape at the waist.

Play with surface stitches or edgings around the neckline and sleeve openings to give a polished finished look that complements your colorway.

If you like pockets, crochet small squares or rectangles and seam them onto the bottom section before joining top to bottom.

I also recommend blocking each square lightly to even the stitches before seaming; this helps the stripes and edges line up neatly for a professional finish.

Common Mistakes & How to Fix Them

✗ Not checking gauge before starting; make a gauge swatch so the finished tunic matches the stated measurements and fits as intended. ✗ Changing colors without carrying yarn tidily causes bulky joins; weave in ends as you go and carry the yarn neatly at the back between stripe changes. ✗ Skipping stitch counts when repeating the 2nd rnd for the square leads to incorrect sizing; count stitches regularly and measure square size as you work. ✗ Sewing seams without pinning can create asymmetry; pin or place safety pins to align squares and sleeve openings before sewing a flat seam. ✗ Placing the drawstring too high or too low changes fit; mark the waist seam and weave the drawstring at the recommended distance for the best fit.

Striped Crochet Tunic Pattern

Make a bright, breezy striped crochet tunic using Caron Cinnamon Swirl Cakes. This pattern guides you step-by-step to create a comfortable, oversized tunic with pretty stripe details and a waist drawstring. Perfect for gifting or refreshing your wardrobe with a handmade statement piece.

Beginner Friendly 12-15 Hours

Materials Needed for Striped Crochet Tunic Pattern

— Main Fabric

  • 01
    Caron Cinnamon Swirl Cakes (8 oz/227 g; 407 yds/372 m) - main cake yarn
  • 02
    Contrast A: Sour Lime (33054) - balls: XS/S 2, M 3, L 3, XL 4, 2/3XL 4, 4/5XL 5
  • 03
    Contrast B: Tangerine Twist (33054) - balls: XS/S 2, M 2, L 2, XL 3, 2/3XL 3, 4/5XL 4

— Tools Required

  • 01
    Crochet hook size U.S. H/8 (5 mm) Susan Bates Silvalume (or size needed to obtain gauge)
  • 02
    Susan Bates yarn needle
  • 03
    Safety pin (for threading drawstring)
  • 04
    Scissors
  • 05
    Pins for assembly (optional)

Progress Tracker

0% Complete

— General Information :

Info :

ABBREVIATIONS: Approx = Approximately. Beg = Beginning. Ch = Chain(s). Cont = Continue(ity). Dc = Double crochet. Pat = Pattern. Rem = Remain(ing). Rep = Repeat. Rnd(s) = Round(s). Sc = Single crochet. Sl st = Slip stitch. Sp(s) = Space(s). St(s) = Stitches. Tog = Together.

Info :

SIZES: To fit chest measurement XS/S 28-34" [71-86.5 cm], M 36-38" [91.5-96.5 cm], L 40-42" [101.5-106.5 cm], XL 44-46" [112-117 cm], 2/3XL 48-54" [122-137 cm], 4/5XL 56-62" [142-157.5 cm].

Info :

FINISHED CHEST: XS/S 40" [101.5 cm], M 44" [112 cm], L 48" [122 cm], XL 52" [132 cm], 2/3XL 58" [147.5 cm], 4/5XL 64" [162.5 cm].

Info :

GAUGE: 13 single crochet (sc) and 14 rows = 4" [10 cm].

Info :

Stripe Pattern (Pat): With A, work 2 rnds. With B, work 2 rnds. These 4 rnds form Stripe Pat.

Info :

INSTRUCTIONS: The instructions are written for XS/S. If changes are necessary for larger sizes the instructions will be written XS/S (M-L-XL-2/3XL-4/5XL). When only one number is given, it applies to all sizes.

Info :

Note: Chain (ch) 2 at beginning (beg) of round (rnd) does not count as stitch (st).

— Squares :

Round 1 :

With A, ch 4. Join with slip stitch (sl st) to first ch to form ring. 1st rnd: Ch 2. [3 double crochet (dc) in ring. Ch 2] 3 times. 3 dc in ring. Ch 1. Join to first dc with a sc.

Round 2 :

2nd rnd: Ch 2. 2 dc in same space (sp) as join. [1 dc in each dc to next ch-2 sp. (2 dc. Ch 2. 2 dc) in ch-2 sp] 3 times. 1 dc in each st to next (ch 1. 1 sc) sp. 2 dc in sp. Ch 1. Join to first dc with a sc.

Info :

First 2 rnds of Stripe Pat are now in place. Keeping continuity (cont) of Stripe Pat, repeat (rep) 2nd rnd until work measures approximately (approx) 19½ (21½-23½-25½-28½-31½)" [49.5 (54.5-59.5-65-72.5-80) cm] square, ending after a 2nd or 4th row of Stripe Pat. Fasten off B.

Round 3 :

Next rnd: With A, ch 1. 1 sc in same sp as join. (1 sc in each dc to next ch-2 sp. 3 sc in ch-2 sp) 3 times. 1 sc in each st to next (ch 1. 1 sc) sp. 2 sc in sp. Join with sl st to first sc. Fasten off.

— Finishing :

Info :

Using a flat seam, sew 2 Squares together (tog) along side seams to form Bottom of Tunic, leaving 8 (8-9-10-11-12)" [20.5 (20.5-23-25.5-28-30.5) cm] open along bottom of seam at each side for side slit.

Info :

Using a flat seam and working vertically, sew first 4 (4-5-6-7-8)" [10 (10-12.5-15-18-20.5) cm] of remaining (rem) 2 Squares tog for Top of Tunic. Leave open to last 8 (9-10-11-12-15)" [20.5 (23-25.5-28-30.5-38) cm]. Seam rem 8 (9-10-11-12-15)" [20.5 (23-25.5-28-30.5-38) cm] tog using a flat seam.

Info :

Fold Top of Tunic in half horizontally. Leave 4" [10 cm] open at each end. Sew next 6 (7-8-9-10½-12)" [15 (18-20.5-23-26.5-30.5) cm] closed for Sleeve using a flat seam. Leave rem 20 (22-24-26-29-32)" [51 (56-61-66-73.5-81) cm] in center open.

Info :

With Top of Tunic centered along Bottom, seam Top to Bottom around circumference of Tunic using a flat seam.

— Waist Drawstring :

Waist Drawstring (P1) :

Ch 175 (188-208-221-248-274). 1st row: 1 sc in 2nd ch from hook. 1 sc in each ch to end of chain. Fasten off.

Info :

Place end of Drawstring on safety pin. Beg at side of center front, thread drawstring around waist approx. 3 (3½-4-4½-5-6)" [7.5 (9-10-11.5-12.5-15) cm] below seam by weaving safety pin over and under groups of 2 dc around to opposite side of center front.

Info :

STITCH KEY: o = chain (ch). + = single crochet (sc). T = double crochet (dc).

Assembly Instructions

  • Sew two large squares together along the side seams using a flat seam to form the Bottom of Tunic, leaving side slits open as directed (leave 8 (8-9-10-11-12)" open at each side).
  • Sew the remaining two squares together vertically to form the Top of Tunic, leaving the central opening and sleeve openings as indicated in the finishing instructions.
  • Fold the Top of Tunic in half horizontally and sew sleeve seams closed for the specified length (6 (7-8-9-10½-12)" depending on size), leaving the center section open.
  • Center the Top of Tunic on the Bottom piece and seam around the full circumference using a flat seam to join both sections securely.
  • Thread the drawstring through the waist casing by attaching the end to a safety pin and weaving around groups of 2 dc approximately 3 (3½-4-4½-5-6)" below the seam, then knot or finish the ends as desired.

Important Notes

  • 💡Use a flat seam for joining squares and seaming top to bottom to ensure a neat, low-profile join that keeps stripes aligned.
  • 💡Measure the square as you work and repeat the 2nd rnd until the square reaches the specified measurement to ensure correct tunic size.
  • 💡Fasten off color B where directed and carry or weave in ends neatly to keep stripe transitions tidy.
  • 💡Pin pieces in place and check symmetry before sewing the final seams to avoid misaligned squares or sleeve openings.

This Striped Crochet Tunic pattern turns simple stitches into a striking wardrobe piece you will reach for again and again. Try it with variegated cakes or your favorite solids to create a look that's uniquely yours. Enjoy the process and wear your handmade tunic with pride! 🧶✨

You ask,

we answer.

FAQs

What size will the finished piece be?

The finished tunic chest measurements range from 40" (XS/S) to 64" (4/5XL) as listed in the pattern; finished chest measurement depends on the size you choose.

Can I use different yarn weights for this pattern?

You can use different yarn weights but this will change the finished size and gauge; adjust hook size accordingly and make a gauge swatch to achieve the desired measurements.

Do I need prior crochet experience for this pattern?

This pattern is beginner-friendly, so basic familiarity with chain, single crochet, and double crochet is all that's required; the pattern includes clear step-by-step instructions.

How long does this project typically take to complete?

Most crocheters complete this tunic in about 12-15 hours, though time will vary with experience, yarn choice, and customization.