🧢 Beautiful ✨ Detailed πŸ’ Adorable

Super Simple Socks Pattern

Super Simple Socks Pattern
4.8β˜… Rating
2-4 Hours Time Needed
3.1K Made This
βœ‚οΈ

Beginner Friendly Level

Perfect for those just starting their crochet journey, with clear instructions and simple techniques

⏱️

Bite-Sized Project

Finishes in 2-4 hoursβ€”perfect for an afternoon of creative relaxation.

πŸ‘•

Casual Chic

Relaxed style with a modern twist, perfect for everyday wear while maintaining that handcrafted uniqueness.

About This Super Simple Socks Pattern

This pattern creates a single pair of adult-sized, cosy socks worked in the round with a separate cuff that you attach at the end. The design uses half treble stitches in UK terms for a soft squishy fabric and a neat, simple shape. It is written for the crocheter who wants a quick, relaxing make with minimal finishing.

Super Simple Socks Pattern crochet pattern - detailed view of completed project

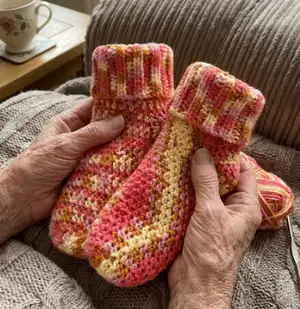
The socks are designed to fit up to a UK size 8 adult foot and are made using one 100g ball of self-striping yarn. The pattern includes a full materials list, gauge information and step-by-step instructions for the main sock and cuff attachment.

Why You'll Love This Super Simple Socks Pattern

I absolutely love this pattern because it makes a very practical, wearable item that comes together quickly. I enjoy how using a self-striping yarn creates professional-looking colour transitions without any sewing in of colour changes. I also love that the cuff is worked flat and sewn on, which makes shaping and fitting straightforward for any level of crocheter. Lastly, the simplicity of the stitches means I can relax and enjoy crocheting while still producing a cosy, durable pair of socks.

Super Simple Socks Pattern step 1 - construction progress Super Simple Socks Pattern step 2 - assembly progress Super Simple Socks Pattern step 3 - details and accessories Super Simple Socks Pattern step 4 - final assembly and finishing

Switch Things Up

I love how easy it is to customise these socks with different yarn choices; try a solid colour for a classic look or a variegated yarn for a fun, random stripe effect.

If you want a larger or smaller sock try changing yarn weight and hook size; bulky yarn with a larger hook will make a chunkier sock, while finer yarn creates a daintier version.

I often lengthen or shorten the sock by adding or subtracting rounds from Rounds 4-37 to better fit the foot or calf height I want my socks to reach.

You can alter the cuff style by working more or fewer rows in the cuff section or by working into both loops instead of BL to change the rib texture.

For extra grip consider sewing on a non-slip sole using puffy paint dots or by stitching a suede patch to the bottom of the foot for safer indoor wear.

I sometimes embroider small motifs on the side or add a tiny crocheted flower for a personalised gift detail that makes the socks extra special.

Want a child size? Reduce initial rounds for a smaller toe circle (for example start with 7 Htr instead of 9) and work fewer rounds before beginning the cuff.

I like to experiment with contrasting cuffs by changing yarn for the cuff only so it folds back to reveal a pop of colour against a solid body.

For a more fitted ankle try decreasing one round in the ankle area or add shaping rows with occasional decreases to contour the sock.

I also add a tiny heel tab by working a few extra rows on the back of the sock before finishing for a slightly more structured shape if desired.

Finally, you can make matching sets by using the same yarn in different colourways for slippers and hats; matching yarn makes a lovely coordinated gift set.

Common Mistakes & How to Fix Them

βœ— Skipping a gauge swatch then being surprised by the finished size; make a 4"/10cm swatch (13 Htr x 11 rows) with your yarn and adjust hook size accordingly. βœ— Not closing the magic ring tight enough which creates a hole in the toe; pull the ring fully closed and slip stitch to secure the first stitch. βœ— Forgetting that Ch2 does not count as a stitch while working rounds; always work the stitches into the indicated stitches and only count actual stitch placements for totals. βœ— Fastening off the cuff before attaching it to the sock which makes sewing awkward; do not fasten off after the last cuff row - attach it to the sock first and then seam and fasten off. βœ— Working into the wrong loop when forming the cuff ridges which loses the rib effect; be sure to work into the back loops (BL) as instructed to create the ribbed cuff texture.

Super Simple Socks Pattern

Make a cozy pair of Super Simple Socks designed for comfort and ease. This pattern walks you through creating an adult-sized sock with a separate rolled cuff you sew on for a neat finish. Using one 100g ball of self-striping yarn makes these socks quick to stitch and beautifully variegated without colour changes. Perfect for relaxing evenings or a thoughtful handmade gift.

Beginner Friendly 2-4 Hours

Materials Needed for Super Simple Socks Pattern

β€” Main Fabric

  • 01
    1 Ball (100g) of chosen yarn - I used Aldi's So Crafty acrylic/wool mix (50/50) but any wool mix yarn will be appropriate
  • 02
    Suggested alternatives: Cascade Pacific Multis or Stylecraft Life Heritage
  • 03
    Self-striping yarn recommended to disguise round joins and avoid colour changes

β€” Tools Required

  • 01
    5mm Crochet hook
  • 02
    Scissors
  • 03
    Tapestry Needle

Progress Tracker

0% Complete

β€” Materials :

Infos :

1 Ball (100g) of chosen yarn - I used Aldi's So Crafty acrylic/wool mix (50/50) but any wool mix yarn will be appropriate. Alternatives include Cascade Pacific Multis or Stylecraft life heritage. I used self-striping yarn for my socks for two reasons. One it was easier to disguise the joins of the rounds and two because it meant I did not need to work any colour changes. 5mm Crochet hook. Scissors. Tapestry Needle.

β€” Sizes and measurements :

Infos :

Finished sock length 32cm (cuff down). 40cm Cuff up (can be worn either way). Socks sit at just above ankle height with cuff down. Finished sock width 12cm. Made to fit adult sized foot size UK 8 or below.

β€” Gauge :

Info :

13 Htr x 11 rows = 4" square using a 5mm hook and worsted weight yarn. To ensure your socks will become the required size I would recommend hooking up a gauge swatch prior to commencement of the pattern and adjust yarn / hooks accordingly.

β€” Abbreviations used :

Infos :

Ch - Chain stitch. Sl st - Slip Stitch. Htr - Half Treble crochet. Inc - Increase. St - Stitch. FO - fasten off your yarn. () - Indicate how many stitches you should have at the end of each round. WS - wrong side of your work. BL - work into the back loops only of the work.

β€” Skill Level :

Info :

Easy - Project includes simple increases, shaping and stitches.

β€” Instructions :

β€” Main Sock :

Round 1 :

Work 9 Htr stitches into a magic ring. Pull the ring closed and Sl St to the beginning Htr. (9)

Round 2 :

Ch2 (does not count as a stitch). Htr Inc in the stitch at the bottom of the Ch2, Htr inc into each st around. (18)

Round 3 :

Ch2 (does not count as a stitch). Htr in the stitch at the bottom of the Ch2, 2HTr into the next stitch. *Htr 1, Htr inc into the next*. Repeat from *to* around. Sl St to the top of the first Htr. (27)

Rounds 4-37 :

Ch2 (does not count as a stitch), work 1Htr into the stitch at the bottom of the Ch2, 1Htr into each stitch around.

Info :

At the end of Round 37 FO. We will work the cuff of the sock separately and attach to the sock at the end.

β€” Sock Cuff :

Row 1 :

Ch 14, 1Htr into the 3rd Ch from the hook and each of the next 11 stitches. Ch 2 and turn.

Row 2 :

1 Htr into the BL of each stitch to the end. Ch2 and turn.

Rows 3-27 :

1Htr into the BL of each stitch, Ch2 and turn. At the end of row 27 omit the Ch2 and turn DO NOT FASTEN OFF. We will now attach the cuff to the sock.

Info :

With the WS of the sock facing you flatten the sock and determine the central point. We will begin attaching the cuff using a simple DC at the central point of the sock when flat. Insert your hook through one row of the cuff and one stitch of the sock top, yarn over and pull through, yarn over and pull through both loops to make a stitch. You will continue around the top of the sock attaching the cuff in this manner. One stitch on the sock body will coincide with the top of each of the rows on the cuff.

Info :

When you reach the end of the top rim do not fasten off, we will now seam the cuff. Dc the cuff seam together in the same way as you attached the cuff to the sock. You will have 12 stitches down the seam. Once you have completed the cuff seam FO and weave in the ends.

Info :

Enjoy your new super simple socks. They are particularly cosy worn with pyjamas and enjoyed with a hot drink of your choice πŸ˜‰

Assembly Instructions

  • With the wrong side (WS) of the sock facing you, flatten the sock and determine the central point before beginning to attach the cuff so it sits evenly.
  • Attach the cuff to the sock by inserting your hook through one row of the cuff and one stitch of the sock top, yarn over and pull through, yarn over and pull through both loops to make a DC, repeating around the top so that one cuff row lines up with one stitch on the sock body.
  • When the cuff is attached around the top do not fasten off; seam the cuff edges together using DC in the same manner as attachment to create a 12-stitch seam down the cuff.
  • After seaming the cuff, fasten off (FO) and weave in all ends neatly with a tapestry needle to secure and hide tails.
  • Try the sock on and adjust the position slightly if needed before final sewing to ensure the cuff sits comfortably either cuff-down or cuff-up.

Important Notes

  • πŸ’‘This pattern is written in standard UK crochet terms and the stitches used must be interpreted accordingly for correct sizing and height.
  • πŸ’‘Make a gauge swatch (13 Htr x 11 rows = 4" square) before starting to ensure your finished socks match the dimensions given.
  • πŸ’‘Do not fasten off the cuff after the last row; attach the cuff to the sock first and then seam and FO to ensure neat finishing.
  • πŸ’‘Use self-striping yarn to disguise round joins and avoid doing colour changes if you want a multi-coloured effect without extra sewing.

These Super Simple Socks are designed to be quick, cosy, and wonderfully satisfying to crochet. They knit together the comfort of soft yarn with a simple construction that makes a lovely handmade gift. Whether you wear the cuff up or folded down, these socks are perfect for chilly evenings and thoughtful presents. 🧢 Cozy stitches and happy feet await! 🧦

You ask,

we answer.

FAQs

What size will the finished piece be?

The finished sock length is approximately 32cm with the cuff down and 40cm with the cuff up; the width is about 12cm and the pattern is made to fit up to a UK size 8 adult foot.

Can I use different yarn weights for this pattern?

Yes, you can use different yarn weights but that will change the finished size; make a gauge swatch (13 Htr x 11 rows = 4" square) and adjust hook size to match the pattern gauge for similar sizing.

Do I need prior crochet experience for this pattern?

This pattern is beginner friendly and uses simple stitches and increases, however basic knowledge of working in rounds, half treble (Htr), and working into back loops will be helpful.

How long does this project typically take to complete?

Most crocheters finish one pair of socks in approximately 2-4 hours, though time will vary depending on pace, yarn choice, and experience level.