About This Stripy Shell Stitches Crochet Hat Pattern
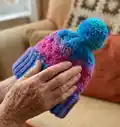
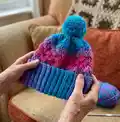
This pattern creates an adult-sized striped shell stitches crochet hat with a fold-up ribbing and a textured shell stitch body. The design uses self-striping yarn to create the colorful bands and finishes with a large pompom for a playful touch. Techniques include working in the round, shell stitch repeats, and creating a folded ribbed brim for a neat edge.

Clear step-by-step rounds and a diagram are included to guide you through the shell stitch pattern. The hat is designed to be quick to make and works beautifully with variegated or stripe yarns.
Why You'll Love This Stripy Shell Stitches Crochet Hat Pattern
I absolutely love this pattern because it turns simple stitches into a striking, textured hat with minimal effort. The shell stitch creates a lovely scalloped texture that pairs so well with stripe yarn for instant visual interest. I enjoy how the folded ribbing gives a neat, warm edge while keeping the hat comfortable and snug. The pompom finish always feels fun and personal — I often make several in different colorways to match winter coats and give as gifts.
Switch Things Up
I love changing yarn colors to create completely new looks with this hat; try switching to a solid color for a more subtle texture or a bright variegated for a bold statement.
I often change hook size to make a larger or smaller hat; using a bulkier yarn with a larger hook will give you a chunkier, warmer version.
You can shorten the hat by working fewer shell pattern repeats to create a slouch-less fitted beanie, or add extra rows for a deep slouch.
I sometimes replace the large pompom with a faux fur pompom for a more luxurious finish or make a smaller pompom for a less dramatic look.
Try alternating two colors every shell repeat to create a striped shell effect distinct from self-striping yarn, for custom color blocking.
Embroider small details on one shell row to personalize the hat with initials or simple motifs using contrasting yarn.
I also experiment with different brim styles: work a longer ribbing for a cuffed look or a shorter ribbing for minimal fold.
For kids, make the hat smaller by using DK weight yarn and a smaller hook, and reduce the number of stitches in the rib and shell foundation proportionally.
Consider adding a decorative trim around the shell section, like a round of reverse single crochet or a surface slip stitch, to frame the scallops.
I recommend making a swatch and trying one or two of these customizations on the swatch first so you can preview the look before committing to the whole hat.
Common Mistakes & How to Fix Them
✗ Skipping the ribbing gauge check can make the brim too small or too loose; measure the ribbing stretched to the specified 19�bd" [49.5 cm] before joining and adjust hook size if needed.
✗ Forgetting that the ch-3 counts as a dc in rounds causes stitch count errors; always treat the beginning ch-3 as a double crochet when counting rounds.
✗ Not turning the ribbing and working from the long edge can lead to incorrect placement; be sure to fold and turn the ribbing sideways and work 72 sc evenly around the long edge as instructed.
✗ Failing to maintain even tension during shell stitch rounds causes uneven shells; keep a consistent tension and count shells regularly to ensure the pattern remains aligned.
✗ Joining rounds incorrectly can produce a visible seam or misaligned shells; join each round with the specified sl st to the first sc and ensure repeats start in the correct stitch.