🧢 Beautiful ✨ Detailed πŸ’ Adorable

Storm The Deer Amigurumi Pattern

Storm The Deer Amigurumi Pattern
4.3β˜… Rating
5-7 Hours Time Needed
1.5K Made This
βœ‚οΈ

Intermediate Level

Ideal for those with basic crochet experience, featuring slightly more advanced stitches and techniques to expand your skills.

⏱️

Weekend Treat

Takes 5-7 hours, making it an enjoyable project to finish over a couple of days.

🧸

Cute Companion

An adorable friend to cherish, handcrafted with love to bring comfort and joy for years to come.

About This Storm The Deer Amigurumi Pattern

This pattern teaches you how to crochet a whimsical deer amigurumi with separate pieces for body, head, legs, antlers, ears, tail and a cosy scarf. It includes detailed round-by-round instructions so you can follow each stitch precisely. Decorative embroidery and small beads are suggested to add personality and festive charm to your finished toy.

Storm The Deer Amigurumi Pattern crochet pattern - detailed view of completed project

Suitable for crocheters with basic experience, the pattern uses single crochet shaping and simple assembly techniques. The end result is an approximately 20 cm tall deer (with antlers) made with Gazzal Jeans yarn.

Why You'll Love This Storm The Deer Amigurumi Pattern

I absolutely love this pattern because it balances simplicity with charming details that really bring the character to life. I enjoy how easy it is to personalise the deer with different colours, embroidery and bead accents to match any style. The separate antler parts and sewn-on scarf make assembly fun and rewarding, and the shaping creates a lively, bouncy posture. Making several in different colours is one of my favourite quick gifting projects.

Storm The Deer Amigurumi Pattern step 1 - construction progress Storm The Deer Amigurumi Pattern step 2 - assembly progress Storm The Deer Amigurumi Pattern step 3 - details and accessories Storm The Deer Amigurumi Pattern step 4 - final assembly and finishing

Switch Things Up

I love changing colors to give each deer a unique personality; try pastel shades for a subtle nursery version or bright contrasting colours for a playful look.

I often swap yarn weights and corresponding hook sizes to change the final size β€” use a bulkier yarn and larger hook for a chunky, cuddly deer or fingering yarn for tiny keychain versions.

I sometimes replace the wire antlers with felt or stiffened fabric if I want a softer, child-friendly toy without wire.

I like to experiment with embroidery styles β€” simple starbursts, snowflakes or flowers look beautiful on the body; try metallic thread or tiny seed beads for a sparkly effect.

I recommend making the scarf in a contrasting color or striping two colors for added interest; you can also stitch on a small button or pompom to personalise it.

To add posability, I insert thin wire into the limbs before finishing, then reinforce with tight stitches at the joints to keep wires hidden and safe.

If you want a different facial expression, try varying eye placement and mouth length β€” moving eyes closer together or embroidering a bigger smile changes the personality dramatically.

I sometimes make sets with different sized deer β€” use the same pattern but change yarn and hook to make a matching family trio.

For a holiday theme, switch to wintery colors and add embroidered snowflakes or tiny bells to the scarf for a festive touch.

Don't be afraid to mix materials: felt antler tips, wooden beads for hooves or ribbon scarves can all make fun variations and unique gifts.

Common Mistakes & How to Fix Them

βœ— Skipping stitch markers when working in spiral can make rounds hard to follow; place a marker at the start of every round to keep your count accurate. βœ— Overstuffing the body will create visible lumps and misshapen curves; stuff gradually in small portions and shape as you go for an even finish. βœ— Crocheting too loosely allows stuffing to show through the stitches; maintain a firm, consistent tension to keep the fabric neat and the stuffing hidden. βœ— Failing to count stitches after increases or decreases leads to incorrect shaping; count stitches at the end of each round, particularly after shaping rounds. βœ— Not weaving the closing tail through front loops correctly will leave an open gap; thread the tail through the front loops of the final stitches and pull tight to close securely.

Storm The Deer Amigurumi Pattern

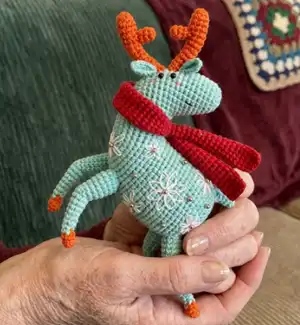
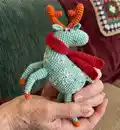
Make a charming hand-crocheted deer with this full Storm the Deer amigurumi pattern. You will get step-by-step round instructions, clear assembly notes, and finishing tips so your toy looks professional. Perfect as a handmade gift or a festive decoration, this pattern shows you how to crochet the body, legs, antlers, ears, tail and scarf with delightful embroidered details.

Intermediate 5-7 Hours

Materials Needed for Storm The Deer Amigurumi Pattern

β€” Main Fabric

  • 01
    Gazzal Jeans yarn (58% cotton, 42% polyacrylic), 170 m / 50 g - main color (beige) approx 50 g
  • 02
    Gazzal Jeans yarn (58% cotton, 42% polyacrylic), 170 m / 50 g - accent color (teal blue) approx 25 g
  • 03
    Gazzal Jeans yarn (58% cotton, 42% polyacrylic), 170 m / 50 g - scarf/contrast colors (pink, red, orange, yellow) approx 10-20 g each depending on choice
  • 04
    Scraps of yarn in different colors for embroidery (you may want to use embroidery thread) - small amounts for flowers and snowflakes
  • 05
    Black glass beads 2 mm (optional) for eyes

β€” Tools Required

  • 01
    B-1 / 2 mm crochet hook
  • 02
    Sewing needle
  • 03
    Yarn needle / tapestry needle for weaving and sewing
  • 04
    Pins for holding pieces during assembly
  • 05
    Stitch markers
  • 06
    Fiberfill for stuffing
  • 07
    Approx. 12 cm of wire for antlers
  • 08
    Scissors

Progress Tracker

0% Complete

β€” Body and Head :

Round 1 :

Ch 11 in beige. Start in second ch from hook, inc, 8 sc, 4 sc in next st, 8 sc, inc (24)

Round 2 :

2 inc, 8 sc, 4 inc, 8 sc, 2 inc (32)

Round 3 :

(sc, inc) x 2, 8 sc, (sc, inc) x 4, 8 sc, (sc, inc) x 2 (40)

Round 4 :

sc in all 40 st (40)

Round 5 :

(sc, inc) x 3, 8 sc, (sc, inc) x 6, 8 sc, (sc, inc) x 3 (52)

Round 6 :

sc in all 52 st (52)

Round 7 :

(sc, inc) x 3, 40 sc, (sc, inc) x 3 (58)

Round 8 :

26 sc, (2 sc, inc) x 2, 26 sc (60)

Round 9 :

(sc, inc) x 3, 48 sc, (sc, inc) x 3 (66)

Round 10-12 :

(3 rounds) sc in all 66 st (66)

Infos :

Divide the work into 4 parts with stitch markers, using 20 stitches for the head, 5 stitches for the neck, 36 stitches for the body and another 5 stitches for the neck. Continue crocheting the body in beige yarn.

Round 13 :

(5 sc, inc) x 3, skip 30 sc, (5 sc, inc) x 3 (42)

Info :

Leave the remaining stitches unworked.

Round 14-25 :

(12 rounds) sc in all 42 st (42). Stuff the body firmly with fiberfill and continue stuffing as you go.

Round 26 :

(5 sc, dec) x 6 (36)

Round 27 :

sc in all 36 st (36)

Round 28 :

9 sc, (sc, dec) x 6, 9 sc (30)

Round 29 :

6 sc, (sc, dec) x 6, 6 sc (24)

Round 30 :

sc, (dec, 2 sc) x 5, dec, sc (18)

Round 31 :

(sc, dec) x 6 (12)

Round 32 :

6 dec (6)

Info :

Fasten off leaving a tail about 10 cm long and cut the yarn. Using a tapestry needle, weave the yarn tail through the front loops of the six stitches and pull tight to close. Weave in the yarn end.

Info :

Go back to round 12. Hold the body with the open side towards you. Count 5 stitches from the body and pull up a loop of beige yarn in the 6th stitch. Leave a long starting yarn tail. Start crocheting the head.

Round 1 :

sc in all 20 st (20). Leave the remaining stitches unworked. Sc in the first st to close the round.

Info :

Mark the last stitch with a stitch marker, this is the new beginning of the round.

Round 2-4 :

(3 rounds) sc in all 20 st (20)

Round 5 :

dec, 14 sc, dec, 2 sc (18)

Round 6-7 :

(2 rounds) sc in all 18 st (18)

Round 8 :

(sc, dec) x 6 (12)

Round 9 :

6 dec (6)

Info :

Fasten off leaving a tail long and cut the yarn. Using a tapestry needle, weave the yarn tail through the front loops of the six stitches and pull tight to close. Weave in the yarn end.

Info :

Use the beige starting yarn tail to sew the gap on the neck closed. Before you make the last stitch, make sure the toy is stuffed tightly and evenly, with no palpable lumps and holes inside.

β€” Leg (make 4) :

Round 1 :

Start in teal blue. 6 sc in a MR (6)

Round 2 :

BLO, sc in all 6 st (6)

Round 3 :

sc in all 6 st (6)

Info :

Change to beige yarn. Cut the teal blue yarn.

Round 4 :

inc, 5 sc (7)

Round 5-6 :

(2 rounds) sc in all 7 st (7)

Round 7 :

2 inc, 5 sc (9)

Round 8-9 :

(2 rounds) sc in all 9 st (9)

Info :

Stuff the leg with fiberfill and continue stuffing as you go (don't stuff rounds 1-3).

Round 10 :

4 slst, sc, 3 hdc, sc (9)

Round 11 :

sc, 2 inc, 6 sc (11)

Round 12-13 :

(2 rounds) sc in all 11 st (11)

Round 14 :

3 sc, inc, 7 sc (12)

Round 15-16 :

(2 rounds) sc in all 12 st (12)

Info :

Slst in next st. Fasten off, leaving a long tail for sewing. Sew the legs on the bottom part of the body. Front legs between rounds 5 and 12 an interspace of approx. 2 stitches from below, back legs between rounds 21 and 27 an interspace of approx. 2 stitches from each other.

β€” Antler (make 2) :

Info :

The antler consists of two parts that will be sewn together.

Part 1 (P1) :

In teal blue. 1: 6 sc in a MR (6). 2: (sc, inc) x 3 (9). 3-4: (2 rounds) sc in all 9 st (9). Stuff the horn up to this point with fiberfill. The next rounds don't need to be stuffed. 5: 7 sc, dec (8). 6-7: (2 rounds) sc in all 8 st (8). 8: 6 sc, dec (7). 9-10: (2 rounds) sc in all 7 st (7). 11: 5 sc, dec (6). 12-13: (2 rounds) sc in all 6 st (6). 14: 4 sc, dec (5). Slst in next st. Fasten off, leaving a long tail for sewing. Insert a piece of wire.

Part 2 (P2) :

In teal blue. 1: 6 sc in a MR (6). 2-3: (2 rounds) sc in all 6 st (6). Slst in next st. Fasten off, leaving a long tail for sewing. The part 2 doesn't need to be stuffed. Sew the part 2 to the part 1 between rounds 4 and 7 of the part 1. Sew the antlers at the top of the head between rounds 8 and 11 an interspace of approx. 1 stitch from each other.

β€” Ear (make 2) :

Round 1 :

Ch 6 in beige. Start in second ch from hook, slst, 2 sc, hdc, 4 hdc in next st, continue on the other side of the foundation chain, hdc, 2 sc, slst (12)

Info :

Fasten off, leaving a long tail for sewing. Sew the ears to the head under the antlers, before sewing, make a couple of stitches on the ear.

β€” Tail :

Round 1 :

In beige. 5 sc in a MR (5)

Round 2 :

inc, 4 sc (6)

Round 3 :

inc, 5 sc (7)

Round 4 :

inc, 6 sc (8)

Info :

Slst in next st. Fasten off, leaving a long tail for sewing. Sew the tail to the back between rounds 28 and 30 of the body.

β€” Scarf :

Info :

The scarf doesn't need to be stuffed. Ch 5 in pink.

Round 1 :

Start in second ch from hook, inc, 2 sc, 4 sc in next st, 2 sc, inc (12)

Round 2-3 :

(2 rounds) sc in all 12 st (12)

Round 4 :

10 sc, dec (11)

Round 5-6 :

(2 rounds) sc in all 11 st (11)

Round 7 :

9 sc, dec (10)

Round 8-9 :

(2 rounds) sc in all 10 st (10)

Round 10 :

8 sc, dec (9)

Round 11-12 :

(2 rounds) sc in all 9 st (9)

Round 13 :

7 sc, dec (8)

Round 14-15 :

(2 rounds) sc in all 8 st (8)

Round 16 :

6 sc, dec (7)

Round 17-18 :

(2 rounds) sc in all 7 st (7)

Round 19 :

5 sc, dec (6)

Round 20 :

sc in all 6 st (6)

Round 21 :

(sc, inc) x 3 (9)

Round 22-23 :

(2 rounds) sc in all 9 st (9)

Round 24 :

(2 sc, inc) x 3 (12)

Round 25-53 :

(23 rounds) sc in all 12 st (12)

Round 54 :

(2 sc, dec) x 3 (9)

Round 55-56 :

(2 rounds) sc in all 9 st (9)

Round 57 :

(sc, dec) x 3 (6)

Round 58 :

sc in all 6 st (6)

Round 59 :

5 sc, inc (7)

Round 60-61 :

(2 rounds) sc in all 7 st (7)

Round 62 :

6 sc, inc (8)

Round 63-64 :

(2 rounds) sc in all 8 st (8)

Round 65 :

7 sc, inc (9)

Round 66-67 :

(2 rounds) sc in all 9 st (9)

Round 68 :

8 sc, inc (10)

Round 69-70 :

(2 rounds) sc in all 10 st (10)

Round 71 :

9 sc, inc (11)

Round 72-73 :

(2 rounds) sc in all 11 st (11)

Round 74 :

10 sc, inc (12)

Round 75-76 :

(2 rounds) sc in all 12 st (12)

Info :

Flatten the scarf and work the next round through both layers to close.

Round 77 :

sc in all 6 st (6)

Info :

Fasten off and weave in the yarn end. Sew the scarf to the deer's neck using pink yarn.

β€” Finishing Touches :

Info :

Glue eyes or embroider them on the head between the ears an interspace of approx. 1-2 stitches from each other.

Info :

Embroider cheek blushes under the eyes using pink yarn and smile using teal blue yarn.

Info :

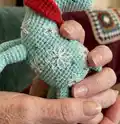
Use scraps of teal blue yarn to embroider flowers or snowflakes on body. A water-soluble marker or sewing pins may come in handy here. You can follow the example in the pictures or decorate the deer to your own taste.

Assembly Instructions

  • Sew the legs on the bottom part of the body: place front legs between rounds 5 and 12 with an interspace of approx. 2 stitches, and place back legs between rounds 21 and 27 with an interspace of approx. 2 stitches from each other.
  • Sew the two antler parts together (part 2 to part 1 between rounds 4 and 7 of part 1), insert the wire into part 1 and attach the finished antlers at the top of the head between rounds 8 and 11 with approx. 1 stitch spacing.
  • Use the beige starting yarn tail at the neck to sew the gap closedβ€”stuff the toy firmly before making the final stitches to ensure an even interior with no palpable lumps.
  • Sew the ears to the head under the antlers, making a couple of securing stitches on each ear before final placement.
  • Sew the tail to the back between rounds 28 and 30 of the body, and sew the scarf to the deer’s neck using pink yarn after flattening and closing the scarf.
  • Use a tapestry/yarn needle to weave in all ends neatly and pin pieces in place before sewing to achieve symmetrical placement.

Important Notes

  • πŸ’‘Most of the pieces are crocheted in spiralβ€”use a stitch marker or contrasting yarn to mark the beginning of each round.
  • πŸ’‘Crochet tightly to avoid stuffing showing through and add stuffing in small portions so it is distributed evenly.
  • πŸ’‘Use pins to hold the pieces in position while assembling and use the artistic side to find positions for eyes, ears, smile and antlers.

Create your own Storm the Deer to gift or displayβ€”each one is a tiny handcrafted treasure full of personality. Personalise with colours, embroidery and beads to make each deer uniquely yours. Enjoy the process and share your makes with pride! 🎁🧢

You ask,

we answer.

FAQs

What size will the finished piece be?

The finished amigurumi measures approximately 20 cm tall with antlers when made with the recommended Gazzal Jeans yarn and hook size.

Can I use different yarn weights for this pattern?

Yes, you can use different yarn weights but the finished size will change; adjust your hook size accordingly and remember that stitch tension will affect shaping.

Do I need prior crochet experience for this pattern?

This pattern is rated intermediate, so basic knowledge of single crochet, increases, decreases and working in the round is recommended for best results.

How long does this project typically take to complete?

Most crocheters finish this project in about 5-7 hours, though this depends on experience, decorations and assembly time.

How should I attach and shape the antlers?

Sew the two antler parts together, insert the wire into the first part, and sew the antlers to the head between rounds 8 and 11 with approx. 1 stitch spacing; use pins to position before stitching.