🧢 Beautiful ✨ Detailed πŸ’ Adorable

Squirtle Amigurumi Pattern

Squirtle Amigurumi Pattern
3.9β˜… Rating
2-3 Hours Time Needed
3.9K Made This
βœ‚οΈ

Beginner Friendly Level

Perfect for those just starting their crochet journey, with clear instructions and simple techniques

⏱️

Bite-Sized Project

Finishes in 2-4 hoursβ€”perfect for an afternoon of creative relaxation.

🧸

Cute Companion

An adorable friend to cherish, handcrafted with love to bring comfort and joy for years to come.

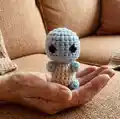
About This Squirtle Amigurumi Pattern

This pattern creates a small Squirtle amigurumi with a separate head, body, shell, arms, legs and tail. You will use worsted weight yarn in blue, beige, white and light brown to recreate Squirtle's classic look. Techniques include single crochet, increases and decreases, and simple assembly instructions for sewing the pieces together.

Squirtle Amigurumi Pattern crochet pattern - detailed view of completed project

The finished toy is compact and great for gifting or display, with clear row-by-row instructions and photos for guidance. Ideal if you want a quick, satisfying amigurumi project that builds basic shaping skills.

Why You'll Love This Squirtle Amigurumi Pattern

I absolutely love this pattern because it captures Squirtle's charm in a tiny, collectible form that is quick to make. I enjoy how the shell and tail details let me practice small shaping techniques without a big time commitment. I love that the pattern is approachable for newer crocheters, yet still satisfying for experienced makers looking for a fast project. Making a set of these with different colors always brings a smile and makes wonderful gifts.

Squirtle Amigurumi Pattern step 1 - construction progress Squirtle Amigurumi Pattern step 2 - assembly progress Squirtle Amigurumi Pattern step 3 - details and accessories Squirtle Amigurumi Pattern step 4 - final assembly and finishing

Switch Things Up

I love customizing this pattern by changing yarn colors to make different turtle characters or whimsical colorways.

I often make a rainbow-shelled version by substituting the light brown and white with bright colors for a fun twist.

To make a larger Squirtle, I use bulky yarn and a larger hook; this changes stitch counts but creates a cuddlier toy.

For tiny keychain versions, I use fingering weight yarn and a 2.0–2.5mm hook for a miniaturized result.

I sometimes embroider a small mouth or cheeks instead of using safety eyes for a softer, child-safe finish.

Adding a bit of wire in the tail makes it poseable, so I can shape the curl and keep it in place.

I like to make matching sets and vary shell colors to create a family of little turtles.

Try using a fuzzy or textured yarn for a plush, cuddly look; it hides small stuffing imperfections nicely.

I also add tiny crocheted accessories like scarves or hats for seasonal variations and gifting ideas.

When gifting, I package the Squirtles together with a small card explaining care and materials used so recipients know how to wash and enjoy them.

Common Mistakes & How to Fix Them

βœ— Placing safety eyes too close together will alter the face proportions; place the eyes 5 stitches apart and 6 stitches down from the top of the head as instructed. βœ— Forgetting to stuff as you go can make final shaping difficult; stuff the head as much as possible before closing and stuff the body before completing the final decreases. βœ— Not leaving a tail when changing colors can make attaching and sewing more awkward; cut the blue yarn leaving a tail when switching to beige so you can sew securely. βœ— Skipping stitch counts on increase/decrease rounds leads to incorrect shaping; count your stitches after each round, especially after INC and DEC rounds to ensure correct totals.

Squirtle Amigurumi Pattern

Make an adorable mini Squirtle amigurumi with this friendly crochet pattern. You will work simple single crochet rounds, increases and decreases to shape the head, body, limbs and tail. The pattern uses worsted weight yarn and a 3.5mm hook for a compact, huggable result. Perfect for gift-making or adding to your Pokemon collection.

Beginner Friendly 2-3 Hours

Materials Needed for Squirtle Amigurumi Pattern

β€” Main Fabric

  • 01
    Worsted weight yarn (#4) - Blue (main head & limbs) - small amount (approx 20-30g)
  • 02
    Worsted weight yarn (#4) - Beige (body) - small amount (approx 20-30g)
  • 03
    Worsted weight yarn (#4) - White (shell trim) - small amount (approx 5-10g)
  • 04
    Worsted weight yarn (#4) - Light Brown (shell center) - small amount (approx 5-10g)
  • 05
    Polyfil or another soft stuffing - small amount for head/body/limbs

β€” Tools Required

  • 01
    Crochet hook size 3.5mm
  • 02
    Scissors
  • 03
    Tapestry needle (yarn needle)
  • 04
    1 pair 10mm safety eyes
  • 05
    Polyester stuffing (Polyfil)

Progress Tracker

0% Complete

β€” Head :

Row 1 :

CH 2, SC 8 in first stitch. (8 stitches)

Info :

Alternatively, SC 8 into a magic circle

Row 2 :

INC x 8 (16 stitches)

Row 3 :

*SC, INC* x 8 (24 stitches)

Row 4-6 :

SC x 24 (24 stitches)

Row 7 :

*SC x 7*, INC, *SC x 8*, INC, *SC x 7* (26 stitches)

Info :

Place eyes 5 stitches apart, and 6 stitches down from the top of the head, between the two increases.

Row 8 :

SC x 26 (26 stitches)

Row 9 :

*SC x 2*, *DEC x 11*, *SC x 2* (15 stitches)

Info :

Stuff the head as much as possible

Row 10 :

SC, *DEC x 6*, *SC x 2* (9 stitches)

Info :

Finish stuffing the head

β€” Body :

Info :

Cut the blue yarn, leaving a tail, but don't fasten off, and switch to the beige yarn. Stuff any extra yarn into the head.

Row 1 :

INC x 9 (18 stitches)

Row 2-6 :

SC x 18 (18 stitches)

Row 7 to close :

DEC to close, FO.

Info :

Stuff the body before you complete the DEC.

β€” Shell :

Info :

With light brown

Row 1 :

CH 2, SC 7 in first stitch. (7 stitches)

Info :

Alternatively, SC 7 into a magic circle

Row 2 :

INC x 7 (14 stitches)

Row 3 :

*SC x 3, INC x 4* x 2 (22 stitches)

Info :

With white

Row 4 :

SC x 22 (22 stitches)

Info :

FO with SlSt.

Info :

Sew shell onto body. (As pictured)

β€” Arms :

Row 1 :

CH 2, SC 6 into first stitch. (6 stitches)

Info :

Alternatively, make a magic circle and SC 6 into it.

Row 2 :

SC x 6 (6 stitches)

Info :

FO with SlSt

Info :

Sew on arms using the tapestry needle (use picture for guidance.)

β€” Legs :

Row 1 :

CH 2, SC 7 into first stitch. (7 stitches)

Info :

Alternatively, make a magic circle and SC 7 into it.

Row 2 :

SC x 7 (7 stitches)

Info :

FO with SlSt

Info :

Sew on legs using the tapestry needle (use picture for guidance.)

β€” Tail :

Row 1 :

CH 2, SC 10 in first stitch. (10 stitches)

Info :

Alternatively, SC 10 into a magic circle

Row 2 :

*SC x 2*, INC, *SC x 4*, INC, *SC x 2* (12 stitches)

Row 3-7 :

SC x 12 (12 stitches)

Row 8 :

*SC x 2*, DEC, *SC x 4*, DEC, *SC x 2* (10 stitches)

Row 9 :

SC x 10 (10 stitches)

Row 10 :

*SC x 4*, DEC, *SC x 4* (9 stitches)

Row 11 :

SC x 9, FO with a SlSt.

Info :

Using the same shade of blue yarn, fold over the top (row 1) and sew to fasten, creating the curl. Sew the tail to the base of the shell.

Info :

Weave in any remaining loose ends, and trim off.

Assembly Instructions

  • Place safety eyes between Row 7 and Row 8 of the head, 5 stitches apart and 6 stitches down from the top of the head before continuing to Row 8.
  • Sew the head to the top of the body securely using the yarn tail left when switching colors, finishing the final decrease on the body for a neat join.
  • Sew shell onto the back of the body as pictured, matching the shell center to the body center and stitching around the edge securely.
  • Position and sew arms on either side of the body using the tapestry needle, referring to photos for correct placement and angle.
  • Sew legs to the bottom of the body spaced evenly for stability, and attach the curled tail to the base of the shell.
  • Fold over the top row of the tail to create the curl and stitch in place, then sew the tail to the shell base and weave in all loose ends.

Important Notes

  • πŸ’‘Cut the blue yarn leaving a tail when switching to the beige body so you can sew the head and body together securely.
  • πŸ’‘Place safety eyes before closing the head fully; eyes should be 5 stitches apart and 6 stitches down from the top.
  • πŸ’‘Stuff the head and body prior to completing final decrease rounds to achieve smooth, consistent shaping.

This cute Squirtle amigurumi is a pocket-sized Pokemon you can finish in an afternoon. It combines simple shaping and small piece assembly for a satisfying crochet experience. Perfect for gifting, collecting, or displaying on your shelf. 🧢🐒

You ask,

we answer.

FAQs

What size will the finished piece be?

The finished amigurumi measures approximately 8-12 cm tall when using worsted weight yarn and a 3.5mm hook; exact size depends on tension and stuffing.

Can I use different yarn weights for this pattern?

Yes, you can use different yarn weights, but this will affect the final size and stitch counts; adjust hook size accordingly and expect a larger or smaller result.

Do I need prior crochet experience for this pattern?

This pattern is rated Beginner Friendly, so basic knowledge of single crochet, increases and decreases is recommended for best results.

How long does this project typically take to complete?

Most crocheters complete this project in 2-3 hours, though time may vary based on experience level, customization and assembly pace.