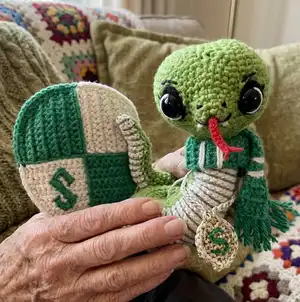
Crochet your own charming Snake Slythie, a small amigurumi mascot with a striped jacquard body, embroidered house crest and a tiny locket. This pattern guides you step-by-step through shaping the head, muzzle, jacquard body, and all decorative extras so you can create a polished collectible. With clear photos and detailed instructions, you will enjoy making a unique, poseable plush with personality.
Progress Tracker
0% Complete
— Muzzle :
Round 1 :
5 loops, turning, 4sc (starting from the 2nd loop from the hook), 4sc (from the back of the chain) (8l)
Round 2 :
only through back loops [sc, inc]x4 (12l)
Round 3 :
12sc, sl st in the 1st sc (12l)
Info :
Cut and fix the thread. Mark with a pin the place where the muzzle connect to the head - move the pin to the 2nd loop from the beginning of the round (see photos 1).
— Head and Body :
Info :
The top of the head is crochet in two identical details. Crochet the first detail as follows below:
Round 1 :
Yarn A: 7 loops, turning, 6sc (starting from the 2nd loop from the hook), 6sc (from the back of the chain) (12l)
Round 2 :
[sc, inc]x6 (18l)
Round 3 :
[2sc, inc]x6 (24l)
Info :
Cut and fix the thread. Mark with a pin the place where the first detail connect to the second one - move the pin to the 7th loop from the beginning of the round count anticlockwise (see photos 2). Crochet the second detail according to the same scheme, do not cut the thread.
Info :
To connect the details insert the hook initially into the first detail (from the inside to the outside), and then into the second detail (from the outside to the inside) (see photos 3-5).
Round 4 :
(incomplete round): crochet 3sc along the second detail, crochet 6sc of the first detail together with 6sc of the second detail, then crochet 15sc along the second detail (see photo 6)
Round 5 :
crochet around [5sc, inc]x6 (42l) (see photo 7, 8)
Info :
Sew the holes between the details using extra thread (see photo 9).
Round 6 :
[6sc, inc]x6 (48l)
Info :
Connect the head with the muzzle in the next round. To connect the details insert the hook initially into the muzzle (from the inside to the outside), and then into the head (from the outside to the inside) (see photos 10-14).
Round 9 :
(incomplete round): crochet 25sc along the head, crochet 6sc of the head together with 6sc of the muzzle, then crochet 17sc along the head (see photo 15)
Info :
Crochet the floating loop (extra sc) and move the pin (that marking the beginning of the round) to this loop (see photo 16).
Round 10 :
crochet 24sc on the head, crochet 6sc on the muzzle, crochet 18sc on the head (48l) (see photos 17, 18).
Info :
Sew the holes between the muzzle and the head using extra thread (see photos 19).
Round 14 :
9sc, [sc, dec]x6, [dec, sc]x6, 3sc (36l)
— Eyes :
Info :
Cut two "egg"-shapes figures out of black felt. Make x-shaped incisions and insert eyes there (see photos 20, 21). Place safety eyes between the rounds 8 and 9 of the head, the distance between them is approximately 11 stitches, but don't fix yet (see photo 22). Sew black felt to the face with black threads (see photo 23).
Info :
Using yarn needle to do from inner corner to the top the eye «loose stitch» of white threads floss (see photos 24, 25). Separate one thread and fasten with a needle «loose stitch» (see photos 26, 27). Press the eye to the embroidered line and fasten it.
Info :
Divide black threads floss in half and embroider the eyelashes (see photo 28). Make the nostrils with 2 "French knots" (see photo 29).
Info :
Embroider the mouth (see photos 30-32). Sew two white beads under the mouth to make the teeth (see photo 33).
Info :
Crochet two brow ridges with 6 loops each using extra thread of Yarn A. Sew the brow ridges to the head and embroider the brows with black threads mouline (divide the threads in half, see photos 34, 35).
— Tongue :
Info :
TOUNGE (Red threads mouline) Crochet tongue with 1,5 mm hook.
Round 1 :
9 loops, turning, 8 sl st (starting from the 2nd loop from the hook) (8l)
Info :
Make a knot and cut the threads leaving small ends. Fix the ends of the threads with super glue (see photos 36, 37). Sew the tongue to the mouth (see photos 38, 39).
Info :
Start stuffing the head with synthepus and continue crocheting.
Round 15 :
9sc, [dec]x12, 3sc (24l)
Info :
Cut a piece of decorative wire approximately 25 cm (9.8 inches). Twist the end of the wire into the ring (the diameter is equal to the head opening, see photo 40) with the help of round nose pliers. Wrap the place of twisting with electrical tape (see photo 41). Insert the wire ring to the head opening.
Info :
Crochet and fix the wire on six points to the head – every 4th sc, crocheting the next round (see photos 42-45).
Round 17 :
9sc, [sc, dec]x2, [dec, sc]x2, 3sc (20l)
Info :
Completely fill the head and start crochet the body.
Info :
Next, you need to crochet the body of yarn A and yarn B at once, alternately change the thread, but not cutting it to get a grey breast. This technique is called jacquard.
Info :
Color changing technique: when crocheting the last green sc, insert the hook into the loop, pull out the thread, crochet this sc to the end with a grey thread (see photo 46). Then the green thread is thrown forward, and the grey working thread goes backwards (see photos 47-49). To change the color back: when crocheting the last grey sc, insert the hook into the loop, pull out the thread, crochet this sc to the end with the green thread (see photos 50, 51).
Info :
It is more convenient to crochet with the jacquard only the front of the body, and the back should only be crocheted from yarn A.
Info :
At the end of the row, when crocheting the last green sc, insert the hook into the loop, pull out the thread, crochet this sc to the end with a grey thread grabbing it in the place where it remained (see photos 52-54). A «loose stitch» is formed on the wrong side (see photo 55). You need to move it forward along with the green thread, so when crocheting jacquard it will be inside and the wrong side will become as neat as the front one (see photos 56-60).
Round 18 :
only through back loops 10sc (Yarn A); 8sc (Yarn B); 2sc (Yarn A) (20l)
Info :
It's neccessery to stuff the body slightly with synthepus while crocheting.
Round 19-23 :
10sc (Yarn A); 8sc (Yarn B); 2sc (Yarn A) (20l)
Round 24 :
7sc, inc, 2sc (Yarn A); 7sc, inc (Yarn B); 2sc (Yarn A) (22l)
Round 25-27 :
11sc (Yarn A); 9sc (Yarn B); 2sc (Yarn A) (22l)
Round 28 :
8sc, inc, 2sc (Yarn A); 8sc, inc (Yarn B); 2sc (Yarn A) (24l)
Round 29-36 :
12sc (Yarn A); 10sc (Yarn B); 2sc (Yarn A) (24l)
Round 37 :
12sc (Yarn A); 9sc, inc (Yarn B); dec (Yarn A) (24l)
Round 38-43 :
12sc (Yarn A); 11sc (Yarn B); sc (Yarn A) (24l)
Round 44-75 :
12sc (Yarn A); 12sc (Yarn B) (24l)
Round 76 :
dec, 10sc (Yarn A); dec, 10sc (Yarn B) (22l)
Round 77-78 :
11sc (Yarn A); 11sc (Yarn B) (22l)
Round 79 :
dec, 9sc (Yarn A); dec, 9sc (Yarn B) (20l)
Round 80-81 :
10sc (Yarn A); 10sc (Yarn B) (20l)
Round 82 :
dec, 8sc (Yarn A); dec, 8sc (Yarn B) (18l)
Round 83-84 :
9sc (Yarn A); 9sc (Yarn B) (18l)
Round 85 :
dec, 7sc (Yarn A); dec, 7sc (Yarn B) (16l)
Round 86-87 :
8sc (Yarn A); 8sc (Yarn B) (16l)
Round 88 :
dec, 6sc (Yarn A); dec, 6sc (Yarn B) (14l)
Round 89-90 :
7sc (Yarn A); 7sc (Yarn B) (14l)
Round 91 :
dec, 5sc (Yarn A); dec, 5sc (Yarn B) (12l)
Round 92-93 :
6sc (Yarn A); 6sc (Yarn B) (12l)
Info :
Stop stuffing the body and continue crocheting.
Round 94 :
dec, 4sc (Yarn A); dec, 4sc (Yarn B) (10l)
Round 95-96 :
5sc (Yarn A); 5sc (Yarn B) (10l)
Round 97 :
dec, 3sc (Yarn A); dec, 3sc (Yarn B) (8l)
Round 98-99 :
4sc (Yarn A); 4sc (Yarn B) (8l)
Info :
Cut off excess wire. Twist the end of the wire into a loop and wrap it with electrical tape (see photo 61, 62).
Round 100 :
dec, 2sc (Yarn A); dec, 2sc (Yarn B) (6l)
Info :
Trim the thread. Pass the thread through all the loops using a yarn needle. Tighten and secure (see photo 63).
Info :
Embroider the lines on the breast with black threads (see photos 64-66). Congratulations, you did a great job and created a small miracle! Embrace your snake (see photos 67-69)!
— Bonus Locket :
Info :
Crochet the locket with 1,5 mm hook. The locket is crocheted in two identical details. Crochet the first detail as follows below (Golden metalized threads mouline):
Round 1 :
3 loops, turning, 2sc (2l)
Round 2 :
1 loop, turning, [inc]x2 (4l)
Round 3 :
1 loop, turning, inc, 2sc, inc (6l)
Round 4-6 :
1 loop, turning, 6sc (6l)
Round 7 :
1 loop, turning, dec, 2sc, dec (4l)
Round 8 :
1 loop, turning, [dec]x2 (2l)
Round 9 :
1 loop, turning, 2sc (2l)
Info :
Cut and fix the thread. Embroider the letter "S" using green threads floss (or divide Yarn C thread in half, see photos 70-75).
Info :
Crochet the second detail with silver metalized threads mouline according to the same scheme, do not cut the thread. Press the first detail to the second one with the wrong side. Crochet the details around anticlockwise. First, insert the hook into the first detail, and then into the second one, so that the crocheting is turned on the front side (see photos 76-80).
Round 10 :
8sc down, 2sc straight, 8sc up, 2sc straight, sl st in 1st sc (20l)
Info :
Crochet the chain of 20 loops (see photo 81). Cut and fix the thread. Join thread to the other side and crochet the second chain of 20 loops (see photos 82-84).
— House Crest :
Info :
Crochet the house crest with 1,75 mm hook along rows. Use video help to crochet 10, 21, 22 and 37 rows.
Round 1 :
Yarn B 1: 10 loops, turning, 9sc (9l)
Round 2 :
1 loop, turning, 9sc (9l)
Round 3 :
1 loop, turning, 8sc, inc (10l)
Round 4 :
1 loop, turning, 10sc (10l)
Round 5 :
1 loop, turning, 9sc, inc (11l)
Round 6 :
1 loop, turning, 11sc (11l)
Round 7 :
1 loop, turning, 10sc, inc (12l)
Round 8-9 :
1 loop, turning, 12sc (12l) Change the thread to Yarn C.
Round 10 :
1 loop, turning, 12sc (Yarn B + Yarn C) (12l)
Info :
Next crochet with Yarn C only, but don't cut Yarn B!
Round 11-14 :
1 loop, turning, 12sc (12l)
Round 15 :
1 loop, turning, 10sc, dec (11l)
Round 16 :
1 loop, turning, 11sc (11l)
Round 17 :
1 loop, turning, 9sc, dec (10l)
Round 18 :
1 loop, turning, 10sc (10l)
Round 19 :
1 loop, turning, 8sc, dec (9l)
Round 20 :
1 loop, turning, 9 sl st (9l)
Info :
Take another end of the yarn B ball and change the thread. In the next row turn the direction as shown on photo 88 and crochet part of the sc in this way - half of the sc with green thread, and the other half with grey (Yarn C + Yarn B) and then vice versa (see photo 89).
Round 21 :
10sc (Yarn C + Yarn B), 10 sc (Yarn B + Yarn C) (20l) Cut the Yarn B.
Round 22 :
1 loop, turning, 10sc (Yarn C), 10sc (Yarn B)* (20l)
Info :
* grab the thread that you leave in the row 10.
Round 23 :
1 loop, turning, 10sc (Yarn B), 10sc (Yarn C) (20l)
Round 24 :
1 loop, turning, 10sc (Yarn C), 10sc (Yarn B) (20l)
Round 25 :
1 loop, turning, 10sc (Yarn B), 10sc (Yarn C) (20l)
Round 26 :
1 loop, turning, 10sc (Yarn C), 10sc (Yarn B) (20l)
Round 27 :
1 loop, turning, 10sc (Yarn B), 10sc (Yarn C) (20l)
Round 28 :
1 loop, turning, dec, 8sc (Yarn C), 8sc, dec (Yarn B) (18l)
Round 29 :
1 loop, turning, dec, 7sc (Yarn B), 7sc, dec (Yarn C) (16l)
Round 30 :
1 loop, turning, dec, 6sc (Yarn C), 6sc, dec (Yarn B) (14l)
Round 31 :
1 loop, turning, dec, 5sc (Yarn B), 5sc, dec (Yarn C) (12l)
Round 32 :
1 loop, turning, dec, 4sc (Yarn C), 4sc, dec (Yarn B) (10l)
Round 33 :
1 loop, turning, dec, 3sc (Yarn B), 3sc, dec (Yarn C) (8l)
Round 34 :
1 loop, turning, dec, 2sc (Yarn C), 2sc, dec (Yarn B) (6l)
Round 35 :
1 loop, turning, dec, sc (Yarn B), sc, dec (Yarn C) (4l)
Round 36 :
1 loop, turning, dec (Yarn C), dec (Yarn B) (2l) (see photo 90)
Round 37 :
1 loop, turning, dec. Next crochet the detail around the perimeter in a counter-clockwise direction from the point "Start" using jacquard technique for changing color (see photos 91, 92) - 16sc (Yarn C), 19sc (Yarn B), 19sc (Yarn C), 16sc, sl st in the 1st dec (Yarn B) (71l)
Info :
Embroider the lines with Yarn C and fix it with 1 thread of green thread floss to hide the "stages" (see photos 93-96).
Info :
On the left is a picture that I used to embroider the letter on the house crest. Add brightness on the screen to maximum, enlarge or reduce the picture so that the size of the letter will be approx. 2.5 cm (1 inch) high. Attach a water soluble cross stitch canvas on it and circle the picture with a pencil (see photos 97, 98).
Info :
Fix the canvas to the left lower side of the house crest with the needle for cutting (see photo 99). Divide Yarn C in half (or use 2 threads of green thread floss) and embroider the outline of the letter using the seam "backstitch" (see photo 100). Then embroider the inside of the letter with fill stitches (see photo 101-103).
Info :
Rinse the embroidery under running water and gently peel off the canvas with your fingers (see photos 104-105). Steam the house crest with an iron. Cut approx. 20 cm (7,8 inches) of Yarn C and join it to the house crest with the hook from both sides (see photos 106-108).
— Scarf :
Info :
SCARF (Yarn C) Crochet the scarf with 1,75 mm hook along rows.
Round 1 :
5 loops, turning, 4sc (4l)
Round 2-62 :
1 loop, turning, 4sc (4l) See photo 109. Cut 8 strands of Yarn C 6 cm (2.4 inches) long for the fringe.
Info :
Fix the threads with a hook at both edges of the scarf and trim the fringe with scissors to the same length (see photo 110-114).
This delightful Snake Slythie pattern brings a tiny Slytherin-inspired mascot to life with adorable details and a striped jacquard breast. The little locket and embroidered crest make this an extra special keepsake you can proudly gift or display. Enjoy making every stitched detail and watching your plush personality come together. 🧶🐍