🧢 Beautiful ✨ Detailed πŸ’ Adorable

Smurf Amigurumi Pattern

Smurf Amigurumi Pattern
4.3β˜… Rating
2-3 Hours Time Needed
3.8K Made This
βœ‚οΈ

Intermediate Level

Ideal for those with basic crochet experience, featuring slightly more advanced stitches and techniques to expand your skills.

⏱️

Bite-Sized Project

Finishes in 2-4 hoursβ€”perfect for an afternoon of creative relaxation.

🧸

Cute Companion

An adorable friend to cherish, handcrafted with love to bring comfort and joy for years to come.

About This Smurf Amigurumi Pattern

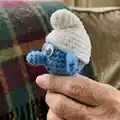
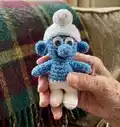
This pattern creates a small Smurf amigurumi approximately 10cm high using light blue and white acrylic yarn. You will crochet the head, body, arms, legs, ears, nose and hat in round-by-round instructions. The design uses basic amigurumi shaping techniques and small hook sizes for tight stitches.

Smurf Amigurumi Pattern crochet pattern - detailed view of completed project

Includes a full materials list, abbreviations and step-by-step assembly instructions. Perfect for making a handmade gift or collecting tiny crochet characters.

Why You'll Love This Smurf Amigurumi Pattern

I absolutely love this pattern because it captures the classic Smurf look in a tiny, collectible size that works up quickly. I enjoy the simple shaping that still gives a lot of character with minimal pieces to sew. The small hat and nose details are fun to make and let you practice short shaping techniques. Making this pattern always makes me smileβ€”it is satisfying to see the little Smurf come together with just a few rounds.

Smurf Amigurumi Pattern step 1 - construction progress Smurf Amigurumi Pattern step 2 - assembly progress Smurf Amigurumi Pattern step 3 - details and accessories Smurf Amigurumi Pattern step 4 - final assembly and finishing

Switch Things Up

I love experimenting with colors on this pattern; you can switch the hat and pants to pastel shades for a softer look or use bright colors for a playful twist.

I often change yarn weight and hook size to make different sizes β€” use a bulkier yarn and larger hook for a chunky version, or finer yarn for a miniature keychain version.

I like to replace plastic eyes with embroidered eyes for a safer toy suitable for babies, and it gives a softer, handmade look.

Try embroidering a small smile or using contrasting yarn for mouth details to change the Smurf's expression and personality.

For a set, I make families by varying hat and pants colors to create unique characters β€” it's a fun way to personalize gifts.

Adding a tiny scarf, backpack, or crochet prop can instantly change the scene and make the Smurf more characterful and decorative.

If you want posable limbs, consider inserting a thin wire armature inside the arms before stuffing to allow gentle posing.

I sometimes add texture to the hat by using back loop only stitches or switching to a fuzzy yarn to create a cosy effect.

To make the sewing cleaner, I pin all parts in place and baste them with loose stitches first, then whipstitch securely once I’m happy with placement.

I recommend trying different eye sizes and placements on a scrap head to experiment with facial expressions before committing to the final face.

Common Mistakes & How to Fix Them

βœ— Skipping the magic ring or starting chain can leave a hole at the top; always start with a proper magic ring and tighten it securely. βœ— Not counting stitches after increases or decreases leads to mismatched shaping; count each round and mark the start with a stitch marker. βœ— Overstuffing limbs will distort the amigurumi shape and make sewing difficult; stuff gradually and keep a firm but moderate filling. βœ— Sewing pieces without pinning can cause uneven placement; pin or baste pieces first and check symmetry before permanently sewing.

Smurf Amigurumi Pattern

Make a tiny, adorable Smurf amigurumi with this clear and friendly crochet pattern. You will work in the round using light blue and white yarn to create a 10 cm tall Smurf complete with hat, nose, ears and tiny feet. The pattern includes full round-by-round instructions, materials and finishing tips so you can sew the pieces together with confidence. Perfect for gifting or adding to your amigurumi collection.

Intermediate 2-3 Hours

Materials Needed for Smurf Amigurumi Pattern

β€” Main Fabric

  • 01
    Wool acrylic 100% Light Blue - small amount (main body)
  • 02
    Wool acrylic 100% White - small amount (hat, pants, feet)
  • 03
    Small amounts of black yarn or embroidery thread for mouth detail

β€” Tools Required

  • 01
    Crochet hook size 2mm
  • 02
    Tapestry needle
  • 03
    Stuffing (polyester fiberfill)
  • 04
    Plastic eyes
  • 05
    Scissors
  • 06
    Glue for eyes (optional)

Progress Tracker

0% Complete

β€” Materials & Notes :

Info :

English version. Wool acrylic 100% Light Blue and White. 2mm hook. Tapestry needle. Stuffing. Plastic eyes. The smurf is about 10cm high.

Infos :

Stitches used: magic ring. chain (ch). single crochet (sc). half double crochet (hdc). double crochet (dc). treble crochet (tr). slip stitch (sl st). 2dctog = work 2 dc together. back loop = insert hook under back loop only.

β€” Head and body :

Info :

Work in circular rows.

Round 1 :

with Light Blue yarn 10sc in magic ring.

Round 2 :

2sc in each st [20sts]

Round 3-9 :

1sc in each st [20sts]

Round 10 :

(2sctog) rep to end [10sts]

Round 11 :

1sc in each st [10sts]

Round 12 :

(1sc, 2sc in next st) rep to end [15sts]

Round 13-14 :

1sc in each st [15sts]

Round 15 :

(2sc, 2sc in next st) rep to end [20sts]

Round 16 :

1sc in each st [20sts]

Round 17-19 :

join White yarn. 1sc in each st [20sts]

Info :

stuff

Info :

Now we work a leg, continues with the white yarn. Counts 10 stitches and join with a chain the last point made with 10Β° stitch.

Round 20 :

3sc, 2sctog, 3sc, 2sctog + chain initially made [9sts]

Round 21 :

2sctog working in the chain and in the first sc [8sts]

Round 22 :

1sc in each st [8sts]

Info :

Now we will work a foot, continues with the white yarn

Round 23 :

2hdc in next st, 1dc and 1tr in next st, 2tr in next st, 1tr and 1dc in next st, 2hdc in next st, 1sc in next 3st [13st]

Round 24 :

1sc in each st [13sts]

Round 25 :

work sl st for all the way around in back loop [13sts]

Info :

Fill with stuffing, sew the two ends and cut the thread. Work the other leg and foot in the same way.

β€” Arms :

Round 1 :

with Light Blue yarn 6sc in magic ring.

Round 2 :

1sc in each st [6sts]

Round 3 :

(1sc, 2sctog) rep to end [4sts]

Round 4-6 :

1sc in each st [4sts]

Info :

Fill with stuffing, cut the thread, sew them to the body.

β€” Ears :

Round 1 :

with Light Blue yarn 5sc in magic ring.

Round 2 :

2sc in each st [10sts]

Info :

Cut the thread, sew them to the body.

β€” Nose :

Round 1 :

with Light Blue yarn 6sc in magic ring.

Round 2 :

(1sc, 2sctog) rep to end [4sts]

Round 3 :

1sc in each st [4sts]

Info :

Fill with stuffing, cut the thread, sew it to the center of the head.

β€” Hat :

Round 1 :

with White yarn 10sc in magic ring.

Round 2-9 :

1sc in each st [10sts]

Round 10 :

2sc in each st [20sts]

Round 11 :

(1sc in next 3st, 2sc in next st) rep to end [25sts]

Round 12-14 :

1sc in each st [25sts]

Info :

Fill the top with a bit of stuffing and sew it on the head, glue the eyes and here it is your Smurf :)

Info :

As always you can use my patterns to make and sell your creations, all I ask is that design credit and a link are posted in the description of the item. If you have any questions feel free to contact me. I'd love to see your work, share photos of your creations to page me on Fb Valery Lab. Thanks again for visiting this page, and happy crocheting! Bye bye!

Assembly Instructions

  • Attach the hat to the top of the head after filling the top with a bit of stuffing and sew around securely.
  • Glue or sew the plastic eyes to the front of the head after positioning them symmetrically on the face.
  • Sew the nose to the center of the head and secure it with a few tight stitches so it maintains shape.
  • Sew arms to the sides of the body, positioning them evenly and stuffing lightly before closing.
  • Sew ears to the sides of the head, spacing them evenly and mirroring each other for a balanced look.

Important Notes

  • πŸ’‘Use a 2mm hook and tight tension to achieve the dense fabric needed for small amigurumi details.
  • πŸ’‘Stuff parts gradually and evenly; overstuffing can distort the final shape and make assembly difficult.
  • πŸ’‘Pin pieces in place before sewing to check placement and symmetry, especially eyes and nose.
  • πŸ’‘Weave in and secure ends as you go to make finishing neater and avoid loose threads.

This adorable Smurf amigurumi pattern makes a tiny friend just 10cm tall, perfect for gifts and collectors. 🧢 The clear round-by-round instructions guide you through every small detail, from the hat to the tiny feet. ✨ Have fun creating and sharing your Smurf β€” I can't wait to see your photos! 😊

You ask,

we answer.

FAQs

What size will the finished piece be?

The smurf measures about 10cm high when using the recommended 2mm hook and the specified yarn.

Can I use different yarn weights for this pattern?

Yes, but changing yarn weight and hook size will change the finished size and may require adjusting stitch counts.

Do I need prior crochet experience for this pattern?

This pattern is rated intermediate; basic experience with amigurumi techniques, magic ring, increases and decreases is recommended.

How long does this project typically take to complete?

Most crocheters finish this small amigurumi in about 2-3 hours, though time varies with experience and finishing details.