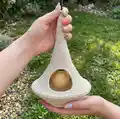
About This Rustic Lamp Pattern
This pattern guides you to crochet a rustic pendant lamp using the rope stitch for a textured, airy look. It combines simple crochet repeats with careful finishing around metal rings to create the lamp profile. The design is versatile and looks great in neutral tones or customized colors to match your decor.

Includes a rope stitch diagram, round-by-round instructions and assembly notes for electrical parts. Best paired with Katia Capri yarn and the two metal rings to achieve the shown shape.
Why You'll Love This Rustic Lamp Pattern
I absolutely love this pattern because it turns basic stitches into a sculptural, elegant lamp that feels handmade and high-end. I enjoy how the rope stitch creates subtle texture and light diffusion when a bulb is placed inside. The process of working around the metal rings gives a satisfying structure to the piece and a clear finishing point. It is a joyful mix of crochet and simple hardware work that results in a beautiful, functional object I am proud to display in my home.
Switch Things Up
I love changing the color palette to suit different rooms; try warm neutrals for a cozy feel or deep blues and greens for a moody, modern look.
I often make a mini version using thinner yarn and a smaller ring to create matching pendant clusters for over a dining table.
For a bolder texture, I switch to a bulkier yarn and a larger hook to give the lamp a chunkier, softer silhouette that diffuses light differently.
I sometimes add a lining of thin fabric or parchment inside the lamp to soften the light and hide the bulb more completely.
I recommend trying different bulb types and brightness levels; an LED 600 lumen E27 gives a warm glow while remaining energy efficient.
I like to embellish the edge with a small crocheted trim or fringe to change the style from modern to boho chic.
Another idea is to replace the metal rings with wooden hoops for a natural contrast, which looks great with rustic or coastal decor.
I also experiment with dyeing the finished lamp for an ombre effect; dye the yarn before stitching for the cleanest look.
I sometimes add decorative beads or tiny shells woven into the stitches for a coastal or artisanal vibe.
For safety and longevity, I consider coating the inside lightly with a fire-retardant or fabric stiffener if the lamp will be used daily and exposed to heat from the bulb.
Common Mistakes & How to Fix Them
✗ Skipping the test swatch and not testing hook size; adjust your hook to match the rope stitch tension so the lamp keeps its shape and fits the metal rings.
✗ Joining rounds inconsistently leading to visible seams; always end each round with 1 sl st in the first stitch of that round to maintain an even edge.
✗ Not weaving in ends immediately which makes them hard to reach later; weave ends with the wool needle as soon as you finish so they remain hidden inside the narrow part.
✗ Pulling the yarn too tight when working around metal rings which distorts shape; gently pull the yarn through and maintain even tension while crocheting over the ring.
✗ Forgetting to check electrical clearances and fitting placement; plan the cord and bulb height early and leave access to the fitting so you can insert and secure the wiring safely.