🧢 Beautiful ✨ Detailed πŸ’ Adorable

Round Bag with T-Shirt Yarn Pattern

Round Bag with T-Shirt Yarn Pattern
4.6β˜… Rating
2-4 Hours Time Needed
2.1K Made This
βœ‚οΈ

Beginner Friendly Level

Perfect for those just starting their crochet journey, with clear instructions and simple techniques

⏱️

Bite-Sized Project

Finishes in 2-4 hoursβ€”perfect for an afternoon of creative relaxation.

✨

Stylish Touch

An elegant detail to elevate any look, combining traditional techniques with contemporary design sensibilities.

About This Round Bag with T-Shirt Yarn Pattern

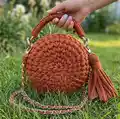
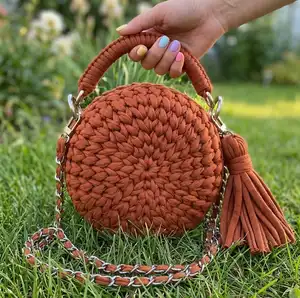
This pattern teaches you how to crochet a round bag using t-shirt yarn (7-9 mm) and a 6 mm hook, including the base, sides, finishing, and a decorative tassel. It includes full round-by-round instructions, helpful tips for working with bulky yarn, and a link to a detailed video tutorial. The finished bag has a chain strap and snap hardware for a polished, wear-ready look.

Round Bag with T-Shirt Yarn Pattern crochet pattern - detailed view of completed project

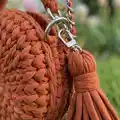
Designed for beginners, the pattern uses single crochet and simple increases to shape the circle and sides. Detailed assembly steps explain how to join the two parts, attach hardware, and make the tassel.

Why You'll Love This Round Bag with T-Shirt Yarn Pattern

I absolutely love this pattern because it transforms basic t-shirt yarn into a chic, wearable accessory with minimal supplies. I enjoy how quickly the circle grows with bulky yarn, letting you see progress fast and stay motivated. The assembly and hardware details give the bag a professional look without complicated sewing. I also love that you can customize the strap, tassel, and color to match your style, making each bag truly unique. This project brings me joy because it is practical, fast, and endlessly adaptable.

Round Bag with T-Shirt Yarn Pattern step 1 - construction progress Round Bag with T-Shirt Yarn Pattern step 2 - assembly progress Round Bag with T-Shirt Yarn Pattern step 3 - details and accessories Round Bag with T-Shirt Yarn Pattern step 4 - final assembly and finishing

Switch Things Up

I love recommending color changes for this pattern: try a two-tone base and top trim for a modern contrast, or use a variegated t-shirt yarn for texture and depth.

You can make the bag larger or smaller by changing your yarn weight and hook size; using bulkier yarn and a larger hook creates a chunkier, oversized bag, while thinner yarn gives a smaller, delicate purse.

I often swap the metal chain for a leather strap or a braided yarn strap to change the look from casual to dressy, which also changes the weight and wearability of the bag.

I sometimes add a fabric lining with an inner zip pocket for extra durability and to protect small items; glue-basting and sewing the lining in place works well for a neat finish.

Try swapping the snap closure for a magnetic clasp or a zipper if you prefer a more secure closure; just adjust the placement and reinforce the area with extra stitching.

I like to embellish my bags with crocheted flowers, appliques, or embroidered initials to personalize gifts β€” these details really elevate a simple design.

If you want a slouchier shape, skip a few side rounds or use less tension while crocheting; for a stiffer bag, add interfacing to the lining or use a denser stitch for the sides.

Experiment with decorative trims: a round of bobble stitches, surface slip stitch accents, or a contrasting edge add character without complicating the pattern.

For an evening version, use metallic or sparkly t-shirt yarn and swap hardware to gold or brass-tone chain to create a special-occasion accessory I love gifting to friends.

Finally, I recommend trying different tassel sizes and styles β€” a compact tassel or a long dramatic one both look wonderful, and changing tassel color can completely change the bag’s vibe.

Common Mistakes & How to Fix Them

βœ— Taking the yarn from the middle of the bobbin can cause tangles and tension problems; always take the thread from the outside to keep the yarn untwisted and easy to work with. βœ— Twisting the t-shirt yarn while crocheting makes loops sit uneven and messy; be careful to let the yarn unwind naturally and check frequently for twists, untwisting as needed. βœ— Pulling the working thread too low when crocheting SC will create holes in the fabric; pull the working thread just above the level of the column and hold the hook at an angle for neat stitches. βœ— Forgetting to hide and secure the starting tail after row 2 leaves a visible hole; pull the end through all stitches of row 1 from the wrong side, tighten, strengthen and cut the thread to hide the hole. βœ— Not steaming the circle through a damp cloth can leave ragged edges and uneven shape; steam the circle with an iron through a damp cloth to flatten and shape the base properly.

Round Bag with T-Shirt Yarn Pattern

Make a stylish round crochet bag using bulky t-shirt yarn and a 6 mm hook. This beginner-friendly pattern gives you step-by-step rounds, assembly instructions, and a video link so you can follow along easily. The finished bag measures about 7-8 inches in diameter and includes a removable tassel and chain strap. Perfect for gifting or a quick handmade accessory.

Beginner Friendly 2-4 Hours

Materials Needed for Round Bag with T-Shirt Yarn Pattern

β€” Main Fabric

  • 01
    T-shirt yarn (7-9 mm width), approximately 131 yards (120 meters) - main color, enough for bag body and tassel

β€” Tools Required

  • 01
    Crochet hook N6 - 6 mm
  • 02
    Chain for strap - 47 inches (120 cm)
  • 03
    Valve with button (snap closure)
  • 04
    2 snap hook-rings
  • 05
    3 snap hooks
  • 06
    Sewing thread
  • 07
    Sewing needle
  • 08
    Needle with large eyelet
  • 09
    Scissors
  • 10
    Iron and damp cloth

Progress Tracker

0% Complete

β€” Materials and tools :

Info :

T-shirt yarn, width 7-9 mm, 131 yard (120 meters), Hook N6 - 6 mm, Set of furniture (chain - 47 inches (120 cm); valve with button; 2 snap hook-rings; 3 snap hooks), Sewing thread, Sewing needle, Needle with large eyelet, Scissors, Iron and damp cloth.

Info :

Finished bag from the specified materials: diameter - 7-8inches (18-20 cm), width - 4 3/8 inches (11 cm).

Info :

Gauge: 9 stitches and 8 row = 4*4 inches (10*10cm).

β€” Abbreviation :

Info :

CH - chain stitch, SlSt - slip stitch, SC - single crochet, Inc - increase (2 SC in 1).

Info :

Link to the video of the process (1 hour): https://youtu.be/ON6u98Vzqp8

Info :

Attention: Take the thread not from the middle of the bobbin, but from the outside. The more yarn you unwind, the easier it will be to crochet. Be careful not to twist the thread. If the thread is turned over to the wrong side, it dos not matter. But if the thread is twisted, all the loops will look messy.

Info :

When crocheting with t-shirt yarn, so that there are no holes in the fabric when crocheting SC, we pull the working thread just above the level of the column. We hold the hook not perpendicularly, but under an angle.

β€” Crochet the base(circle) :

Round 1 :

Crochet 2 CH.

Round 1 :

1 row. Crochet 6 SC in the 2nd loop from the hook. In the 1st SC crochet CH like on the video.

Info :

Next, crochet the split single stitch. For that, we need to insert the hook between the legs of each stitch, to split the stitch from the face and from the wrong side.

Round 2 :

2 row. 1 Inc*6= 12, CH.

Info :

After crocheting 2nd row, the hole will be formed in the middle. The end needs to be hidden and thus the hole will be removed.

Info :

Pull the end through all the stitches of the 1st row from the wrong side. Tighten, strengthen, hide and cut the end of the thread.

Info :

The hole is gone.

Round 3 :

3 row. (1 SC, 1 Inc)*6 = 18, CH.

Round 4 :

4 row. (2 SC, 1 Inc)*6 = 24, CH.

Round 5 :

5 row. (3 SC, 1 Inc)*6 = 30, CH.

Round 6 :

6 row. (4 SC, 1 Inc)*6 = 36, CH. Don't cut the thread. Steam the circle with an iron through a damp cloth at high setting. T-shirt yarn can withstand high temperatures. But, need to iron through a damp cloth so that the canvas does not shine.

Round 7 :

7 row. 36 SC, CH.

Round 8 :

8 row. 36 SC. Don't cut the thread.

Info :

Pull the loop under 1st SC, pull out on the wrong side under last SC. Crochet the base trim SlSt in the each loops. Cut the end. Pull the end under 1st SlSt, pull back on the wrong side. Strengthen and hide the end.

Info :

Steam the edge with an iron through a damp cloth.

Info :

Similarly, crochet the second part of the bag.

β€” Assembly :

Info :

Join the 2 parts of the bag with the edges. Insert the hook in the loops of the previous row of both parts of the bag. Pull out the loop. Again, insert the hook in the loops of the previous row of both parts of the bag. Pull out the next loop, crochet SlSt. Each time, insert the hook, first in one part, then in the other. Crochet SlSt, leave unconnected 7-8 inches (18-20 cm). Strengthen and hide both ends of the thread on the wrong side.

Info :

Insert the snap hook-rings in the places where the connecting seam ends.

Info :

Sew on the valve. Sew on the top part of the valve. Then, position the lower part of the valve to where it is supposed to be and sew on it.

Info :

Cut off the piece of the yarn 48 inches (122 cm) long. Pass the piece of the yarn through each link of the chain with the needle with large eyelet. Sew in the ends with the sewing needle and the sewing thread with the color of the yarn.

Info :

Fasten the shoulder strap to the snap hook-rings.

β€” Make the tassel :

Info :

Cut off 20-25 pieces of the yarn 13-14 inches (33-35 cm) long. Intercept with a longer piece in the middle. Put a snap hook on the piece of the yarn.

Info :

Wrap the bundle with a long piece several times.

Info :

Tie the ends, hide them under the turns.

Info :

Spread the tassel with hands, cut off the ends exactly. Hang the tassel on any snap hook-ring.

Info :

Congratulations! Your cute bag is readyπŸ‘

Assembly Instructions

  • Join the two crocheted circular parts by inserting the hook into a loop from the previous row of both parts, pull up a loop, then insert into the next loop of the other part and work SlSt; continue alternating parts and leave 7-8 inches (18-20 cm) of the edge unjoined for the opening, then secure and hide ends on the wrong side.
  • Insert snap hook-rings at the seam ends where the strap will attach, making sure they are positioned symmetrically and secure firmly through the rounds.
  • Sew the valve (snap closure) in two parts: first sew on the top decorative piece, position the lower part on the opposite side and sew it in place so the snap aligns correctly.
  • Create the chain strap by cutting a 48 inch (122 cm) yarn piece, passing it through each chain link with the needle with a large eyelet, then sew the yarn ends securely with sewing thread matching the yarn color.
  • Fasten the shoulder strap to the snap hook-rings once the chain and rings are attached, ensuring the hooks are snapped closed and the strap hangs evenly.
  • Make the tassel and attach it to any snap hook-ring as a decorative accent; hide and tidy the wrapping and tie-off ends so the tassel looks neat.

Important Notes

  • πŸ’‘Take the yarn from the outside of the t-shirt yarn bobbin to prevent twist and tangles while crocheting.
  • πŸ’‘When working single crochet with t-shirt yarn, pull the working thread just above the level of the stitch and hold the hook at an angle to avoid holes.
  • πŸ’‘Steam the base and edges through a damp cloth with an iron at high setting to shape and flatten the piece without making the yarn shine.
  • πŸ’‘Hide and secure the starting tail after the second row by pulling it through the first row stitches from the wrong side to remove the center hole.

Thank you for choosing this round t-shirt yarn bag pattern β€” I hope it sparks your creativity and becomes a favorite accessory in your wardrobe. Try different colors, straps, and tassels to make each bag truly yours. Happy crocheting and enjoy every stitch! 🧢✨

You ask,

we answer.

FAQs

What size will the finished piece be?

The finished bag measures approximately 7-8 inches (18-20 cm) in diameter and about 4 3/8 inches (11 cm) wide when using the recommended t-shirt yarn and 6 mm hook.

Can I use a different yarn or hook size?

You can use different yarns and hooks, but changing yarn weight or hook size will affect the final size and drape; make a gauge swatch to adjust rounds and ensure desired dimensions.

Do I need experience with splitting stitches or special techniques?

This beginner-friendly pattern shows how to work a split single stitch and gives visual cues; basic single crochet and increases are sufficient and the included video helps demonstrate the technique.

How long does this project typically take to complete?

Most crocheters finish this project in 2-4 hours, depending on experience and how long assembly and hardware attachment take.

How do I close the center hole after the second row?

Pull the starting end through all stitches of the first row from the wrong side, tighten and strengthen the end, then cut and hide it as instructed to remove the hole.