🧢 Beautiful ✨ Detailed πŸ’ Adorable

Brighten Your Day Crochet Rainbow Stuffie Amigurumi Pattern

Brighten Your Day Crochet Rainbow Stuffie Amigurumi Pattern
4.4β˜… Rating
2-3 Hours Time Needed
3.1K Made This
βœ‚οΈ

Beginner Friendly Level

Perfect for those just starting their crochet journey, with clear instructions and simple techniques

⏱️

Bite-Sized Project

Finishes in 2-4 hoursβ€”perfect for an afternoon of creative relaxation.

🧸

Cute Companion

An adorable friend to cherish, handcrafted with love to bring comfort and joy for years to come.

About This Brighten Your Day Crochet Rainbow Stuffie Amigurumi Pattern

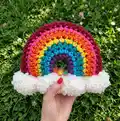
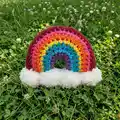
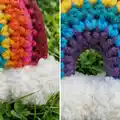
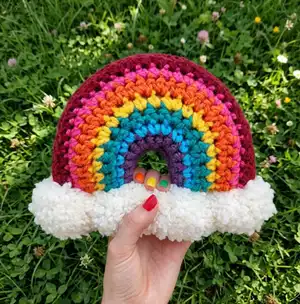
This pattern creates a sweet little rainbow stuffie made from two simply shaped single crochet pieces that are seamed together and stuffed. It features bold stripe colors and a row of fluffy pom-pom clouds along the bottom for a playful finish. The design is worked in chunky yarn so it grows quickly and has a soft, plush feel.

Brighten Your Day Crochet Rainbow Stuffie Amigurumi Pattern crochet pattern - detailed view of completed project

Perfect for beginners who know basic single crochet, it includes clear row-by-row instructions and simple finishing tips. Use the recommended bulky yarn and a 6 mm hook to achieve the correct size and squishy texture.

Why You'll Love This Brighten Your Day Crochet Rainbow Stuffie Amigurumi Pattern

I absolutely love this pattern because it transforms a few basic crochet skills into a charming, tactile object that brings instant joy. Working with chunky yarn makes the piece quick to complete and wonderfully soft to hold. The little pom-pom clouds are my favorite detail β€” they add so much character and playfulness with very little extra work. I enjoy how easily the colors pop together to create a bright, handmade accent for any room.

Brighten Your Day Crochet Rainbow Stuffie Amigurumi Pattern step 1 - construction progress Brighten Your Day Crochet Rainbow Stuffie Amigurumi Pattern step 2 - assembly progress Brighten Your Day Crochet Rainbow Stuffie Amigurumi Pattern step 3 - details and accessories Brighten Your Day Crochet Rainbow Stuffie Amigurumi Pattern step 4 - final assembly and finishing

Switch Things Up

I love how easily this pattern adapts to different colorways; try pastel shades for a soft nursery look or jewel tones for a bold, modern accent.

You can make a tiny keychain version by using fingering weight yarn and a smaller hook to create miniature rainbows.

I sometimes substitute a boucle or textured yarn for the cloud base to create even fluffier pom-poms and a different tactile effect.

Try adding embroidered raindrops beneath the clouds for a whimsical take β€” small French knots work beautifully for this detail.

If you want a sturdier toy, sew in a thin cardboard arc between the front and back before closing to help the rainbow hold its shape.

I often make a set of three in graduated sizes using the same color palette for a charming mobile or shelf display.

For a holiday twist, use sparkly or metallic accent yarn for one stripe to add subtle shimmer and festive cheer.

Consider stuffing with a small amount of lavender sachet inside for a scented decorative piece that doubles as a calming pillow.

To personalize, embroider a small initial or date on the back with contrast thread to make a meaningful gift for a new baby or special occasion.

I also enjoy making coordinating accessories like a tiny star or cloud using leftover yarn to create a mini matching set.

Common Mistakes & How to Fix Them

βœ— Changing color incorrectly can leave strands showing; work to the last 2 loops on the hook, yarn over with the new color and pull through both loops to secure a neat color change. βœ— Overstuffing the Rainbow causes distortion of the arc shape; stuff gradually and shape as you go to maintain the rounded silhouette. βœ— Failing to align stripes when seaming results in mismatched bands; pin the front and back together carefully and match each color stripe before sewing. βœ— Skipping stitch counts after increases creates uneven rows; count stitches at the end of each row, especially after increases and joins, to ensure accuracy. βœ— Using a different hook size without adjusting tension can change the finished size; check gauge of 10 sc and 11 rows = 4" [10 cm] and change hook size if necessary.

Brighten Your Day Crochet Rainbow Stuffie Amigurumi Pattern

Crochet a cheerful rainbow stuffie to brighten your home or give as a handmade gift. This small, squeezable toy is worked in two simple single crochet pieces and finished with fluffy pom-pom clouds for extra charm. The pattern uses bulky yarn and a large hook for quick progress, perfect when you want a satisfying project in a single afternoon.

Beginner Friendly 2-3 Hours

Materials Needed for Brighten Your Day Crochet Rainbow Stuffie Amigurumi Pattern

β€” Main Fabric

  • 01
    Bernat Softee Chunky Yarn #6 Bulky Yarn, 3.5 oz [100 g] / 108 yds [99 m]
  • 02
    Contrast A - Dark Mauve (28323) - 1 ball or 7 yds [7 m]
  • 03
    Contrast B - Ultra Blue (28742) - 1 ball or 4 yds [4 m]
  • 04
    Contrast C - Emerald (28200) - 1 ball or 6 yds [6 m]
  • 05
    Contrast D - Glowing Gold (28607) - 1 ball or 6 yds [6 m]
  • 06
    Contrast E - Pumpkin (28630) - 1 ball or 8 yds [8 m]
  • 07
    Contrast F - Hot Pink (28416) - 1 ball or 9 yds [9 m]
  • 08
    Contrast G - Wine (28532) - 1 ball or 21 yds [20 m]
  • 09
    Contrast H - Natural (28008) - 1 ball or 21 yds [20 m]

β€” Tools Required

  • 01
    US J/10 (6 mm) crochet hook (or size needed to obtain gauge)
  • 02
    Polyester stuffing
  • 03
    Scissors
  • 04
    Yarn needle for sewing
  • 05
    Piece of 2" [5 cm] cardboard for making pom-poms
  • 06
    Stitch markers (optional)

Progress Tracker

0% Complete

β€” Pattern Instructions :

Intro :

A cute little rainbow to brighten your day! This colorful stuffie is worked in two simply shaped single crochet stitch pieces that are seamed together and stuffed before fluffy pom-pom clouds are attached across the bottom.

Note :

To change color, work to last 2 loops on hook, yoh with new color. Pull through 2 loops on hook to complete st and proceed in new color.

β€” Front and Back (make alike) :

Setup :

With A, ch 8.

1st row :

(RS). 1 sc in 2nd ch from hook (counts as ch 1. 1 sc). 1 sc in next ch. 2 sc in next ch. 1 sc in next ch. 2 sc in next ch. 1 sc in each of last 2 ch. Turn. (9 sc).

2nd row :

Ch 1. 1 sc in each of first 2 sc. 2 sc in each of next 5 sc. 1 sc in each of last 2 sc. Join B. Break A. Turn. (14 sc).

3rd row :

With B, ch 1. 1 sc in each sc across. Join C. Break B. Turn.

4th row :

With C, ch 1. 1 sc in each of first 3 sc. 2 sc in next sc. 1 sc in next sc. 2 sc in next sc. 1 sc in each of next 2 sc. 2 sc in next sc. 1 sc in next sc. 2 sc in next sc. 1 sc in each of next 3 sc. Join D. Break C. Turn.

5th row :

With D, ch 1. 1 sc in each of first 5 sc. 2 sc in next sc. 1 sc in next sc. 2 sc in next sc. 1 sc in each of next 2 sc. 2 sc in next sc. 1 sc in next sc. 2 sc in next sc. 1 sc in each of next 5 sc. Join E. Break D. Turn. (22 sc).

6th row :

With E, ch 1. 1 sc in each of first 4 sc. 2 sc in next sc. (1 sc in next sc. 2 sc in next sc) 3 times. (2 sc in next sc. 1 sc in next sc) 4 times. 1 sc in each of last 3 sc. Join F. Break E. Turn. (30 sc).

7th row :

With F, ch 1. 1 sc in each sc across. Join G. Break F. Turn.

8th row :

With G, ch 1. 1 sc in each of first 10 sc. (2 sc in next sc. 1 sc in next sc) twice. 2 sc in each of next 2 sc. (1 sc in next sc. 2 sc in next sc) twice. 1 sc in each of last 10 sc. Turn. (36 sc).

9th row :

Ch 1. 1 sc in each sc across. Fasten off.

β€” Finishing :

Finishing :

With WS facing each other, sew Front and Back tog using appropriate color while aligning stripes and leaving a small opening for stuffing. Stuff stuffie, making sure to maintain Rainbow shape. Sew opening closed.

Note :

To sew the inner arc of Rainbow closed, I used a strand of A and a flat slip stitch join method across. To seam top arc of Rainbow closed, I used a strand of G and flat slip stitch join method across. To sew the bottoms of the Rainbow closed, I used a strand of yarn (any shade) and sewed them together.

Flat Slip Stitch Join Method :

With RS facing, insert hook into back loop only of first stitch on one side of seam and into back loop only of first stitch on other side of seam. With working yarn behind both pieces, pull up a loop through back loops and loop on hook to slip stitch the seams together. Repeat for each set of stitches along seam.

β€” 2" [5 cm] Pom-Poms (make 4) :

Pom-Poms :

Wind yarn around 2" [5 cm] piece of cardboard 40 times. Tie tightly in the middle and leave a long end for attaching to Rainbow. Cut loops at both ends and trim to smooth round shape.

Attach Pom-Poms :

Using long ends, sew 2 pom-poms evenly across each bottom of Rainbow (as shown in photo).

Assembly Instructions

  • With wrong sides facing, align Front and Back pieces so color stripes match and pin in place before seaming.
  • Sew Front and Back together using matching colors, leaving a small opening along the bottom for stuffing.
  • Stuff the Rainbow firmly but evenly, shaping the arc as you go to maintain a rounded rainbow silhouette, then sew the opening closed.
  • Use the flat slip stitch join method with a strand of A to sew the inner arc closed and a strand of G to seam the top arc closed for a tidy finish.
  • Sew the bottom edges together using a strand of yarn (any shade) to close the bottom seam securely.
  • Make 4 pom-poms and use the long yarn tails to sew 2 pom-poms evenly across each bottom of the Rainbow as pictured.

Important Notes

  • πŸ’‘Work color changes to the last two loops on the hook and yarn over with new color to keep transitions tidy.
  • πŸ’‘Use stitch markers or a removable marker at the ends of rows if needed to keep track of row counts and alignments.
  • πŸ’‘Check gauge: 10 sc and 11 rows = 4" [10 cm] to ensure finished dimensions of approximately 7" [18 cm] wide x 6" [15 cm] tall.

This cheerful Rainbow Stuffie is a quick, satisfying make that brightens any space and makes a delightful gift. The fluffy pom-pom clouds add a playful finish and soft texture that children and adults will both adore. Crochet one in different colorways to create a whole family of rainbows for your shelves and gifts. 🧢🌈✨

You ask,

we answer.

FAQs

What size will the finished piece be?

The finished Rainbow measures approximately 7" [18 cm] wide x 6" [15 cm] tall when using the recommended Bernat Softee Chunky yarn and a 6 mm hook.

Can I use different yarn weights for this pattern?

Yes, you can use different yarn weights, but the finished size will change; if using a thicker or thinner yarn, adjust your hook size and check the gauge to achieve the desired dimensions.

Do I need prior crochet experience for this pattern?

This pattern is beginner friendly and uses basic single crochet stitches and simple color changes, so basic crochet knowledge such as chaining and single crochet is recommended.

How long does this project typically take to complete?

Most crocheters finish this small chunky rainbow in 2-3 hours, though time may vary depending on experience and how quickly you make pom-poms and finish assemblies.

How many pom-poms do I need and how are they attached?

Make 4 pom-poms (2 for each rainbow bottom) by winding yarn around a 2" [5 cm] cardboard piece 40 times; tie, trim, and sew them across the bottom using the long tails.