๐Ÿงถ Beautiful โœจ Detailed ๐Ÿ’ Adorable

Rose Turtle Amigurumi Pattern

Rose Turtle Amigurumi Pattern
4.5โ˜… Rating
5-7 Hours Time Needed
2.1K Made This
โœ‚๏ธ

Intermediate Level

Ideal for those with basic crochet experience, featuring slightly more advanced stitches and techniques to expand your skills.

โฑ๏ธ

Weekend Treat

Takes 5-7 hours, making it an enjoyable project to finish over a couple of days.

๐Ÿงธ

Cute Companion

An adorable friend to cherish, handcrafted with love to bring comfort and joy for years to come.

About This Rose Turtle Amigurumi Pattern

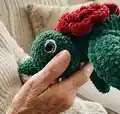
This pattern creates an adorable Rose Turtle amigurumi with a layered rose shell and soft, plush body. Techniques include working in back loops only (BLO) for the shell top and forming petals in the front loops. The pattern uses bulky/velvety yarn for a soft finish and dramatic texture. Clear photos and step notes guide assembly and placement.

Rose Turtle Amigurumi Pattern crochet pattern - detailed view of completed project

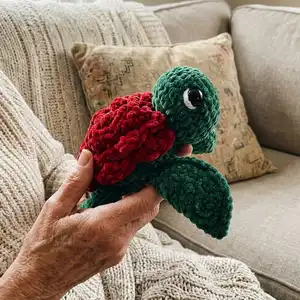
Perfect for crafters who enjoy texture and shaping, the rose petals are worked in a spiral to create a realistic bloom. Detailed instructions cover legs, tail, head, and finishing touches for a polished result.

Why You'll Love This Rose Turtle Amigurumi Pattern

I absolutely love this pattern because the combination of a rose and a turtle is charming and unexpected. I enjoy how the petals are formed in the front loops to create a dimensional bloom that really stands out. Working with velvety bulky yarn makes the finished piece irresistibly soft and tactile โ€” great for displaying or gifting. I also appreciate that the pattern includes clear attachment and finishing instructions so the final assembly feels neat and professional.

Rose Turtle Amigurumi Pattern step 1 - construction progress Rose Turtle Amigurumi Pattern step 2 - assembly progress Rose Turtle Amigurumi Pattern step 3 - details and accessories Rose Turtle Amigurumi Pattern step 4 - final assembly and finishing

Switch Things Up

I love experimenting with different yarns to change the look of the rose โ€” try a shiny or variegated yarn for an eye-catching bloom.

You can make the turtle larger or smaller by changing the yarn weight and corresponding hook size; a lighter yarn with a smaller hook gives a tiny keychain-friendly version.

I often adjust petal spacing or add extra spiral rounds to make fuller or thinner roses depending on the look I want.

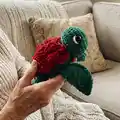
Try different color combinations: a pastel rose with a neutral shell looks soft and modern, while a bright red rose with emerald green is dramatic and bold.

Consider embroidering small details on the shell or adding felt leaves for extra texture and a mixed-media finish.

I sometimes add wire lightly to the legs for a slightly posable display, being careful to encase the wire so it is safe and secure.

If you want a friendlier face, move the eyes closer together or embroider a tiny smile โ€” small changes change the personality a lot.

You can turn the rose into a removable accessory by sewing it onto a small snap or button, making it interchangeable between projects.

Make a set in different sizes and colors to create a family of rose turtles as a charming gift ensemble.

For gifting, I like to attach a small loop behind the head so the turtle can be hung as an ornament or displayed easily.

Common Mistakes & How to Fix Them

โœ— Not using stitch markers when working FLO/BLO can make it hard to identify loop rows; place stitch markers on the first front loop of each row to keep your petals aligned and avoid confusion. โœ— Forgetting to fold the leg circle before stitching can lead to incorrectly shaped legs; fold your completed circle in half and work SC through both sides for correct shaping and symmetry. โœ— Overstuffing the body and head can distort shape and cause seams to pop; stuff gradually and evenly, adding small amounts until you reach the desired firmness. โœ— Missing the color change between the shell and body will hide the petal work and seams; follow the color change instructions exactly and secure ends so petals sit neatly on the shell. โœ— Skipping counting stitches when attaching legs and tail will lead to uneven placement; count and mark body stitches where each piece will be attached before sewing. โœ— Not leaving a long enough tail when finishing the head can make sewing difficult; leave an 8-9 inch tail (or longer) to comfortably sew the head in place without running out of yarn.

Rose Turtle Amigurumi Pattern

Make a charming Rose Turtle amigurumi featuring a plush rose shell and cuddly turtle body. This pattern guides you through petals worked from the front loops and a cozy bulky yarn construction. Perfect for gifting or keeping as a whimsical home accent. You will love the velvety textures and beginner-friendly shaping hints included.

Intermediate 5-7 Hours

Materials Needed for Rose Turtle Amigurumi Pattern

โ€” Main Fabric

  • 01
    Size 5-6 Bulky Yarn (general)
  • 02
    Premier Parfait Chunky (Size 6) - Emerald (used for body, head, legs, tail and green portions)
  • 03
    Premier Parfait Chunky (Size 6) - White (used for small eye detail if desired)
  • 04
    Yarn Bee Velvety Smooth (Size 5) - Red (used for the rose/petals)
  • 05
    Note: Premier Parfait Chunky and Yarn Bee Velvety Smooth are similar in size; consider both size 5 bulky equivalents

โ€” Tools Required

  • 01
    Crochet hook size 4.5mm
  • 02
    Safety eyes 14mm (2 pieces)
  • 03
    Tapestry needle (yarn needle)
  • 04
    Scissors
  • 05
    Poly-Fil stuffing (polyester fiberfill)
  • 06
    Stitch markers (recommended for FLO/BLO marking)

Progress Tracker

0% Complete

โ€” Front Legs :

Info :

Using Emerald (Make 2)

Round 1 :

8SC in MR

Round 2 :

Inc (16)

Round 3 :

SC, Inc (24)

Round 4 :

3SC, Inc (30)

Info :

Fold your circle in half to make a half circle.

Info :

Working around the half circle and through both sides, SC through both stitches. Continue until you reach the end of the half circle. FO, there is no need to leave a tail for sewing, you will SC the legs into a round of the body.

โ€” Back Legs :

Info :

Using Emerald (Make 2)

Round 1 :

8SC in MR

Round 2 :

Inc (16)

Round 3 :

SC, Inc (24)

Info :

Working around the half circle and through both sides, SC through both stitches. Continue until you reach the end of the half circle. FO, there is no need to leave a tail for sewing, you will SC the legs into a round of the body.

โ€” Tail :

Info :

Using Emerald

Round 1 :

6SC in MR

Round 2-4 :

SC (6)

Info :

SS, FO, there is no need to leave a tail for sewing, you will SC the tail piece into a round of the body.

โ€” Head :

Info :

Using Emerald

Round 1 :

8SC in MR

Round 2 :

Inc (16)

Round 3 :

SC, Inc (24)

Round 4 :

3SC, Inc (30)

Round 5-7 :

SC (30)

Round 8 :

3SC, Dec (24)

Round 9 :

SC, Dec (16)

Info :

SS, leave a long tail for sewing. I leave about 8-9 inches to be safe, but I usually have a lot left over.

Info :

Add eyes and stuff the head. I added my eyes at around rows 5-6 and about 9-10 stitches apart.

โ€” Shell/Body :

Info :

The top of the shell is all worked in the BLO (back loops only) of the previous round. The petals are formed in the front unworked loops once the top of the shell is completed.

Info :

Using Red

Round 1 :

8 SC in MR

Round 2 :

Working in BLO: Inc (16)

Round 3 :

Working in BLO: SC, Inc (24)

Round 4 :

Working in BLO: (SC, Inc, SC)*8 (32)

Round 5 :

Working in BLO: 3SC, Inc (40)

Round 6 :

Working in BLO: (5SC, Inc, 2SC)*5 (45)

Info :

Color change to green

Round 7 :

Working in BLO: SC (45)

Info :

We will now make the petals. Drop your working yarn, the rest of the body will be finished after we complete the petals. Petals: To make the petals, you will be working in a continuous spiral on top of the shell in the unworked front loops of each round.

Info :

Grab your red yarn and attach it with a SC in the very first unworked front loop of row 2. Working into the remaining front loops repeat the following pattern until you reach the last front loop: HDC, DC, TC, DC, HDC, SS

Info :

**Please note, you should be careful not to miss any stitches, however, this is a very forgiving sequence of stitches so if you miss a loop/double up a loop anywhere it is not a huge deal. No two flowers are the same, so it is ok if your turtle is unique! If you find you have missed a stitch/stitches just end the round on whichever stitch you have left and complete a SS in the ending stitch as well. If you find you have stitches remaining you can continue the sequence until you reach the end or you can SS until the end, whichever you prefer. FO, weave in the ends.

Info :

The remaining steps of the body will be worked normally, through both loops. Picking up where you left off with your green yarn.

Round 8 :

3SC, Dec (36)

Round 9 :

Grab your legs and tail, this is the row you will SC your pieces into. You place your pieces in front of the stitches of the body, pushing your hook through the leg/tail first then through the body stitch. - 4SC - Grab the first big leg, attach using 3SC (refer to photo for placement, the curve of the leg should be on your right). - 5SC - Grab the first small leg, attach using 2SC (refer to photo above for placement, the curve of the leg should be on your right). - 3SC - Grab your tail and using 3SC attach the tail (see photo for placement).

Round 9 Continued :

- 3SC - Grab the second small leg, attach using 2SC (refer to photo below for placement, the curve of the leg should be on your left). - 5SC - Grab the second big leg, attach using 3SC (refer to photo above for placement, the curve of the leg should be on your left). - 3SC (36)

Round 10 :

SC, Dec (24)

Info :

Stuff the body to your desired firmness.

Round 11 :

SC, Dec (16)

Info :

Add any additional stuffing.

Round 12 :

Dec (8)

Info :

SS, cut yarn leaving a short tail to sew the hole closed. Weave the yarn tail back and forth into the stitches around then pull tight to close. Tie to secure and weave the rest of the yarn tail into the body.

โ€” Finishing Details :

Info :

Sew the head onto the body. I sew mine in the middle of the front two legs, half way over the rose and half over the bottom portion of the body, this help cover your color changes.

Item Name (Eye Detail) :

Eye Detail: If you would like the white detail on the eye, grab your white yarn and embroid er a line up the side of the eye. Insert your needle at the middle bottom of the safety eye and bring it up to the top middle of the safety eye, it will tend to curve around the safety eye when you pull it tighter.

Assembly Instructions

  • Sew the head onto the body in the middle of the front two legs, positioning it half over the rose and half over the bottom portion of the body to help conceal color changes.
  • Attach legs and tail in Round 9 by placing pieces in front of the body stitches, pushing your hook through the leg/tail first then through the body stitch, then SC to secure.
  • Sew petals securely to the shell by weaving in ends and ensuring the spiral petals sit flat; weave in ends after FO to secure the rose.
  • Add safety eyes at around rows 5-6 of the head, spacing them approximately 9-10 stitches apart before stuffing the head and finishing.
  • Close the body opening after R12 by weaving the tail through the surrounding stitches, pulling tight to close, tying to secure and weaving the tail into the body.
  • Use pins to position parts before sewing and adjust placement to match photos for symmetrical results.

Important Notes

  • ๐Ÿ’กUse stitch markers to mark your front loops, at least one in the front loop of the first stitch of each row to help form consistent petals.
  • ๐Ÿ’กWork the top of the shell in BLO only and form petals in the unworked front loops for proper texture and petal placement.
  • ๐Ÿ’กThere is no need to leave long tails for legs and tail when you FO; you will SC these pieces directly into a round of the body for a cleaner finish.

This Rose Turtle amigurumi brings a delightful mix of floral charm and cute turtle design to your crafting table. ๐Ÿงถ The soft velvety petals and plush chunky body make it a wonderful gift or a whimsical decor piece. ๐ŸŒน Keep this pattern handy โ€” it's perfect for practicing BLO/FLO techniques and creative colorwork. โœจ

You ask,

we answer.

FAQs

What size will the finished piece be?

The finished amigurumi measures approximately 6 inches long, 6.5 inches wide, and 3 inches tall using the recommended bulky yarn and 4.5mm hook.

Can I use different yarn weights for this pattern?

Yes, you can use different yarn weights but the final size and texture will change; use an appropriate hook size for your chosen yarn and expect the rose petals and shell size to vary.

Do I need prior crochet experience for this pattern?

This pattern is rated intermediate, so basic knowledge of single crochet, increases, decreases, and working in BLO/FLO is recommended for best results.

How long does this project typically take to complete?

Most crocheters complete this project in 5-7 hours, though time may vary based on experience level and how much time you spend on the petals and assembly.

Where should I place the safety eyes and how far apart?

Place safety eyes at around rows 5-6 of the head and space them approximately 9-10 stitches apart before stuffing and closing the head.

Can I make the rose shell in a different color or yarn?

Absolutely โ€” use any color or textured yarn for the petals to create unique results, just be mindful that different yarns will affect petal size and shell fit.