🧢 Beautiful ✨ Detailed πŸ’ Adorable

Reversible Muffin Toy Amigurumi Pattern

Reversible Muffin Toy Amigurumi Pattern
4.2β˜… Rating
5-7 Hours Time Needed
3.6K Made This
βœ‚οΈ

Intermediate Level

Ideal for those with basic crochet experience, featuring slightly more advanced stitches and techniques to expand your skills.

⏱️

Weekend Treat

Takes 5-7 hours, making it an enjoyable project to finish over a couple of days.

🧸

Cute Companion

An adorable friend to cherish, handcrafted with love to bring comfort and joy for years to come.

About This Reversible Muffin Toy Amigurumi Pattern

This pattern creates a reversible muffin toy that becomes a sweet doll when flipped β€” two toys in one. It features a textured underskirt, a frilly dress, curly hair, and a striped muffin hat with a cherry. The instructions are written round-by-round so you can follow each shaping step precisely.

Reversible Muffin Toy Amigurumi Pattern crochet pattern - detailed view of completed project

You'll use sport weight cotton yarn with a 2.0 mm hook for crisp stitches and neat details. The doll measures small and giftable; adjust yarn/hook to change the final size.

Why You'll Love This Reversible Muffin Toy Amigurumi Pattern

I absolutely love this pattern because it turns a playful idea into a charming two-in-one toy that both kids and adults adore. I enjoy the combination of simple amigurumi shaping with decorative finishing β€” it is satisfying and never boring. The curly hair and the striped muffin hat let me add little creative touches each time I make one. Sewing the hat and adding beads always makes the piece feel truly handmade and special to give away.

Reversible Muffin Toy Amigurumi Pattern step 1 - construction progress Reversible Muffin Toy Amigurumi Pattern step 2 - assembly progress Reversible Muffin Toy Amigurumi Pattern step 3 - details and accessories Reversible Muffin Toy Amigurumi Pattern step 4 - final assembly and finishing

Switch Things Up

I love that you can easily customize this pattern by changing the yarn colors β€” try pastels for a sweet nursery look or bright neon stripes for a playful version.

Want to make it bigger? Use a bulkier yarn and a larger hook and keep the same stitch counts for a chunkier muffin-doll.

I often swap the safety eyes for embroidered eyes when making toys for young children to avoid small parts.

Try adding tiny crocheted props like a little purse or a mini cupcake to give your doll more personality and play value.

I sometimes replace the sequins and beads with small pom-poms or flat buttons for a different textured top on the muffin hat.

Change the hair style by using straight loops instead of curls for a different silhouette β€” braids or buns also look great.

If you want a more poseable version, add thin wire inside the arms before stuffing to allow slight positioning.

Experiment with eyelash length and eyebrow shapes to create unique expressions β€” small changes make big differences in character.

I recommend writing down your color and stitch choices if you plan to make a set so you can reproduce favorites later.

For gifting, stitch a small pocket inside the muffin base to hide a tiny note or charm β€” it’s a lovely surprise for the recipient.

Common Mistakes & How to Fix Them

βœ— Skipping stitch markers during continuous rounds leads to lost starting points; place a marker at the first stitch of each round and move it up to track rows. βœ— Forgetting to stuff gradually causes lumps and uneven shaping; stuff small amounts at a time and shape as you go so the head and body keep a smooth silhouette. βœ— Not counting stitches after increases or decreases results in incorrect shaping; count your stitches at the end of each round, especially after increase/decrease rounds. βœ— Sewing parts without pinning can create asymmetry; always pin hands and hair in place before sewing to check placement and symmetry. βœ— Using a loose tension when crocheting small amigurumi leaves gaps and visible stuffing; use a slightly tighter tension for small hooks to keep stuffing hidden.

Reversible Muffin Toy Amigurumi Pattern

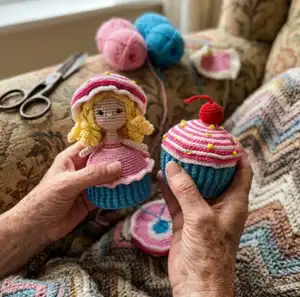
Make a charming reversible muffin-doll that flips from a cupcake to a little doll β€” a playful amigurumi perfect for gifting or display. You will enjoy clear round-by-round instructions and helpful photos so your project turns out adorable. The pattern uses sport weight cotton yarn and a small hook for neat stitch definition.

Intermediate 5-7 Hours

Materials Needed for Reversible Muffin Toy Amigurumi Pattern

β€” Main Fabric

  • 01
    YarnArt Jeans (sport/fine) 1.75 oz / 175 yds - #01 white (small amounts for hat/trim)
  • 02
    YarnArt Jeans (sport/fine) 1.75 oz / 175 yds - #18 lilac (optional detail)
  • 03
    YarnArt Jeans (sport/fine) 1.75 oz / 175 yds - #20 pink (dress)
  • 04
    YarnArt Jeans (sport/fine) 1.75 oz / 175 yds - #59 pink neon (hat stripes)
  • 05
    YarnArt Jeans (sport/fine) 1.75 oz / 175 yds - #88 light yellow (hair)
  • 06
    YarnArt Jeans (sport/fine) 1.75 oz / 175 yds - #26 red (cherry)
  • 07
    Alize Cotton Gold 3.5 oz / 361 yds - #458 stone (skin color)
  • 08
    Alize Cotton Gold 3.5 oz / 361 yds - #287 turquoise (underskirt)

β€” Tools Required

  • 01
    Crochet hook size 2.0 mm
  • 02
    Yarn needle for sewing and weaving ends
  • 03
    Black 5 mm safety eyes (2 pairs recommended)
  • 04
    Polyester stuffing (hollowfiber)
  • 05
    Embroidery floss colors: black, white, brown
  • 06
    Dry pastel or blush for cheeks
  • 07
    Pins for assembly and hair placement
  • 08
    Stitch markers
  • 09
    Scissors
  • 10
    Beads and sequins for hat decoration
  • 11
    Elastic band to secure muffin hat (optional)

Progress Tracker

0% Complete

β€” Hands :

Info :

Hands are crochet in continuous rounds / spirals. To crochet the hands take 2-Fine (Sport) weight cotton blend yarn (stone color) and 2 mm crochet hook

Row 1 :

5 sc in mr

Rows 2-9 :

5 sc (8 rows)

Row 10 :

fold edges in a half, work 2 sc

Info :

Cut a thread, leave a long tail for sewing.

β€” Hair :

Info :

Hair crochet in continuous rounds / spirals. To crochet hair take 2-Fine (Sport) weight cotton blend yarn (light-yellow color) and 2 mm crochet hook

Row 1 :

6 sc in mr

Row 2 :

6 (12)

Row 3 :

*1 sc, 1 inc* 6 times (18)

Row 4 :

*2 sc, 1 inc* 6 times (24)

Row 5 :

*3 sc, 1 inc* 6 times (30)

Row 6 :

10 times β€œcurl #1”, 10 times β€œcurl #2”

Info :

Curl #1 - 30 ch, from 2nd ch from the hook *1 sc, 1 inc* 10 times, 9 sc, 1 sc in the next stitch of 5th row

Info :

Curl #2 - 30 ch, from 2nd ch from the hook *1 sc, 1 inc* 10 times, 9 sc, skip 1 stitch of 5th row, 1 sc in 5th row stitch

Info :

Join the first and the last curls with 1 ss. Leave a long tail for sewing

β€” Head and Body :

Info :

Head and body are crochet in continuous rounds / spirals. To crochet head take 2-Fine (Sport) weight cotton blend yarn (stone, light pink and pink colors) and 2 mm crochet hook. Start with stone color yarn, then we’ll switch to the pink one

Row 1 (stone) :

6 sc in mr

Row 2 :

6 inc (12)

Row 3 :

*1 sc, 1 inc* 6 times (18)

Row 4 :

1 sc, 1 inc, *2 sc, 1 inc* 5 times, 1 sc (24)

Row 5 :

*3 sc, 1 inc* 6 times (30)

Row 6 :

2 sc, 1 inc, *4 sc, 1 inc* 5 times, 2 sc (36)

Rows 7-15 :

36 sc (9 rows)

Info :

Here we are going to shape the face. Use black floss to embroider the eyelashes, brown floss to embroider the eyebrows. Embroider the nose with cotton blend stone color yarn. Insert safety eyes between 11th and 12th rows. There should be 6 sc between eyes. Use white floss to make the eyes brighter.

Row 16 :

*2 sc, 1 dec* 9 times (27)

Row 17 :

*1 sc, 1 dec* 9 times (18)

Info :

Tightly fill the head with hollowfiber

Row 18 :

9 dec

Rows 19-20 :

9 sc (2 rows)

Row 21 :

*2 sc, 1 inc* 3 times (12)

Row 22 :

*1 sc, 1 inc* 6 times (18)

Row 23 :

18 sc

Row 24 (pink) :

18 sc

Rows 25-26 :

18 sc (2 rows)

Row 27 :

18 inc-flo (36)

Row 28 :

*5 sc, 1 inc* 6 times (42)

Row 29 :

3 sc, 1 inc, *6 sc, 1 inc* 5 times, 3 sc (48)

Row 30 :

*7 sc, 1 inc* 6 times (54)

Row 31 :

54 sc-flo

Rows 32-34 :

54 sc (3 rows)

Row 35 :

4 sc, 1 inc, *8 sc, 1 inc* 5 times, 4 sc (60)

Rows 36-38 :

60 sc (3 rows)

Row 39 (light pink) :

60 dc inc, 1 ss

Info :

Sew hands between 23rd and 24th rows. Fasten off, cut a thread and weave in ends. Fill the body with hollowfiber.

β€” Underskirt :

Info :

Underskirt is crochet in continuous rounds / spirals. To crochet the underskirt take 2-Fine (Sport) weight cotton blend yarn (turquoise color) and 2 mm crochet hook

Row 1 :

6 sc in mr

Row 2 :

6 inc (12)

Row 3 :

*1 sc, 1 inc* 6 times (18)

Row 4 :

1 sc, 1 inc, *2 sc, 1 inc* 5 times, 1 sc (24)

Row 5 :

*3 sc, 1 inc* 6 times (30)

Row 6 :

2 sc, 1 inc, *4 sc, 1 inc* 5 times, 2 sc (36)

Row 7 :

*5 sc, 1 inc* 6 times (42)

Row 8 :

3 sc, 1 inc, *6 sc, 1 inc* 5 times, 3 sc (48)

Row 9 :

*7 sc, 1 inc* 6 times (54)

Info :

Now take the doll, turn pink skirt inside out. Find back loops of 31st row, attach the detail we are currently working on to it as pictured below

Row 10 :

Work back loops only + back loops of 31st row – 54 sc

Row 11 :

*8 dc, 1 inc* 6 times, 1 ss, 2 ch (60)

Rows 12-21 :

*1 fpdc, 1 bpdc* 30 times, 1 ss, 2 ch (60) (10 rows)

β€” Muffin-hat :

Info :

Muffin-hat is crochet in continuous rounds / spirals. To crochet the hat take 2-Fine (Sport) weight cotton blend yarn (white and neon-pink colors) and 2 mm crochet hook

Row 1 :

6 sc in mr

Row 2 :

6 inc-blo (12)

Row 3 :

(behind the arch on the wrong side - look at the pictures below) - *1 hdc, 1 inc* 6 times (18)

Row 4 :

(behind the arch on the wrong side) - *2 hdc, 1 inc* 6 times (24)

Row 5 :

(behind the arch on the wrong side) - *3 hdc, 1 inc* 6 times (30)

Row 6 :

(behind the arch on the wrong side) - *4 hdc, 1 inc* 6 times (36)

Row 7 :

(behind the arch on the wrong side) - *5 hdc, 1 inc* 6 times (42)

Row 8 :

(behind the arch on the wrong side) - *6 hdc, 1 inc* 6 times (48)

Row 9 :

(behind the arch on the wrong side) - *7 hdc, 1 inc* 6 times (54)

Info :

Turn your work, 1 ch, from the 3rd stitch from the hook work *1 inc, 1 dc-blo* repeat up to the 1st row. Work *1 hdc, 1 sc, 1 ss* in the last 3 stitches of the 2nd row

Info :

Attach neon-pink thread, as pictured below. In the front loops work 2 ch, *1 inc, 1 dc*. Repeat action in the asterisks up to the 1st row. Work 1 hdc, 1 sc, 1 ss in the last 3 stitches of 2nd row. Fasten off, cut a thread and weave in ends.
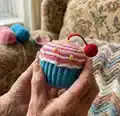
β€” Cherry :

Info :

Cherry is crochet in continuous rounds / spirals. To crochet the cherry take 2-Fine (Sport) weight cotton blend yarn (red color) and 2 mm crochet hook

Row 1 :

6 sc in mr

Row 2 :

6 inc (12)

Row 3 :

*1 sc, 1 inc* 6 times (18)

Row 4 :

*2 sc, 1 inc* 6 times (24)

Rows 5-8 :

24 sc (4 rows)

Row 9 :

*2 sc, 1 dec* 6 times (18)

Row 10 :

*1 sc, 1 dec* 6 times (12)

Row 11 :

6 dec

Info :

Tie the hole. Fasten off and cut a thread. Weave in ends. Tail: 12 ch. Cut a thread, leave a long tail for sewing

Info :

Sew the tail to the cherry. Sew the cherry to the hat, decorate hat with beads and sequins

β€” Decoration & Finishing :

Info :

Decorate the neckline and straps of the dress with pink yarn. To make it, work ss on the edge of the back of the dress (edge of the stone and pink colors). When you reach the hand work 5 ch, then ss on the front side of the dress, 5 ch. Fasten off a thread, weave in ends.

Info :

Use light-pink thread to crochet the belt: 18 ss. Don’t forget to apply the blush or dry pastel on the cheeks. Attach hair to the head with pins. Do some hairstyle and sew hair to the head.

Info :

Sew the elastic band on the wrong side of the hat, to fasten the hat on the head of the doll. If you don’t have an elastic band, you can sew the hat to the head. Small details are dangerous for small kids! You can replace them with embroidery.

Assembly Instructions

  • Attach the hair to the head with pins and sew each curl securely to the head using the long tails; style the curls and sew them down so they hold their shape.
  • Sew the hands between rounds 23 and 24 of the body, spacing them evenly and securing with a whipstitch; weave in ends inside the body.
  • Turn the pink skirt inside out and align the back loops of the underskirt (31st row) to attach the underskirt to the pink dress section, then work round 10 (back loops) to join them securely.
  • Decorate the neckline and straps by slip-stitching pink yarn around the dress edge; make 5-ch loops over each hand to create straps and secure with slip stitches.
  • Sew the cherry to the top center of the muffin hat using the long tail from the cherry; add beads and sequins to the hat surface with small stitches for decoration.
  • Fasten an elastic band to the wrong side of the hat or sew the hat to the head to secure the hat when the doll is turned into the muffin.

Important Notes

  • πŸ’‘This pattern is worked in continuous rounds/spirals unless otherwise stated; use a stitch marker to mark the first stitch of each round.
  • πŸ’‘Insert safety eyes between 11th and 12th rows of the head with 6 sc between them, and embroider lashes and brows before closing the head.
  • πŸ’‘Stuff firmly but evenly and regularly during shaping; overstuffing distorts the piece and understuffing creates flat areas.
  • πŸ’‘Small beads and sequins pose a choking hazard; for children under three replace with embroidered dots or larger sewn-on embellishments.

This reversible muffin-doll is a delightful two-in-one project that makes a charming handmade gift and a fun display piece. The pattern combines amigurumi shaping with playful decorative touches like curly hair, a frilly dress, and a beaded muffin hat. Make one for yourself or stitch up a dozen for gifts β€” each one is uniquely adorable and full of personality. 🧢🧁

You ask,

we answer.

FAQs

What size will the finished piece be?

The finished amigurumi measures approximately 12-15 cm tall when using the recommended sport weight yarn and a 2.0 mm hook; size will vary with yarn and hook choice.

Can I use different yarn weights for this pattern?

Yes, you can use different yarn weights, but this will change the final size and stitch count look; if using a thicker yarn, use a larger hook and expect a bulkier toy.

Do I need prior crochet experience for this pattern?

This pattern is rated intermediate, so basic knowledge of single crochet, increases, decreases, and working in rounds is recommended for best results.

How long does this project typically take to complete?

Most crocheters finish this project in about 5-7 hours, though time will vary based on experience, detail work, and finishing steps like sewing hair and decorations.