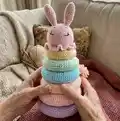
About This Rainbow Bunny Amigurumi Pattern
This pattern creates a pastel Rainbow Bunny stacking toy with a crocheted cone horn and six soft rings. You will work the cone, a flat bottom for the cone, and six rings in different sizes and colors. The instructions include rounds for each piece, materials, abbreviations, and assembly photos to guide you through finishing.

The finished toy measures approximately 27 cm tall using the recommended yarn and hook size. Colors used are listed with yarn amounts, but feel free to customize with your favorite shades.
Why You'll Love This Rainbow Bunny Amigurumi Pattern
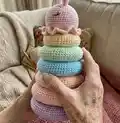
I absolutely love this pattern because it combines simple amigurumi techniques with playful pastel colors to make a charming stacking toy. I enjoy how each ring becomes its own small project, finishing quickly and giving frequent satisfaction. The cone horn and soft bunny head add character and make the toy feel complete and handmade. Sewing the cone into the top ring and matching stuffing amounts is so rewarding — the finished stack looks clean and balanced. I hope making this brings you as much joy as it gave me when I designed it.
Switch Things Up
I love how easy it is to customize this project by changing yarn colors—try bright primaries for a bold look or soft pastels for a nursery-friendly version.
I often change the yarn weight and hook size to make larger or smaller versions; use bulky yarn and a larger hook for a chunky stacking toy or a thin yarn for a mini keychain-sized set.
I sometimes add a little felt or crocheted clothing pieces to the bunny head for seasonal themes, such as a tiny scarf or hat for winter versions.
Try embroidering different facial expressions to give each bunny a unique personality; a small curved mouth or open eyes will change the vibe completely.
Consider swapping the cone for a small crocheted crown to create a princess or prince stacking toy for a themed nursery gift.
I like to mix yarn textures—a fuzzy boucle ring among smooth rings adds tactile interest for babies and makes the stack more sensory-rich.
If you want more stability, I sometimes add a lightweight cardboard disc inside the bottom ring before stuffing to keep the base from compressing too much.
For gifting, I make a set of three matching small toys (mini rings) using the same color palette so they coordinate with nursery decor.
I also experiment with surface crochet or embroidered stripes on rings to add visual contrast and to help babies learn colors and patterns.
Finally, feel free to add small removable accessories like a pompom or ribbon so the toy can be personalized and updated as the child grows.
Common Mistakes & How to Fix Them
✗ Skipping a stitch marker when working in continuous rounds causes you to lose track of round starts; place and move a marker after each round to keep alignment.
✗ Overstuffing rings will distort their shape and make stacking difficult; stuff gradually and evenly while crocheting and match stuffing amounts between rings.
✗ Not leaving a long yarn tail when finishing parts makes sewing pieces together awkward; leave a 10-15 cm tail when finishing non-head parts for stitching.
✗ Rushing increases or decreases leads to uneven circumference and gaps; count stitches every few rounds, especially at increase/decrease rounds, to ensure correct stitch counts.
✗ Changing tension or hook size between rings will change final dimensions and stacking fit; keep hook and tension consistent or intentionally adjust for size differences.