๐Ÿงถ Beautiful โœจ Detailed ๐Ÿ’ Adorable

Ragdoll Pocket Jellyfish Amigurumi Pattern

Ragdoll Pocket Jellyfish Amigurumi Pattern
4.8โ˜… Rating
2-3 Hours Time Needed
1.5K Made This
โœ‚๏ธ

Beginner Friendly Level

Perfect for those just starting their crochet journey, with clear instructions and simple techniques

โฑ๏ธ

Bite-Sized Project

Finishes in 2-4 hoursโ€”perfect for an afternoon of creative relaxation.

๐Ÿงธ

Cute Companion

An adorable friend to cherish, handcrafted with love to bring comfort and joy for years to come.

About This Ragdoll Pocket Jellyfish Amigurumi Pattern

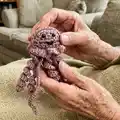
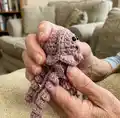
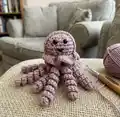
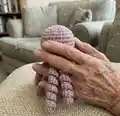
This pattern makes a small ragdoll pocket jellyfish with a stuffed dome and curly tentacles. It uses basic US crochet stitches and simple shaping to create a delightful little toy. The design is compact, perfect for keyrings or small gifts.

Ragdoll Pocket Jellyfish Amigurumi Pattern crochet pattern - detailed view of completed project

The pattern includes a full materials list, abbreviations, and photo steps to guide you. Works well with DK acrylic or cotton yarn and a 3.5mm hook.

Why You'll Love This Ragdoll Pocket Jellyfish Amigurumi Pattern

I absolutely love this pattern because it turns a few simple stitches into a playful, tactile little friend. I enjoy how fast it comes together and how satisfying the curled tentacles look when finished. I love that it is small enough to be a quick gift yet adorable enough to make people smile. I also appreciate that the pattern uses common stitches, so it is accessible and relaxing to make in one sitting.

Ragdoll Pocket Jellyfish Amigurumi Pattern step 1 - construction progress Ragdoll Pocket Jellyfish Amigurumi Pattern step 2 - assembly progress Ragdoll Pocket Jellyfish Amigurumi Pattern step 3 - details and accessories Ragdoll Pocket Jellyfish Amigurumi Pattern step 4 - final assembly and finishing

Switch Things Up

I love customizing this jellyfish by changing yarn colors; try variegated DK for a playful look or soft pastels for a baby-friendly toy.

I often experiment with yarn weight and hook size to alter the finished sizeโ€”bulky yarn makes a chunky squishy version while fingering weight gives a tiny charm.

I sometimes swap safety eyes for embroidered eyes if the toy is for a baby or small child to avoid hard parts.

For a keyring, attach a small metal keyring to the top before finishing the final tail ends so it hangs securely.

Change the tentacle length by altering the CH 21 and CH 28 sequences to make longer or shorter curls to suit your aesthetic.

I like to add beads or small felt accents to create unique personalities and textures on the underside ruffle.

Try embroidering different mouth shapesโ€”smiles, surprised O shapes, or even tiny frecklesโ€”to change the expression.

Use contrasting thread color for the mouth to make it pop, or match the body color for a subtler look.

You can make a whole family by working multiple in complementary shades and varying tentacle patterns for variety.

For extra durability, weave in and knot all ends securely and add a small drop of fabric glue inside seams if the item will be handled frequently.

Common Mistakes & How to Fix Them

โœ— Skipping the placement of the safety eyes or placing them too low or high; position the eyes on the second body side at the starting centre point (the row above the straight row) before closing so the face looks balanced. โœ— Cutting the yarn after the first body side instead of working the two sides together; do not fasten off the second side so you can join and work the edges without rejoining yarn. โœ— Under-stuffing or over-stuffing the dome which can distort shaping; stuff gradually as you sew the edges and stop when the dome holds its shape but remains soft. โœ— Working tentacles with inconsistent tension which causes uneven curls; maintain consistent tension and practice the DC groups to achieve even curled tentacles across all loops.

Ragdoll Pocket Jellyfish Amigurumi Pattern

Make a tiny, squishy pocket jellyfish you can carry anywhere with this friendly crochet pattern. You will enjoy simple shaping, charming curled tentacles, and a sweet embroidered smile. The pattern is written in US terms and includes clear step-by-step rounds and helpful photos at the end.

Beginner Friendly 2-3 Hours

Materials Needed for Ragdoll Pocket Jellyfish Amigurumi Pattern

โ€” Main Fabric

  • 01
    DK acrylic yarn (or cotton yarn alternative) - small amount/scraps for one pocket jellyfish
  • 02
    Polyester fibrefill or scraps of yarn for stuffing

โ€” Tools Required

  • 01
    Crochet hook size 3.5mm
  • 02
    Black embroidery thread
  • 03
    1mm safety eyes (2 pieces)
  • 04
    Scissors
  • 05
    Metal yarn needle
  • 06
    Polyester fibrefill or scraps of yarn
  • 07
    Optional keyring

Progress Tracker

0% Complete

โ€” Abbreviations :

Infos :

CH โ€“ chain. ST โ€“ stitch. SLST โ€“ slip stitch. SC โ€“ single crochet. DC โ€“ double crochet. INC โ€“ increase = single crochet 2 times in the same stitch or chain.

โ€” Materials :

Infos :

DK acrylic yarn is what I used, but you are free to use cotton yarn as well. 3.5mm hook. Black embroidery thread. 1mm safety eyes. Scissors. Metal yarn needle. Polyester fibrefill, or scraps of yarn. (optional) Keyring. *starting from the second body side we will work with the same yarn without cutting it until project is finished

โ€” Body :

Info :

-slipknot, CH 2, SC 3 times in the 2nd CH from hook

Round 1 :

R1 โ€“ SC 2 times in each ST (6 sts total) CH 1, turn

Round 2 :

R2 โ€“ INC, SC 1, repeat until end of row (9 sts total), CH 1, turn

Round 3 :

R3 - INC, SC 2, repeat until end of row (13 sts total) CH 1

Round 4 :

R4 โ€“ starting from where the row ended and working on the bottom (the straight side) SC in 8 ST spaces to form a straight row (picture is marked to show which ST spaces)

Round 5 :

R5 - SC in each ST โ€“ CH 1, turn

Round 6 :

R6 โ€“ SC in each ST, fasten and cut yarn

Info :

*on the second body part donโ€™t fasten yarn, add the safety eyes on each side of the starting centre point (the row above the straight row)

Info :

*bring both sides together and start to SC along the edges

Info :

*stuff as you go

Info :

*when reaching the straight part, SC only in the inside loops until closed

Info :

*when that row is finished CH 1 and start working in the loops on the exterior

Info :

*DC 3 times in each loop around (39 sts in total), SLST in the CH from the beginning of this row

Infos :

*working in the middle row (the one in between the DC sts) make: SLST in first ST. SLST in next ST, CH 21, starting form 2nd CH SC 2 times in each CH, SLST back in the same ST. SLST in next ST, CH 28, starting form 2nd CH SLST in each CH, SLST back in the same ST. SLST in next ST. SLST in next ST, CH 21, starting form 2nd CH SC 2 times in each CH, SLST back in the same ST. SLST in next ST, CH 28, starting form 2nd CH SLST in each CH, SLST back in the same ST. SLST in next ST. SLST in next ST, CH 21, starting form 2nd CH SC 2 times in each CH, SLST back in the same ST, fasten, cut and weave in yarn tail.

Info :

*with black thread add a mouth in V shape working through the back, make a knot and tuck in ends.

Assembly Instructions

  • On the second body side, do not fasten off the yarn; add the safety eyes on each side of the starting centre point (the row above the straight row) before closing the edges.
  • Bring both body sides together and SC along the edges, stuffing as you go to create the dome shape and closing neatly where indicated.
  • When reaching the straight part, SC only in the inside loops until closed, then CH 1 and work in the exterior loops to create the ruffle and tentacle foundation.
  • DC 3 times in each exterior loop (39 sts in total), then SLST in the CH from the beginning of that row to secure the ruffle.
  • Work the middle row tentacles as instructed (SLST, CH 21 or CH 28 with SC groups) then fasten off, cut and weave in tails; embroider a V-shaped mouth with black thread and tuck knot ends securely.

Important Notes

  • ๐Ÿ’กUse the same yarn between the two body sides (do not cut after first side) so you can join and finish edges seamlessly.
  • ๐Ÿ’กAdd safety eyes before fully closing and stuffing the dome to ensure correct placement and secure assembly.
  • ๐Ÿ’กStuff gradually and evenly while sewing the edges closed to avoid overfilling and distortion of the dome shape.
  • ๐Ÿ’กWeave in yarn tails securely and tuck knots from embroidery to prevent unraveling with handling.

Create your very own tiny ragdoll pocket jellyfish with simple stitches and a lot of charm. This little creature is perfect for handmade gifts, keyrings, or a pocket friend on the go. Happy crocheting and enjoy the curls! ๐Ÿงถ๐Ÿงต

You ask,

we answer.

FAQs

What size will the finished piece be?

The finished jellyfish is a small pocket-sized amigurumi, roughly thumb-to-palm scale when using DK yarn and a 3.5mm hook; exact size varies by your tension.

Can I use different yarn weights for this pattern?

Yes, you can use different yarn weights, but this will change the finished size and may require an adjusted hook; heavier yarn and larger hooks give a chunkier jellyfish while finer yarn makes a mini version.

Do I need prior crochet experience for this pattern?

This pattern is rated beginner friendly; basic knowledge of chains, single crochet, double crochet, slip stitch, and increases is helpful to follow the steps comfortably.

How long does this project typically take to complete?

Most crocheters complete this project in 2-3 hours, depending on experience and whether you follow the optional photo steps for assembly.