🧢 Beautiful ✨ Detailed πŸ’ Adorable

Rac the Raccoon Amigurumi Pattern

Rac the Raccoon Amigurumi Pattern
4.9β˜… Rating
5-7 Hours Time Needed
3.2K Made This
βœ‚οΈ

Intermediate Level

Ideal for those with basic crochet experience, featuring slightly more advanced stitches and techniques to expand your skills.

⏱️

Weekend Treat

Takes 5-7 hours, making it an enjoyable project to finish over a couple of days.

🧸

Cute Companion

An adorable friend to cherish, handcrafted with love to bring comfort and joy for years to come.

About This Rac the Raccoon Amigurumi Pattern

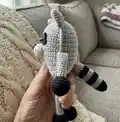
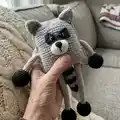
This pattern creates a stretchy raccoon toy with a square body, long retractable limbs, striped tail and cute facial features. You will crochet limbs and body panels, then assemble them to form the flexible stretchy action. Techniques include working in the round, turning rows, color changes, and joining two flat panels together.

Rac the Raccoon Amigurumi Pattern crochet pattern - detailed view of completed project

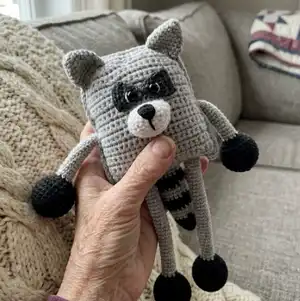
The finished toy measures approximately 27 cm from ears to feet using the recommended materials. Clear round-by-round instructions are included for every piece and detailed assembly steps are provided.

Why You'll Love This Rac the Raccoon Amigurumi Pattern

I absolutely love this pattern because it blends simple amigurumi techniques with a playful mechanical twist β€” the stretching limbs are delightful for kids and adults alike. I enjoy how the square body construction and separate limb pieces allow for straightforward assembly while still creating a charming finished look. The striped tail and facial details give so much character with minimal pieces and yarn. Making multiples is fast and satisfying, and I always enjoy customizing colors to create new personalities.

Rac the Raccoon Amigurumi Pattern step 1 - construction progress Rac the Raccoon Amigurumi Pattern step 2 - assembly progress Rac the Raccoon Amigurumi Pattern step 3 - details and accessories Rac the Raccoon Amigurumi Pattern step 4 - final assembly and finishing

Switch Things Up

I like to change yarn colors to create different personalities for the raccoon; try warmer browns or pastel greys for a softer look.

I sometimes use a slightly thicker yarn and a larger hook to make a chunky, cuddly version β€” it changes the size but keeps the same construction.

I add small felt accessories like a tiny scarf or a crochet hat to give each raccoon a unique outfit.

I experiment with eye sizes and positions to alter the expression, moving eyes slightly closer for a cuter face or wider apart for a curious look.

I sometimes embroider patterns or tiny freckles on the front panel for extra detail and character.

I switch the safety eyes for embroidered eyes for a fully child-safe toy suitable for younger children.

I create a mini keychain version by using fingering yarn and a 1.5 mm hook, reducing rounds proportionally to keep the shape.

I sometimes add a loop or a small pocket at the top of the body so the raccoon can double as a tiny hanging decoration.

I vary the tail striping by changing the number of rounds per color for bolder or subtler stripes.

I like to stuff slightly softer in the limbs for extra stretchability and firmer in the body for stability β€” it changes both look and feel.

Common Mistakes & How to Fix Them

βœ— Skipping stitch markers at the start of rounds can make it easy to lose your place; place a marker at the first stitch of each round and move it up after each completed round. βœ— Overstuffing the head or limbs causes distortion of shape and reduces stretch; stuff gradually and check the shape as you go, adding small amounts until firm but not bulging. βœ— Changing colors without securing ends may result in loose tails and unraveling; weave in or carry yarn neatly and secure color changes with a small knot or weaving technique. βœ— Not counting stitches after increases and decreases leads to uneven shaping; always count your stitches after every shaping round to confirm the pattern stitch count. βœ— Crocheting too tightly when making long slim limbs will make them rigid and hard to stretch; use consistent, slightly relaxed tension for flexible limbs and smooth joins.

Rac the Raccoon Amigurumi Pattern

Make a stretchy raccoon toy that stretches up and down for playful interaction and fine motor skill development. This pattern guides you through crocheting a soft, square-bodied raccoon with long stretching limbs, striped tail, and cute facial details. You will create separate pieces (body panels, limbs, ears, snout, eyes, tail) and assemble them for a charming finished toy. Suitable as a thoughtful handmade gift or a fun project to develop your amigurumi skills.

Intermediate 5-7 Hours

Materials Needed for Rac the Raccoon Amigurumi Pattern

β€” Main Fabric

  • 01
    YarnArt Jeans 50gr/160 m; 55% cotton, 45% acrylic; Shade 80 (grey)
  • 02
    YarnArt Jeans 50gr/160 m; 55% cotton, 45% acrylic; Shade 28 (black)
  • 03
    YarnArt Jeans 50gr/160 m; 55% cotton, 45% acrylic; Shade 62 (white)
  • 04
    Alize Cotton Gold 100gr/330 m; 55% cotton, 45% acrylic; Shade 87 (dark grey)
  • 05
    Fiber filler (polyester stuffing) for body and appendages

β€” Tools Required

  • 01
    Crochet hook size 2.0 mm
  • 02
    Crochet hook size 3.0 mm
  • 03
    8 mm safety eyes (2 pieces)
  • 04
    Scissors
  • 05
    Large-eye yarn needle for sewing and embroidery
  • 06
    Stitch markers (optional)
  • 07
    Pins for positioning parts during assembly

Progress Tracker

0% Complete

β€” Arms and Legs (make 2) :

Round 1 :

6 MR (6)

Round 2 :

INC *6 (12)

Round 3 :

(1 SC, INC)*6 (18)

Round 4 :

(2 SC, INC)*6 (24)

Round 5 :

(3 SC, INC)*6 (30)

Round 6-9 :

4 rnds straight: 30 SC

Round 10 :

(DEC, 3 SC)*6 (24)

Round 11 :

(DEC, 2 SC)*6 (18)

Round 12 :

(DEC, 1 SC)*6 (12)

Info :

Stuff tightly.

Round 13 :

(DEC, 4 SC)*2 (10)

Info :

Switch to grey yarn. Go on crocheting. Don't stuff the grey piece.

Round 14-65 :

52 rnds straight: 10 SC

Info :

Switch to black yarn.

Round 66 :

(INC, 4 SC)*2 (12)

Round 67 :

(1 SC, INC)*6 (18)

Round 68 :

(2 SC, INC)*6 (24)

Round 69 :

(3 SC, INC)*6 (30)

Round 70-73 :

4 rnds straight: 30 SC

Round 74 :

(DEC, 3 SC)*6 (24)

Round 75 :

(DEC, 2 SC)*6 (18)

Round 76 :

(DEC, 1 SC)*6 (12)

Info :

Stuff the piece.

Round 77 :

DEC*6. Fasten off.

β€” Ears (make 2) :

Info :

Work in grey with 2 mm hook.

Round 1 :

6 MR (6)

Round 2 :

(1 SC, INC)*3 (9)

Round 3 :

1 rnd straight: 9 SC (9)

Round 4 :

(2 SC, INC)*3 (12)

Round 5 :

(3 SC, INC)*3 (15)

Round 6 :

1 rnd straight: 15 SC

Round 7 :

(4 SC, INC)*3 (18)

Round 8 :

1 rnd straight: 18 SC

Info :

Fold in half and single crochet 9 through both edges. Leave a long yarn tail for sewing.

β€” Snout (nose) :

Info :

Work in white with 2 mm hook.

Round 1 :

6 MR (6)

Round 2 :

INC*6 (12)

Round 3 :

INC*12 (24)

Round 4-6 :

3 rnds straight: 24 SC

Info :

Leave a long yarn tail for sewing. Stuff the piece.

β€” Eyes (make 2) :

Info :

Work in dark grey with 2 mm hook. Chain 4 as if into MR, but do not join in the round, work in turning rows. Make 1 turning CH at the end of each row.

Round 1-2 :

2 rows straight: 4 SC

Round 3 :

INC, 2 SC, INC (6)

Round 4-5 :

2 rows straight: 6 SC

Info :

Leave a long yarn tail for sewing.

β€” Tail :

Info :

Then alternate grey and black yarn every 3 rounds. Use 2 mm hook. Stuff the tail gradually.

In black - Round 1 :

6 MR (6)

Round 2 :

(1 SC, INC)*3 (9)

Round 3 :

1 rnd straight: 9 SC (9)

Round 4 :

INC*9 (18)

Round 5 :

1 rnd straight: 18 SC (18). Switch to grey.

Round 6 :

(1 SC, INC)*9 (27)

Round 7-8 :

2 rnds straight: 27 SC. Switch to black.

Round 9-11 :

3 rnds straight: 27 SC. Switch to grey.

Round 12-14 :

3 rnds straight: 27 SC. Switch to black.

Round 15 :

(1 SC, DEC)*9 (18)

Round 16-17 :

2 rnds straight: 18 SC. Switch to grey.

Round 18-20 :

3 rnds straight: 18 SC. Switch to black.

Round 21-23 :

3 rnds straight: 18 SC. Switch to grey.

Round 24-25 :

2 rnds straight: 18 SC

Round 26 :

(1 SC, DEC)*6 (12). Switch to black.

Round 27-29 :

3 rnds straight: 12 SC in black.

Info :

Fold in half and single crochet 6 through both edges. Leave a long yarn tail for sewing.

β€” Body (make 2) :

Info :

Work in grey with 3 mm hook. Chain 25, and starting into the 2nd stitch from hook work 24 SC.

Round 1-19 :

19 rows straight: 24 SC, make 1 turning CH at the end of each row.

Round 20 :

1 SC, DEC, 18 SC, DEC, 1 SC (22)

Round 21 :

1 rnd straight: 22 SC

Round 22 :

1 SC, DEC, 16 SC, DEC, 1 SC (20)

Round 23-25 :

3 rnds straight: 20 SC

Info :

Fasten off and cut yarn.

β€” Assembly :

Infos :

Begin joining the body parts together from the right upper corner using 2 mm hook. Put the two parts together and work 19 SC through both parts' stitches, work 2 SC to the corner stitch. Get to the side edge. You are going to insert the arm-leg piece here. It should go between rows 11 and 15. I worked 10 SC through both parts' stitches, then 3 SC across the front part of the body only (skip 3 stitches on the back body part), put the arm-leg piece and go on crocheting across both body parts 11 SC, 2 SC to the corner stitch. Get to the bottom edge. 5 SC through both parts' stitches, 3 SC across the front part only, put the arm-leg piece, 6 SC across both body parts, 3 SC across the front part only, put the second arm-leg piece, 5 SC, 2 SC to the corner stitch. Stuff the body. Work the other side alike (11 SC across both body parts, 3 SC across the front part only, stuff the body, 10 SC through both parts' stitches).

β€” Decoration :

Infos :

Ears: Sew on the ears on outer corners. Eyes: Install safety eyes in the second row. Sew on between rows 16 - 22 in the middle. Make eye whites with white yarn. Sew on the snout in the middle below the eyes at the level of rows 12 - 13. Nose: Embroider a nose in black. Tail: Attach the tail on the back in the middle.

Assembly Instructions

  • Join two body panels from the right upper corner using 2 mm hook; work 19 SC through both panels' stitches and 2 SC to the corner stitch to start joining.
  • Insert each arm-leg between rows 11 and 15 when joining the side edge; work 10 SC through both parts' stitches, then 3 SC across the front panel only, place the arm-leg and continue joining.
  • When reaching the bottom edge, continue joining with 5 SC through both parts' stitches, then 3 SC across the front only, place second arm-leg and finish corner with 5 SC, 2 SC to corner stitch.
  • Stuff the body as you go during assembly to maintain shape; after stuffing, finish the opposite side in the same manner (11 SC through both panels, 3 SC across front only, stuff, 10 SC through both panels).
  • Sew ears to outer corners, install safety eyes between rows 16-22 in the center, sew the snout centered below the eyes at rows 12-13, embroider the nose and attach the tail to the center back.

Important Notes

  • πŸ’‘Use stitch markers to keep track of your rounds and the start stitch, especially during long limbs and color changes.
  • πŸ’‘Stuff limbs and tail gradually to avoid lumps and to keep flexible stretch; overstuffing will reduce movement.
  • πŸ’‘Pin parts in place before sewing to ensure symmetry and correct positioning of eyes, ears, snout and tail.
  • πŸ’‘Maintain even tension throughout for consistent gauge and smooth edges when joining body panels.

This charming Rac the Raccoon amigurumi is full of personality and playful movement, perfect for kids and collectors alike. The stretchy limbs and striped tail make playtime extra fun while the square body gives a modern, minimalist look. Make it in original colors or customize for a unique gift. 🧢🧡

You ask,

we answer.

FAQs

What size will the finished piece be?

The finished toy size from the recommended materials is approximately 27 cm from ears to feet.

Can I use different yarn weights for this pattern?

Yes, but changing yarn weight will affect final size and the stretch mechanics; choose an appropriate hook and adjust stitch counts if needed.

Do I need prior crochet experience for this pattern?

This pattern is rated intermediate and assumes you know basic stitches (SC, INC, DEC, MR) and how to join panels and sew pieces together.

How long does this project typically take to complete?

Most crocheters complete this project in about 5-7 hours, depending on experience and assembly speed.