🧢 Beautiful ✨ Detailed πŸ’ Adorable

Pride Rainbow Gnome Amigurumi Pattern

Pride Rainbow Gnome Amigurumi Pattern
4.6β˜… Rating
5-7 Hours Time Needed
3.7K Made This
βœ‚οΈ

Intermediate Level

Ideal for those with basic crochet experience, featuring slightly more advanced stitches and techniques to expand your skills.

⏱️

Weekend Treat

Takes 5-7 hours, making it an enjoyable project to finish over a couple of days.

🧸

Cute Companion

An adorable friend to cherish, handcrafted with love to bring comfort and joy for years to come.

About This Pride Rainbow Gnome Amigurumi Pattern

This pattern teaches you how to crochet a Pride Rainbow Gnome with a tall striped hat, striped limbs, and a fluffy yarn beard. It includes full round-by-round instructions for hat, body, nose, arms, legs, and assembly. The design uses multiple color changes to create the rainbow effect and is sized to sit as a decorative gnome.

Pride Rainbow Gnome Amigurumi Pattern crochet pattern - detailed view of completed project

Techniques used include magic ring, single crochet, increases and decreases, BLO/FLO shaping, and optional crab stitch edging. The finished gnome measures approx. 17 inches (43 cm) tall using the recommended materials.

Why You'll Love This Pride Rainbow Gnome Amigurumi Pattern

I absolutely love this pattern because the bright rainbow color changes make each gnome feel joyful and unique. I enjoy how the simple amigurumi shaping comes together to create a tall, characterful toy with personality. The beard and hat details are so satisfying to make and allow you to add your own decorative touches. I also love that it is easily customizable β€” you can change colors or scale it with different yarn and hook sizes.

Pride Rainbow Gnome Amigurumi Pattern step 1 - construction progress Pride Rainbow Gnome Amigurumi Pattern step 2 - assembly progress Pride Rainbow Gnome Amigurumi Pattern step 3 - details and accessories Pride Rainbow Gnome Amigurumi Pattern step 4 - final assembly and finishing

Switch Things Up

I love how easy it is to change the look of this gnome by swapping colors; you can make holiday, pastel, or team-themed versions simply by changing the stripe colors.

To make the gnome bigger, use a bulkier yarn and a larger hook; conversely use lighter yarn and a smaller hook for a mini keychain version.

I often customize the hat shape by adding more rounds to the top for a taller point or skipping rounds for a shorter hat style.

Try replacing the cardboard base with a felt circle or a plastic disc for extra durability if the gnome will be handled frequently.

You can embroider small hearts or initials onto the hat or body to personalize the gnome as a gift.

If you want a different beard texture, experiment with wool roving, faux fur trims, or a thicker yarn and then comb or trim to shape.

I sometimes add tiny accessories like a crocheted scarf, buttons, or a little pompom on the hat tip to give the gnome more personality.

For posable limbs, you could route a thin wire through the arms and legs before stuffing; just be sure to secure the ends well to keep them safe.

Play with eye placement or add small safety eyes (or embroidered eyes) to change facial expression and character.

I encourage you to experiment with different yarn brands and hook sizes and to make a few prototypes to perfect the size and color transitions you love most.

Common Mistakes & How to Fix Them

βœ— Not changing colors at the right point can create uneven stripes; mark the stitch where you should change and carry colors neatly to maintain crisp stripes. βœ— Skipping the cardboard base step can make the body wobble and not sit flat; cut and insert a cardboard circle at the instructed round to stabilize the body. βœ— Failing to stuff evenly will result in lumps and odd shaping; stuff gradually and check shape often, adding small amounts until smooth. βœ— Forgetting to leave long yarn tails when instructed prevents easy sewing of parts; always leave long tails when the pattern asks so you can securely sew pieces together.

Pride Rainbow Gnome Amigurumi Pattern

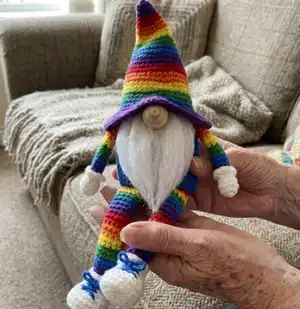
Create a colorful Pride Rainbow Gnome with step-by-step crochet instructions designed to guide you through every piece. This pattern uses simple amigurumi shaping and lots of fun color changes, making it a joyful project you can customize. Youll make a hat, body, nose, arms, legs, and a fluffy beard β€” perfect as a handmade gift or a cheerful home accent.

Intermediate 5-7 Hours

Materials Needed for Pride Rainbow Gnome Amigurumi Pattern

β€” Main Fabric

  • 01
    Red Heart Super Saver (acrylic) in purple - small amount for hat/stripes
  • 02
    Red Heart Super Saver (acrylic) in blue - small amount for hat/stripes and body top
  • 03
    Red Heart Super Saver (acrylic) in green - small amount for hat/stripes and limbs
  • 04
    Red Heart Super Saver (acrylic) in yellow - small amount for hat/stripes and limbs
  • 05
    Red Heart Super Saver (acrylic) in orange - small amount for hat/stripes and limbs
  • 06
    Red Heart Super Saver (acrylic) in red - small amount for hat/stripes and limbs
  • 07
    Red Heart Super Saver (acrylic) in white or beige - for nose, hands, boots and beard base

β€” Tools Required

  • 01
    Crochet hook C/2 - 2.75 mm
  • 02
    Tapestry needle
  • 03
    Scissors
  • 04
    Polyester stuffing (Premium Polyester Fiber Fill)
  • 05
    Piece of cardboard (for the bottom of the body to make it flat)
  • 06
    Stitch markers (recommended)
  • 07
    Comb or brush (for combing the yarn beard)

Progress Tracker

0% Complete

β€” Hat :

Info :

Start crocheting hat with red yarn.

Round 1 :

6 sc in magic circle (6)

Round 2 :

sc in each st (6)

Info :

Change to orange.

Round 3 :

sc in each st (6)

Round 4 :

(sc, 1 inc) x 3 (9)

Info :

Change to yellow.

Round 5-6 :

sc in each st (9)

Info :

Change to green.

Round 7 :

(2 sc, 1 inc) x 3 (12)

Round 8 :

sc in each st (12)

Info :

Change to blue.

Round 9 :

sc in each st (12)

Round 10 :

(3 sc, 1 inc) x 3 (15)

Info :

Change to purple.

Round 11-12 :

sc in each st (15)

Info :

Change to red.

Round 13 :

(4 sc, 1 inc) x 3 (18)

Round 14 :

sc in each st (18)

Info :

Change to orange.

Round 15 :

sc in each st (18)

Round 16 :

(5 sc, 1 inc) x 3 (21)

Info :

Change to yellow.

Round 17-18 :

sc in each st (21)

Info :

Change to green.

Round 19 :

(6 sc, 1 inc) x 3 (24)

Round 20 :

sc in each st (24)

Info :

Change to blue.

Round 21 :

sc in each st (24)

Round 22 :

(7 sc, 1 inc) x 3 (27)

Info :

Change to purple.

Round 23-24 :

sc in each st (27)

Info :

Change to red.

Round 25 :

(8 sc, 1 inc) x 3 (30)

Round 26 :

sc in each st (30)

Info :

Change to orange.

Round 27 :

sc in each st (30)

Round 28 :

(9 sc, 1 inc) x 3 (33)

Info :

Change to yellow.

Round 29 :

sc in each st (33)

Round 30 :

(10 sc, 1 inc) x 3 (36)

Info :

Change to green.

Round 31 :

(11 sc, 1 inc) x 3 (39)

Round 32 :

(12 sc, 1 inc) x 3 (42)

Info :

Change to blue.

Round 33 :

(13 sc, 1 inc) x 3 (45)

Round 34 :

(14 sc, 1 inc) x 3 (48)

Info :

Change to purple.

Round 35 :

FLO (7 sc, 1 inc) x 6 (54)

Round 36 :

(8 sc, 1 inc) x 6 (60)

Round 37-38 :

sc in each st around (60)

Round 39 :

crab stitch (reverse single crochet) in each st around (60) (see pictures 1-8) - Optional (you can do single crochet in each stitch around (60)).

Info :

Slip stitch in next stitch, fasten off, cut yarn.

β€” Body :

Info :

Start crocheting the body from the bottom with blue yarn.

Round 1 :

6 sc in magic circle (6)

Round 2 :

inc x 6 (12)

Round 3 :

(1 sc, 1 inc) x 6 (18)

Round 4 :

(2 sc, 1 inc) x 6 (24)

Round 5 :

(3 sc, 1 inc) x 6 (30)

Round 6 :

(4 sc, 1 inc) x 6 (36)

Round 7 :

(5 sc, 1 inc) x 6 (42)

Round 8 :

(6 sc, 1 inc) x 6 (48)

Info :

Cut out circle of cardboard to the size of your work (see picture 9).

Round 9 :

BLO sc in each st (48)

Round 10-24 :

sc in each st (48)

Info :

Change to beige color. Insert cardboard. (see picture 10)

Round 25 :

BLO (6 sc, 1 dec) x 6 (42) (We're going to use front loops to sew hat to the body).

Round 26 :

(5 sc, 1 dec) x 6 (36)

Round 27 :

(4 sc, 1 dec) x 6 (30)

Round 28 :

(3 sc, 1 dec) x 6 (24)

Round 29 :

(2 sc, 1 dec) x 6 (18) - stuff body (see picture 11)

Round 30 :

(1 sc, 1 dec) x 6 (12)

Round 31 :

(1 dec) x 6 (6)

Info :

Fasten off, cut yarn, weave in yarn. (see picture 12)

β€” Nose :

Info :

Start crocheting with beige yarn.

Round 1 :

6 sc in magic circle (6)

Round 2 :

(sc, 1 inc) x 3 (9)

Round 3 :

(2 sc, 1 inc) x 3 (12)

Round 4 :

sc in each st around (12)

Round 5 :

(2 sc, 1 dec) x 3 (9)

Info :

Fasten off, cut yarn (leave long enough yarn to sew nose to body).

β€” Arm (make 2) :

Info :

Start crocheting the hand with white yarn.

Round 1 :

6 sc in magic circle (6)

Round 2 :

(1 sc, 1 inc) x 3 (9)

Round 3 :

(2 sc, 1 inc) x 3 (12)

Round 4 :

sc in each st (12)

Round 5 :

(2 sc, 1 dec) x 3 (9)

Info :

Change to purple. (Don't cut white yarn, leave it in front of work - see pictures 13-17).

Round 6 :

BLO (1 sc, 1 dec) x 3 (6)

Round 7 :

sc in each st (6)

Info :

Change to blue.

Round 8-9 :

sc in each st (6)

Info :

Change to green.

Round 10-11 :

sc in each st (6)

Info :

Change to yellow.

Round 12-13 :

sc in each st (6)

Info :

Change to orange.

Round 14-15 :

sc in each st (6)

Info :

Change to red.

Round 16 :

sc in each st (6)

Info :

Fold in half and crochet the edges together (3 sc). (see pictures 18-21).

Info :

Fasten off, cut yarn (leave long enough yarn for sewing arm to body).

Info :

Go back to round 5.

Item Name (Cuff) :

Chain 1 with white yarn that was left in front of work through the first front loop holding leg upside down.

Round 1 :

sc in first loop (same loop you did the chain), (1 inc, 1 sc) x 4, 1 inc, 1 sc (16) (see pictures 22-24).

Info :

Slip stitch in next stitch, fasten off, cut yarn, weave in yarn.

β€” Leg (make 2) :

Info :

Start crocheting the boot with white yarn.

Info :

Chain 5.

Round 1 :

sc in 2. stitch from hook, 2 sc, 3 sc in last stitch, 2 sc, 2 sc in last st (10) (see pictures below on next page for Rnd 1-3)

Round 2 :

3 sc, 1 inc, 3 hdc in next st, 1 inc, 3 sc, 3 sc in last st (16) (see picture below)

Round 3 :

5 sc, 1 inc, 1 hdc inc (2 hdc in same st), 1 hdc inc, 1 inc, 5 sc, 2 inc (22) (see picture below)

Round 4 :

BLO sc in each st (22)

Round 5 :

sc in each st (22)

Round 6 :

5 sc, 4 dec, 9 sc (18)

Round 7 :

4 sc, 3 dec, 8 sc (15)

Round 8 :

4 sc, 2 dec, 5 sc, 1 dec (12)

Round 9 :

sc in each st (12)

Round 10 :

(sc, 1 dec) x 4 (8)

Info :

Stuff boot.

Info :

Change to purple. (Don't cut white yarn, leave it in front of work). (see pictures 13-17 for arm)

Round 11 :

BLO sc in each st (8)

Round 12 :

sc in each st (8)

Info :

Change to blue.

Round 13-14 :

sc in each st (8)

Info :

Change to green.

Round 15-16 :

sc in each st (8)

Info :

Change to yellow.

Round 17-18 :

sc in each st (8)

Info :

Change to orange.

Round 19-20 :

sc in each st (8)

Info :

Change to red.

Round 21-22 :

sc in each st (8)

Info :

Change to purple.

Round 23-24 :

sc in each st (8)

Info :

Change to blue.

Round 25-26 :

sc in each st (8)

Info :

Change to green.

Round 27-28 :

sc in each st (8)

Info :

Change to yellow.

Round 29-30 :

sc in each st (8)

Info :

Change to orange.

Round 31-32 :

sc in each st (8)

Info :

Change to red.

Round 33 :

sc in each st (8)

Info :

Fold in half and crochet the edges together (4 sc). (see pictures 18-21 for arm)

Info :

Fasten off, cut yarn (leave long enough yarn for sewing leg to body).

Info :

Go back to round 11.

Item Name (Cuff) :

Chain 1 with white yarn that was left in front of work through the first front loop holding leg upside down.

Round 1 :

2 sc in first loop (same loop you did the chain), 7 inc (2 sc in each st around) (16) (see pictures 22-23 for arm)

Info :

Slip stitch in next stitch, fasten off, cut yarn, weave in yarn.

β€” Assembly and decoration :

Info :

Sew nose on body.

Info :

Sew hands on both sides of body (approx. 5 stitches from nose on each side).

Info :

Sew hat on body.

Info :

Sew legs to the bottom of the body. Add shoe laces.

Info :

Beard: cut about 15 pieces of yarn about 10 inches long. Tie yarn pieces on both sides of the nose (about 4 on each side) and under the nose (about 6-7 pieces). Separate yarn threads and comb with a brush.

Info :

Sew on any decorations youd like to (buttons, embellishments, etc.).

Assembly Instructions

  • Sew nose on body centered on the face area, using the long tail left from the nose to secure it through the body fabric with a tapestry needle.
  • Sew hands on both sides of the body approximately 5 stitches from the nose on each side, use pins to place and check symmetry before sewing.
  • Sew hat to the top of the body using the front loop round (round 25 BLO) as the attachment edge so the hat sits flush with the body.
  • Sew legs to the bottom of the body evenly spaced for stability, then add shoelaces using short lengths of purple yarn or similar.
  • Attach the beard by tying about 15 yarn pieces (approx. 10 inches long) around the nose area: about 4 pieces on each side and 6-7 under the nose, then comb them out to create a fluffy beard.
  • Add any final decorations such as buttons or embellishments and weave in all loose ends securely.

Important Notes

  • πŸ’‘Use a piece of cardboard cut to the size of round 8 of the body to create a flat, stable base for the gnome.
  • πŸ’‘When instructed to leave yarn in front of work (for cuffs), do not cut it; youll use it to crochet the cuff later for a neat finish.
  • πŸ’‘Stuff the body gradually and stop stuffing before the head area so that shaping and sewing go smoothly and the gnome sits correctly.

This Pride Rainbow Gnome pattern brings a burst of color to your handmade collection and makes a joyful, heartfelt gift. 🧢 The tall striped hat, floppy arms, and fluffy yarn beard are playful details that are fun to crochet and easy to personalize. 🌈 Enjoy making this cheerful gnome for displays, presents, or to brighten a shelfβ€”happy crocheting! ✨

You ask,

we answer.

FAQs

What size will the finished piece be?

The finished amigurumi measures approximately 17 inches (43 cm) tall when using the recommended yarn and 2.75 mm hook.

Can I use different yarn weights for this pattern?

Yes, you can use different yarn weights, but this will change the final size; choose an appropriate hook for your yarn and expect a different finished measurement.

Do I need prior crochet experience for this pattern?

This pattern is rated intermediate, so basic knowledge of single crochet, increases, decreases, and working in the round is recommended.

How long does this project typically take to complete?

Most crocheters complete this project in 5-7 hours, depending on experience level and how much time you spend on color changes and assembly.