🧢 Beautiful ✨ Detailed πŸ’ Adorable

Pompompurin Amigurumi Pattern

Pompompurin Amigurumi Pattern
4.2β˜… Rating
5-7 Hours Time Needed
2.6K Made This
βœ‚οΈ

Intermediate Level

Ideal for those with basic crochet experience, featuring slightly more advanced stitches and techniques to expand your skills.

⏱️

Weekend Treat

Takes 5-7 hours, making it an enjoyable project to finish over a couple of days.

🧸

Cute Companion

An adorable friend to cherish, handcrafted with love to bring comfort and joy for years to come.

About This Pompompurin Amigurumi Pattern

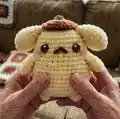
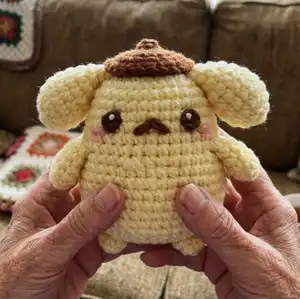
This pattern creates a soft, squishable Pompompurin amigurumi complete with beret, ears, arms, legs, and tail. It uses basic amigurumi techniques like magic rings, increases and decreases, and working in rounds. The body and head are crocheted in one continuous piece to make shaping easy and seamless.

Pompompurin Amigurumi Pattern crochet pattern - detailed view of completed project

Clear round-by-round instructions are provided for every piece, along with materials, abbreviations and step-by-step assembly notes. Perfect for gifting or displaying, and easy to customize with color or facial details.

Why You'll Love This Pompompurin Amigurumi Pattern

I absolutely love this pattern because it captures Pompompurin's plush, cuddly look in a compact, satisfying project. I enjoy that the body and head are worked in one piece β€” it creates a neat silhouette with less sewing. The beret and tiny tail add delightful character and are fun little details to crochet. Making the ears and arms separately lets you position them for the exact expression you want. I also love seeing how different yarn textures give this pattern such charmingly different finishes.

Pompompurin Amigurumi Pattern step 1 - construction progress Pompompurin Amigurumi Pattern step 2 - assembly progress Pompompurin Amigurumi Pattern step 3 - details and accessories Pompompurin Amigurumi Pattern step 4 - final assembly and finishing

Switch Things Up

I love how easy it is to customize this pattern with different yarns and textures; try using a fuzzy or boucle yarn for the body to give Pompompurin a plush, pompom look.

If you want a smaller or larger Pompompurin, change your hook and yarn weight β€” use thinner yarn and a smaller hook for a tiny keychain version, or bulky yarn with a larger hook for a chunky cuddle buddy.

Swap the beret color to match seasons or themes; a pastel beret gives a springtime feel, while deep brown makes it cozy for winter displays.

Personalize the face by adjusting eye and mouth shapes cut from felt β€” larger eyes create a cuter expression, while smaller features look subtler and calmer.

Try embroidering small details like freckles or a mouth instead of using felt if you prefer sewn features; embroidery gives a softer, washable finish.

Add a tiny scarf, bow or removable accessory for gifting options β€” these can be crocheted separately and attached with a few stitches or a small snap.

I sometimes place a small pouch of dried lavender inside the stuffing to make a scented plush; its a lovely touch for gifts or calming toys.

Consider adding a few beads of wire inside the arms if youd like posable limbs; secure the wire ends well and encase them in yarn before stuffing.

Create a family set by changing colors and slightly modifying ear shapes so each character has a unique personality β€” a matching set makes a lovely gift collection.

Dont be afraid to experiment with different facial placements; moving the eyes higher or lower or changing mouth position can completely change the expression and charm of your Pompompurin.

Common Mistakes & How to Fix Them

βœ— Skipping stitch counts during increases will change the shape drastically; recount stitches at the end of each round to ensure accuracy. βœ— Forgetting to stuff as you go makes shaping difficult later on; add stuffing gradually at the recommended rounds to maintain even firmness. βœ— Leaving tails too short when fastening off prevents secure sewing; always leave a long tail for sewing parts together neatly and securely. βœ— Not flattening and joining ear layers carefully can leave gaps; crochet the 3 sc through both layers as instructed to close the ear cleanly.

Pompompurin Amigurumi Pattern

Make your own adorable Pompompurin plush with this friendly crochet pattern. You'll create a squishy, squishable toy with a cute beret and sweet facial details. The pattern includes step-by-step rounds, parts for arms, ears, legs, beret, and clear assembly notes so you can sew everything together with confidence.

Intermediate 5-7 Hours

Materials Needed for Pompompurin Amigurumi Pattern

β€” Main Fabric

  • 01
    Yellow yarn - main color for body and limbs (approx 50-100g, worsted/light DK weight recommended)
  • 02
    Brown yarn - small amount for beret and facial accent (approx 10-20g)
  • 03
    Brown felt - small piece for eyes and mouth details
  • 04
    Optional: pink blush for rosy cheeks (small amount)

β€” Tools Required

  • 01
    Crochet hook (use a size appropriate for your yarn; sample uses a hook to create a firm fabric)
  • 02
    Tapestry needle for sewing parts and weaving ends
  • 03
    Scissors and craft glue
  • 04
    Stuffing (polyester fiberfill)
  • 05
    Pins or safety pins for holding pieces while sewing
  • 06
    Brown felt for eyes and mouth
  • 07
    Optional: pink blush and small brush for cheeks

Progress Tracker

0% Complete

β€” Abbreviations :

Info :

R - Round. MR - Magic Ring. ch - chain. sc - single crochet. inc - increase. dec - decrease. slst - slip stitch. st(s) - stitch(es).

β€” Materials :

Info :

Brown yarn. Yellow yarn. Crochet hook. Tapestry needle. Scissors and glue. Stuffing. Brown felt. Optional: pink blush.

β€” Arms and Ears :

Arms (P1) :

Use yellow yarn. R1. 5sc in a MR (5)

Round 2-4 :

5sc (3 rounds) (5)

Info :

Do not stuff, fasten off and leave a long tail.

Ears (P1) :

Use yellow yarn. R1. 5sc in a MR (5)

Round 2 :

(inc) x 5 (10)

Round 3 :

(sc, inc) x 5 (15)

Round 4 :

15sc (15)

Round 5 :

(3sc, dec) x 3 (12)

Round 6 :

12sc (12)

Info :

Stuff as you go.

Round 7 :

(2sc, dec) x 3 (9)

Round 8 :

(sc, dec) x 3 (6)

Info :

Flatten the opening and crochet 3sc through both layers of sc. Fasten off and leave a long tail.

β€” Legs, Tail, Beret :

Legs + Tail (P1) :

Use yellow yarn. R1. 6sc in a MR (6)

Round 2 :

6sc (6)

Info :

Fasten off and leave a long tail.

Beret (P1) :

Use brown yarn. R1. 6sc in a MR (6)

Round 2 :

(inc) x 6 (12)

Round 3 :

(sc, inc) x 6 (18)

Round 4 :

(2sc, inc) x 6 (24)

Round 5 :

24slst (24)

Info :

Fasten off and leave a long tail.

Info :

Make ch4. Start crocheting on the 3rd ch from hook: 2sc. Fasten off and leave a long tail. Sew the stalk on the beret (in the middle of MR).

β€” Body and Head :

Info :

The body and head will be crocheted in one go, starting from the body to the head. We will start with a chain. Stitches are worked around both sides of the foundation chain.

Round 1 :

Ch9, start crocheting on the 2nd ch from hook: inc, 6sc, 3sc in the last ch. Continue on the other side of the foundation chain: 7sc (18)

Round 2 :

2inc, 6sc, 3inc, 6sc, inc (24)

Round 3 :

(sc, inc) x2, 6sc, (sc, inc) x3, 7sc, inc (30)

Round 4 :

(2sc, inc) x2, 6sc, (2sc, inc) x3, 8sc, inc (36)

Round 5-6 :

36sc (2 rounds) (36)

Round 7 :

(5sc, inc) x 6 (42)

Round 8-10 :

42sc (3 rounds) (42)

Round 11 :

(5sc, dec) x 6 (36)

Round 12-14 :

36sc (3 rounds) (36)

Round 15 :

(4sc, dec) x 6 (30)

Round 16-18 :

30sc (3 rounds) (30)

Info :

Stuff as you go.

Round 19 :

(3sc, dec) x 6 (24)

Round 20 :

(sc, dec) x 8 (16)

Round 21 :

8dec (8)

Info :

Fasten off and leave a long tail. Sew the hole closed and weave in the yarn tails.

β€” Eyes and Mouth :

Info :

Use brown felt.

Eyes :

I cut my felt around 2sts high, you can cut it into whatever shape or size you like. Make two.

Mouth :

I cut my felt around 3sts wide, you can cut it into whatever shape or size you like. Make one.

β€” Assembly :

Info :

You can pin the parts with safety pins before sewing.

Instruction :

Sew the legs at the bottom side of the body.

Instruction :

Sew the arms at the side of the body (around R12-13).

Instruction :

Sew the ears at the side of the head (around R19-20).

Instruction :

Sew the beret on the top of the head.

Instruction :

Sew the tail at the back (around R7). Optional: Sew a small 'x' below the tail.

Instruction :

Glue the eyes and mouth on the face. Use pink blush for the rosy cheeks. Weave in all the yarn tails and youre done !

Assembly Instructions

  • You can pin the parts with safety pins before sewing to check placement before permanently stitching.
  • Sew the legs at the bottom side of the body, spacing the three legs evenly for balance.
  • Sew the arms at the side of the body around rounds 12-13, angling slightly for a natural pose.
  • Sew the ears to the side of the head around rounds 19-20, placing symmetrically on both sides.
  • Attach the beret to the top of the head by sewing through the MR in the center; sew the stalk onto the beret.
  • Glue or sew the brown felt eyes and mouth into position and add pink blush for rosy cheeks.

Important Notes

  • πŸ’‘The body and head are crocheted in one piece starting from the body and working up to the head; follow the foundation chain instructions carefully.
  • πŸ’‘Stuff the body and head gradually as you work to maintain an even, round shape and avoid lumps.
  • πŸ’‘Weave in all yarn tails and secure sewn seams so small hands cannot pull pieces loose.

This Pompompurin pattern makes a huggable, smiley companion youll cherish or gift with love. Create the beret, tiny tail and expressive face to add personality to your plush. Follow the step-by-step rounds and assembly tips for a neat, finished toy. 🧢✨😊

You ask,

we answer.

FAQs

What size will the finished piece be?

The finished amigurumi measures approximately 12-15 cm tall depending on yarn weight and hook size; adjusting yarn and hook will change final size.

Can I use different yarn weights for this pattern?

Yes, you can use different yarn weights, but this will affect the final size; use a hook appropriate to your chosen yarn for a firm fabric.

Do I need prior crochet experience for this pattern?

This pattern is rated intermediate, so basic knowledge of single crochet, increases, decreases and working in the round is recommended.

How long does this project typically take to complete?

Most crocheters complete this project in 5-7 hours, though time may vary based on experience level and working pace.