🧢 Beautiful ✨ Detailed πŸ’ Adorable

Portia's Sail 4ply Knitting Pattern

Portia's Sail 4ply Knitting Pattern
4.7β˜… Rating
5-7 Hours Time Needed
1.8K Made This
βœ‚οΈ

Intermediate Level

Ideal for those with basic crochet experience, featuring slightly more advanced stitches and techniques to expand your skills.

⏱️

Weekend Treat

Takes 5-7 hours, making it an enjoyable project to finish over a couple of days.

🌟

Elegant Drape

Soft flow with graceful movement, designed to flatter all body types with sophisticated comfort.

About This Portia's Sail 4ply Knitting Pattern

This pattern creates "Portia's Sail", a triangular shawl inspired by a ship's sail with dropped stitches and eyelets. It is designed to use a single 100g skein of 4ply/fingering yarn for a lightweight, elegant wrap. The shaping and lace provide a flowing silhouette that looks great casually draped or pinned.

Portia's Sail 4ply Knitting Pattern crochet pattern - detailed view of completed project

Worked from the cast-on point to a loose cast-off edge, the pattern uses simple repeats and increases to build the sail shape. The finished shawl measures approximately 179cm wingspan by 47cm deep after blocking.

Why You'll Love This Portia's Sail 4ply Knitting Pattern

I absolutely love this pattern because it captures the airy feeling of a sail with very simple knitting techniques. I designed the shaping to be satisfying and rhythmic so you can enjoy the process as the piece grows. The combination of garter, dropped stitches and eyelets creates a beautiful texture that opens up with blocking. I also love that it uses only a single skein of fingering yarn so the finished garment is light and travel-friendly. This shawl is a joy to knit while watching a movie or chatting with friends.

Portia's Sail 4ply Knitting Pattern step 1 - construction progress Portia's Sail 4ply Knitting Pattern step 2 - assembly progress Portia's Sail 4ply Knitting Pattern step 3 - details and accessories Portia's Sail 4ply Knitting Pattern step 4 - final assembly and finishing

Switch Things Up

I love how easily you can customise this shawl by choosing different colourways; try a hand-dyed skein for a variegated sailing effect.

To make the shawl larger, I often switch to a heavier yarn and larger needles; this gives a chunkier, cozier version that still reads the lace motifs.

If you prefer a more delicate result, I will use a thinner lace-weight yarn and smaller needles to create a fine heirloom shawl with more drape.

I sometimes add beads on the yarn-overs for a touch of sparkleβ€”add them to the yoo stitches before dropping for subtle glittering eyelets.

For a reversible look, consider working garter edges longer or adding a knitted-on border after blocking to change the final silhouette.

I recommend experimenting with blocking points; pin some yoo lace points more widely apart for a dramatic sail or closer together for a gentler wave.

I often combine two skeins in alternating stripes for a bicolour sail effect; be mindful of gauge and join transitions neatly.

To create a more structured shawl, I will lightly starch or use a firm block so the lace retains a crisp shape when worn.

Personalise the ending edge by adding a picot bind-off or a simple crocheted scallop if you enjoy mixed techniques.

I also like to create a matching set by knitting smaller versions for shawlettes or scarves using the same motif repeats for a coordinated look.

Common Mistakes & How to Fix Them

βœ— Not checking gauge; use the suggested gauge of 12 sts x 14 rows in garter stitch if you prefer a specific finished size, but it is not strictly required for this design. Ensure your tension is even to keep lace sections neat. βœ— Forgetting to keep track of the slipped edge stitch; always slip the first stitch as instructed to preserve a neat selvedge and consistent shaping throughout the shawl. βœ— Dropping yarn overs accidentally when instructed to 'drop the yoo'; only drop the specified yarn over when the pattern explicitly says to drop it, and keep a lifeline or row counter to avoid errors. βœ— Casting off too tightly which prevents the lace from opening; change to 4.5mm needle and cast off loosely as directed to allow the lace areas to bloom when blocked. βœ— Skipping the blocking step; blocking opens up the dropped stitch lace and gives the shawl its intended wingspan and drape, so pin it out and steam or wet-block carefully.

Portia's Sail 4ply Knitting Pattern

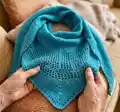
Make a graceful, Outlander-inspired triangular shawl worked from the casting-on point to a gently waved edge. This single-skein 4ply/fingering pattern uses dropped stitches and eyelets to evoke a sailing cloth and finishes with a soft, flowing drape. You will enjoy the rhythmic garter sections and the open lace panels that bloom with a gentle block.

Intermediate 5-7 Hours

Materials Needed for Portia's Sail 4ply Knitting Pattern

β€” Main Fabric

  • 01
    Fingering/4ply weight yarn (Royal Fingering) by Honey Girl Farms - Colourway Moroccan Blue - 1 x 100g skein (approx 400m / 437 yards)

β€” Tools Required

  • 01
    Knitting needles 3.5mm US (for main work)
  • 02
    Knitting needles 4.5mm US (for loose cast-off)
  • 03
    Pins for blocking the lace edge
  • 04
    Yarn/tapestry needle for sewing in ends
  • 05
    Scissors

Progress Tracker

0% Complete

β€” Materials :

Info :

Needles.... 3.5mm US and 4.5mm US. Yarn.... I have used Honey Girl Farms Yarns seen here in Royal Fingering in colourway Moroccan Blue. 1 x 100g skein of 400m/437yrds.

β€” Abbreviations :

Infos :

K - Knit. P - Purl. Slp1 - slip the first stitch from the left to right needle without working the stitch. Yoo - wrap the yarn over the needle twice. K2tg - knit the next two stitches together. Yo - wrap the yarn around the needle once. Kfb - knit the stitch as normal but before transferring it to the right hand needle, also knit into the back of the stitch creating an extra stitch.

β€” Pattern Instructions :

Info :

Set Up: Cast on 4sts with 3.5mm needle

Row 1 :

Slp1, knit to the last stitch, yo, kfb

Row 2 :

Slp1, k2, yo, knit into back of next stitch, knit to the last 2 sts, k2tg

Info :

Repeat these 2 rows twice more

Section 1 - Now work :

Row 1. Slp1, k2, yoo, k1, yoo, knit all stitches to the last stitch, yo, kfb

Row 2 :

Slp1, k2, yo, knit into the back of the next stitch, knit to the yoo, drop the yoo, k1, drop yoo, knit 1, k2tg

Info :

Repeat these 2 rows a further 29 times

Section 2 - Now work :

Row 1. Slp1, k2, (yoo, k1) repeat the bracket across to the last stitch, yo, kfb

Row 2 :

Slp1, k2, yo, knit into the back of the next stitch, (drop yoo, k1) repeat the bracket to the last 2 sts, k2tg

Info :

Repeat these 2 rows twice more

Section 3 - Now work :

Row 1. Slp1, k2, yoo, k1, yoo, knit all stitches to the last stitch, yo, kfb

Row 2 :

Slp1, k2, yo, knit into the back of the next stitch, knit to the yoo, drop the yoo, k1, drop yoo, knit 1, k2tg

Info :

Repeat these 2 rows a further 19 times

Section 4 - Now work :

Row 1. Slp1, k2, yoo, k1, yoo, k1, (k2tg, yo) repeat the bracket 10 times across the row, knit all remaining stitches to the last stitch, yo, kfb

Row 2 :

Slp1, k2, yo, knit into the back of the next stitch, knit to the yoo, drop yoo, k1, drop yoo, k1, k2tg

Info :

Repeat these two rows another 9 times, each time increasing the (k2tg, yo) bracket by one repeat.

Section 5 - Now work :

Row 1. Slp1, k2, (yoo, k1) repeat the bracket across to the last stitch, yo, kfb

Row 2 :

Slp1, k2, yo, knit into the back of the next stitch, (drop yoo, k1) repeat the bracket to the last 2 sts, k2tg

Section 6 - Now work :

Row 1. Slp1, k2, yoo, k1, yoo, k1, (k2tg, yo) repeat the bracket 21 times across the row, knit all stitches to the last stitch, yo, kfb

Row 2 :

Slp1, k2, yo, knit into the back of the next stitch, knit to the yoo, drop yoo, k1, drop yoo, k1, k2tg

Info :

Repeat these two rows another 14 times, each time increasing the (k2tg, yo) bracket by one repeat.

Section 7 - Now work :

Row 1. Slp1, k2, (yoo, k1) repeat the bracket 90 times, then knit across to the last stitch, yo, kfb

Row 2 :

Slp1, k2, yo, knit into the back of the next stitch, (drop yoo, k1) repeat the bracket to the last yoo, and then knit to the last 2 sts, k2tg

Section 8 - Now work :

Row 1. Slp1, k2, yoo, k1, yoo, k1, (k2tg, yo) repeat the bracket 36 times across the row, knit all stitches to the last stitch, yo, kfb

Row 2 :

Slp1, k2, yo, knit into the back of the next stitch, knit to the yoo, drop yoo, k1, drop yoo, k1, k2tg

Info :

Repeat these two rows twice more, each time increasing the (k2tg, yo) bracket by one repeat.

Section 9 - Now work :

Row 1. Slp1, k2, yoo, k1, yoo, knit all stitches to the last stitch, yo, kfb

Row 2 :

Slp1, k2, yo, knit into the back of the next stitch, knit to the yoo, drop the yoo, k1, drop yoo, knit 1, k2tg

Info :

Repeat these 2 rows a further 16 times

Section 10 - Now work :

Row 1. Slp1, k2, yoo, k1, yoo, knit all the stitches to the last stitch, yo, kfb

Row 2 :

Slp1, (k2tg, yo) repeat the bracket to the last stitch before the yoo, k1, drop yoo, k1, drop yoo, k1, k2tg

Info :

Change to 4.5mm needle and loosely cast off all stitches. Sew in the ends and block the shawl to open up the lace areas. I have used pins to block the yoo lace edge into random points, this gives the shawl a slight waved edge as if the sail is blowing in the wind, or you can of course block it straight. Blocked finished measurements are, 179cm wing span by 47cm deep approx.

Assembly Instructions

  • Change to 4.5mm needle and loosely cast off all stitches as directed to create a soft, open edge.
  • Sew in all yarn ends neatly with a yarn needle, weaving into the fabric to secure and hide tails.
  • Block the shawl to open up the dropped stitch lace and eyelets, pinning the yoo lace edge into random points if you want the waved β€˜sail’ effect.
  • Use blocking pins to shape the wingspan to approximately 179cm and depth to approximately 47cm, allowing the lace areas to fully open.

Important Notes

  • πŸ’‘Work from the cast-on point to casting off in the order provided to achieve the intended shaping.
  • πŸ’‘Change to the larger needle (4.5mm) before casting off to ensure a loose, flexible selvedge and open lace.
  • πŸ’‘Pin the yoo lace edge while blocking to create the waved sail look or block straight depending on your preference.
  • πŸ’‘Weave in ends as you go or immediately after casting off to tidy the shawl before blocking.

Portia’s Sail is a breezy, elegant shawl that evokes the sweep of a ship’s sail and dresses any outfit with gentle movement. The single-skein 4ply construction makes it a perfect travel or gift project with a beautiful lace bloom after blocking. Enjoy knitting this sail and pin it out to your preferred wave or straight finish for a personal touch. 🧢✨

You ask,

we answer.

FAQs

What size will the finished piece be?

Blocked finished measurements are approximately 179cm wingspan by 47cm deep.

Can I use different yarn weights for this pattern?

Yes, but changing yarn weight will affect final size and drape; adjust needle sizes accordingly and expect a different gauge and finished dimensions.

Do I need prior knitting experience for this pattern?

This pattern is rated intermediate and uses techniques such as yarn overs, dropped yarn overs and kfb increases; basic knowledge of knitting and reading pattern repeats is recommended.

How long does this project typically take to complete?

Most knitters finish this shawl in 5-7 hours, though time varies based on experience, yarn choice and blocking time.