🧶 Beautiful ✨ Detailed 💝 Adorable

Pino Amigurumi Pattern

Pino Amigurumi Pattern
4.6★ Rating
5-7 Hours Time Needed
3.6K Made This
✂️

Intermediate Level

Ideal for those with basic crochet experience, featuring slightly more advanced stitches and techniques to expand your skills.

⏱️

Weekend Treat

Takes 5-7 hours, making it an enjoyable project to finish over a couple of days.

🧸

Cute Companion

An adorable friend to cherish, handcrafted with love to bring comfort and joy for years to come.

About This Pino Amigurumi Pattern

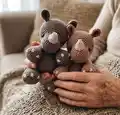
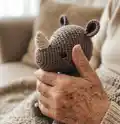
This pattern creates Pino, a small amigurumi rhino worked mostly in single crochet using cotton yarn. The design includes assembled legs, arms, a rounded body, head with sewn-on horn and embroidered nails for charming detail. Detailed stitch counts and photos help you place limbs and features accurately.

Pino Amigurumi Pattern crochet pattern - detailed view of completed project

The pattern uses continuous rounds and simple shaping to create soft, cuddly proportions. Youll find tips for stuffing, marking rounds and finishing small parts for a professional result.

Why You'll Love This Pino Amigurumi Pattern

I absolutely love this pattern because it combines simple amigurumi techniques with thoughtful shaping to create a tiny character full of personality. I enjoy how the small horn and embroidered nails give Pino so much charm with minimal effort. The pattern photos and step-by-step rounds make it easy for me to see exactly where to place parts and how the finished toy should look. I also appreciate that it is adaptable — you can change yarn colors and sizes to make many different little rhinos.

Pino Amigurumi Pattern step 1 - construction progress Pino Amigurumi Pattern step 2 - assembly progress Pino Amigurumi Pattern step 3 - details and accessories Pino Amigurumi Pattern step 4 - final assembly and finishing

Switch Things Up

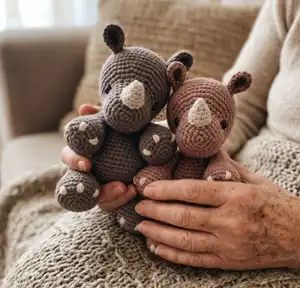
I love customizing Pino by changing the yarn color — try pastel pink or mint green for a whimsical baby version, or gray and cream for a more natural look.

I sometimes swap the recommended cotton for a slightly thicker yarn and a larger hook to create a chunkier, cuddlier rhino that is perfect for toddlers.

I like to add tiny accessories like a crocheted scarf, bow, or a miniature flag to give each Pino its own personality.

If you prefer a keychain, I reduce the hook size and use fingering yarn to make a tiny Pino that fits on a bag or keys.

For eyes, try embroidering them instead of safety eyes if youre making the toy for a baby, or use different sized safety eyes for varied expressions.

I often experiment with slightly changing the horn size by adding or removing a round to achieve different snout proportions.

To make Pino poseable, consider adding a short piece of flexible wire inside the limbs before stuffing; test carefully for safety and secure ends well.

I sometimes embroider freckles, a smile, or tiny eyelashes to customize the face and change the toy's expression subtly.

Want a set? Make two Pintos in complementary colors and stitch them together with a small loop so they can be hung as a matching pair.

I recommend adding felt details like a tiny heart on the chest or a felt patch on the belly for mixed-media charm and texture.

Common Mistakes & How to Fix Them

✗ Skipping a stitch marker while working in continuous rounds leads to lost track of the beginning of the round; always place a marker at the first stitch and move it each round to maintain correct stitch counts. ✗ Overstuffing small pieces like the horn or nails causes them to lose shape and look bulky; stuff little parts lightly and gradually until they hold their form. ✗ Not counting stitches after increases or decreases results in uneven shaping and mismatched pieces; count your stitches every few rounds, especially after any shaping rounds. ✗ Folding and closing openings without checking round alignment can misplace joints and seams; pin the parts and ensure the joints (e.g., rounds 5 and 6 on limbs) are parallel before seaming, adjusting stitches if needed.

Pino Amigurumi Pattern

Create Pino, an adorable hand-crocheted baby rhino perfect for gifts, nursery decor, or a cozy collectible. This pattern walks you through each piece — legs, arms, body, head, ears, horn and nails — with clear photos and step-by-step rounds. Youll work in continuous rounds with simple increases and decreases to shape this lovable companion. Suitable for crocheters who know basic stitches and want a rewarding weekend project.

Intermediate 5-7 Hours

Materials Needed for Pino Amigurumi Pattern

— Main Fabric

  • 01
    Eco Cotton by Grundl (recommended) using 2.5 mm crochet hook for approx 16 cm/6.3 inches finished rhino
  • 02
    1 skein = 50 g, yardage = 105 m - classified as worsted/Aran in the pattern notes
  • 03
    Body: Nr. 08 "Pastell Schlamm" (dark brown) OR Nr. 03 "Mocca" (light brown) - approx 56 g
  • 04
    Horn and nails: Nr. 01 "Natur Weiss" (off white) - approx 6 g
  • 05
    Remnant of white cotton yarn (eg. Schachenmayr Catania) for eye detail - approx 30 cm / 12 inches

— Tools Required

  • 01
    Crochet hook 2.5 mm (size B) or according to yarn
  • 02
    Black embroidery thread to embroider the eyebrows
  • 03
    Pair of safety eyes, diameter 8 mm, black
  • 04
    Darning needle (blunt tip)
  • 05
    Sewing needle
  • 06
    Embroidery needle (pointed, big eyelet)
  • 07
    Stitch marker
  • 08
    Fiberfill / polyester stuffing
  • 09
    Scissors
  • 10
    Pins for attaching and checking placement

Progress Tracker

0% Complete

— Legs :

Round 1 :

6 sc into MR = 6 st

Round 2 :

inc x 6 = 12 st

Round 3 :

(1sc, inc) x 6 = 18 st

Round 4 :

(2 sc, inc) x 6 = 24 st

Round 5 :

(3 sc, inc) x 6 = 30 st

Round 6 :

BLO 30 sc = 30 st

Round 7-9 :

30 sc = 30 st (3 rounds)

Round 10 :

(3 sc, dec) x 6 = 24 st

Round 11 :

24 sc = 24 st (1 round)

Round 12 :

(2sc, dec) x 6 = 18 st

Round 13-14 :

18 sc = 18 st (2 rounds)

Info :

Stuff the leg with fiberfill up to round 11. Do not stuff too tightly, so that the leg will keep its shape.

Round 15 :

(1 sc, dec) x 6 = 12 st

Round 16 :

12 sc = 12 st (1 round)

Round 17 :

dec x 6 = 6 st

Round 18 :

6 sc = 6 st

Round 19 :

2 sc, this round is not crocheted until the end of the round. (When folding the opening the joints of round 5 and 6 should be parallel. Adjust the number of stitches if needed.)

Info :

Fold the two sides of the arm together and crochet 2 sc across. Cut the yarn and weave in the yarn tail nicely.

— Arms :

Round 1 :

6 sc into MR = 6 st

Round 2 :

inc x 6 = 12 st

Round 3 :

(1 sc, inc) x 6 = 18 st

Round 4 :

(2 sc, inc) x 6 = 24 st

Round 5 :

BLO 24 sc = 24 st (1 round)

Round 6-9 :

24 sc = 24 st (4 rounds)

Round 10 :

(2 sc, dec) x 6 = 18 st

Round 11 :

18 sc = 18 st (1 round)

Round 12 :

(1 sc, dec) x 6 = 12 st

Round 13-14 :

12 sc = 12 st (2 rounds)

Info :

Stuff the arm with fiberfill up to round 12. Do not stuff too tightly, so that the arm will keep its shape.

Round 15 :

(2 sc, dec) x 3 = 9 st

Round 16-17 :

9 sc = 9 st (2 rounds)

Round 18 :

(1 sc, dec) x 3 = 6 st

Round 19 :

2 sc, the round is not crocheted until the end of the round. (When folding the opening the joints of round 5 and 6 should be parallel. Adjust the number of stitches if needed.)

Info :

Fold the two sides of the arm together and crochet 2 sc across. Cut the yarn and weave in the yarn tail nicely.

— Body :

Round 1 :

6 sc into MR= 6 st

Round 2 :

inc x 6 = 12 st

Round 3 :

(1 sc, inc) x 6 = 18 st

Round 4 :

(2 sc, inc) x 6 = 24 st

Round 5 :

(3 sc, inc) x 6 = 30 st

Round 6 :

(4 sc, inc) x 6 = 36 st

Round 7 :

(5 sc, inc) x 6 = 42 st

Round 8 :

(6 sc, inc) x 6 = 48 st

Round 9-10 :

48 sc = 48 st (2 rounds)

Info :

The stitch marker is on the front. You can use a yarn remnant as a stitch marker for the front. Make sure that the legs are crocheted in with the right side to the front - the joints of the rounds have to be at the backside.

Round 11 :

13 sc, crochet in the 1st leg with 2 sc, 24 sc, Crochet in the 2nd leg with 2 sc, 7 sc = 48 st (At the front the legs have 20 sc in between and at the back there are 24 sc in between. Make sure that the legs are exactly symmetrically at each side of the body. Change the position of the arms when needed.)

Round 12-14 :

48 sc = 48 st (3 rounds)

Round 15 :

(6 sc, dec) x 6 = 42 st

Round 16-17 :

42 sc = 42 st (2 rounds)

Round 18 :

(5 sc, dec) x 6 = 36 st

Round 19 :

(4 sc, dec) x 6 = 30 st

Round 20-21 :

30 sc = 30 st (2 rounds)

Round 22 :

(3 sc, dec) x 6 = 24 st

Info :

Now start stuffing the body with fiberfill.

Round 23 :

(2 sc, dec) x 6 = 18 st

Round 24 :

7 sc, crochet in the 1st arm with 2 sc, 7 sc, crochet in the 2nd arm with 2 sc = 18 st (The arms have 7 sc in between - at the front and as well at the back. Make sure that the arms are exactly symmetrically at each side of the body. Change the position of the arms when needed.)

Round 25 :

(1 sc, dec) x 6 = 12 st

Info :

Fold the two sides of the opening together and crochet 5 sc across. Cut the yarn and weave in the yarn tail nicely.

— Tail :

Info :

Mark the position of tail centered at the back in round 9 with pins. Thread in a piece of yarn - about 20cm / 8 inches in length - and make a knot. Cut it leaving approx. 1 cm/0,4 inches.

— Head :

Round 1 :

6 sc into MR= 6 st

Round 2 :

inc x 6 = 12 st

Round 3 :

(1 sc, inc) x 6 = 18 st

Round 4 :

(2 sc, inc) x 6 = 24 st

Round 5 :

(3 sc, inc) x 6 = 30 st

Round 6-9 :

30 sc = 30 st (4 rounds)

Round 10 :

4 sc, (inc, 1 sc) x 6, 14 sc = 36 st

Info :

You can already mark the position of the security eyes with two yarn remnants in round 11.

Round 11 :

5 sc, place first marker, (inc, 2 sc) x 5, inc, place second marker, 15 sc = 42 st

Round 12 :

6 sc, (inc, 3 sc) x 6, 12 sc = 48 st

Round 13-14 :

48 sc = 48 st (2 rounds)

Info :

Now insert the safety eyes (diameter: 8 mm) at the position you marked before.

Round 15 :

48 sc = 48 st (1 round)

Round 16 :

42 sc, crochet in the body with 5 sc, 1 sc = 48 st (Make sure that the head is attached upright.)

Round 17-19 :

48 sc = 48 st (3 rounds)

Round 20 :

(6 sc, dec) x 6 = 42 st

Round 21 :

42 sc = 42 st (1 round)

Round 22 :

(5 sc, dec) x 6 = 36 st

Round 23 :

(4 sc, dec) x 6 = 30 st

Round 24 :

(3 sc, dec) x 6 = 24 st

Round 25 :

(2 sc, dec) x 6 = 18 st

Info :

Stuff the head with fiberfill.

Round 26 :

(1 sc, dec) x 6 = 12 st

Round 27 :

dec x 6 = 6 st

Info :

Cut the yarn and weave in the yarn tail nicely.

— Ears :

Round 1 :

6 sc into MR = 6 st

Round 2 :

inc x 6 = 12 st

Round 3 :

1 ch, 5 hdc, (2 dc in 1 st) x 2, 5 hdc = 14 st

Info :

Finish off with a sl st in the next st. Cut the yarn leaving a long tail for sewing. The working thread is weaved in nicely and then cut it. Fold the ear together and sew the two stitches at the bottom together. Insert the needle from above and withdraw it at the bottom.

Info :

Attach the ears: The ears are sewn to the head centered at round 17 with 12 visible sc in between.

— Horn ("Natur Weiß" - off white) :

Round 1 :

6 sc into MR = 6 st

Round 2 :

6 sc = 6 st (1 round)

Round 3 :

(1 sc, inc) x 3 = 9 st

Round 4 :

inc x 3, 6 sc = 12 st

Round 5 :

12 sc = 12 st

Info :

Join the round with a sl st. Cut the yarn leaving a long tail for sewing.

Info :

Stuff the horn slightly with fiberfill and attach it centered to the rounds 3 - 9. Make sure that the 3 increases of the horn are above (please see the Os on the picture).

— Facial features & Nails :

Info :

The eyebrows are embroidered slanted over round 13 with 2 sc in length using black embroidery thread.

Info :

For the eye lid use "Pastell Schlamm" (dark brown) or "Mocca" (light brown) and make a stitch twice from the upper to the lower part of the eye. One third of the lower part of the eye is embroidered with white cotton yarn.

Info :

Mark the nail position with pins. Your reference point is the joint of the rounds from the arms and legs. The joint of the round is now on the bottom (marked with an X in the picture). Between each nail there are 4 visible sc (marked with an O). Embroider each nail with 4 stitches.

Info :

Now your Pino is finished. Have a lot of fun with your own little rhino!

Assembly Instructions

  • Attach the head to the body by crocheting into the body at round 16 (crochet in the body with 5 sc, 1 sc = 48 st) ensuring the head is upright and the joint of the rounds is at the back.
  • Position and sew the legs into the body at round 11: crochet in the 1st leg with 2 sc, 24 sc then crochet in the 2nd leg with 2 sc, 7 sc so that the legs have 20 sc in between at the front and 24 sc at the back for symmetry.
  • Sew the arms into the body at round 24: 7 sc, crochet in the 1st arm with 2 sc, 7 sc, crochet in the 2nd arm with 2 sc to form 18 sc total; adjust arm placement to be symmetrical at each side of the body.
  • Sew the ears to the head centered at round 17 with 12 visible sc in between, using the long tail left from the ears and pin to check alignment before sewing.
  • Attach the horn centered between rounds 3-9 on the nose, making sure the three increases of the horn are oriented upward; stuff horn slightly and sew securely.
  • Mark nail positions on the feet and hands with pins, then embroider each nail with 4 stitches in off-white yarn, spacing four visible sc between each nail.

Important Notes

  • 💡This pattern is written in US terminology and worked in continuous rounds; use a stitch marker to mark the beginning of each round.
  • 💡Use light stuffing for small parts (horn, nails, ears) and firmer but not over-tight stuffing for body and head to maintain shape.
  • 💡Pin all parts and check symmetry before sewing; adjust stitch counts on limbs if your personal tension changes sizing.
  • 💡Weave in ends neatly as you go and cut long tails for sewing attachments to make finishing easier.

Pino is a tiny crochet rhino packed with personality — perfect as a gift, nursery companion, or collectible. Make one in soft pastels or natural shades to match any decor and enjoy the handmade charm. Share your finished Pino with friends and spread the crochet joy! 🧶🧵

You ask,

we answer.

FAQs

What size will the finished piece be?

The finished amigurumi measures approximately 16 cm (6.3 inches) tall when using Eco Cotton by Grundl and a 2.5 mm hook as recommended.

Can I use different yarn weights for this pattern?

Yes, you can use different yarn weights but that will affect the final size and recommended hook. Adjust the hook size accordingly and be mindful of stitch counts and stuffing amounts.

Do I need prior crochet experience for this pattern?

This pattern is rated intermediate, so basic knowledge of amigurumi techniques—magic ring, single crochet, increases, decreases and seaming—is recommended for best results.

How long does this project typically take to complete?

Most crocheters complete this project in 5-7 hours, though time may vary based on experience level and how carefully you place and sew parts.