About This Pica Pau Animal Friends Amigurumi Pattern
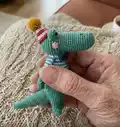
This pattern collection walks you through creating small amigurumi animal friends in a modern, pared-back style. You will learn essential crochet techniques, stitch sequences, and finishing tips used to construct heads, bodies, limbs and faces. The instructions focus on clear shaping, consistent tension and simple embroidery details so you can produce polished results.
Ideal for new crocheters, the guide includes step-by-step photos and stitch explanations to build your confidence. The finished toys are compact, tactile and great for gifting or display.
Why You'll Love This Pica Pau Animal Friends Amigurumi Pattern
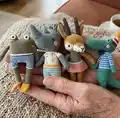
I absolutely love this pattern because it brings simple shapes and playful details together to make characters with personality. I adore how approachable the techniques are—most stitches are basic but the results feel handcrafted and special. I love that you can mix and match colors to create wildly different personalities with the same basic construction. Making these little animals is calming and satisfying, and I always enjoy finishing a set to give as gifts.
Switch Things Up
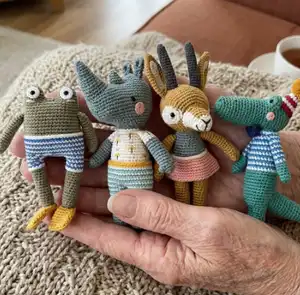
I love how easily these patterns can be customized simply by swapping colors; try pastel palettes for softer, nursery-friendly versions or bright saturated hues for playful characters.
To change the size, adjust your yarn weight and hook: use bulky yarn and a larger hook for a cuddly oversized toy, or fine yarn with a small hook for tiny keychain-sized friends.
I often add embroidered freckles, eyelashes or tiny felt accessories to give each animal a distinct personality that photos alone can't capture.
Try layering clothes or tiny crocheted hats and scarves for seasonal variations—these small additions make great gift themes for holidays.
Want posable limbs? Consider adding a thin wire inside the arms or legs before sewing the final seams to allow gentle posing while keeping it safe.
I sometimes combine yarns—pairing a fuzzy mohair with a smooth cotton for textural contrast on ears or tails to make the toy more tactile.
For a more durable toy for small children, use cotton or sturdy acrylics and securely stitch safety eye washers or opt for embroidered eyes instead.
If you enjoy colorwork, experiment with stripes or simple jacquard panels on bodies and clothing using the book's guidance on changing colors and tapestry techniques.
I recommend blocking small flat pieces like skirts or ears lightly to shape them before attaching, which helps achieve a more professional finish.
Finally, mix-and-match body parts from different animals in the book to create entirely new hybrid characters—this is one of my favorite creative ways to expand the collection.
Common Mistakes & How to Fix Them
✗ Skipping stitch markers at the start of rounds leads to miscounted stitches; place a marker at the beginning of each round to always know where to start and avoid losing your place.
✗ Overstuffing the piece will distort the shape and stretch the fabric; add stuffing gradually and shape as you go so seams remain even and the toy keeps a smooth profile.
✗ Using the recommended hook size for garments can make holes in toys; switch to a hook two or three sizes smaller for amigurumi so stuffing does not show through.
✗ Attaching facial features without checking placement first can make expressions look off; always pin or mark eye and nose positions and photograph or compare before sewing permanently.
✗ Working with inconsistent tension creates uneven stitches and lumpy shapes; practice maintaining a steady, moderate tension and compare swatches before starting the toy.