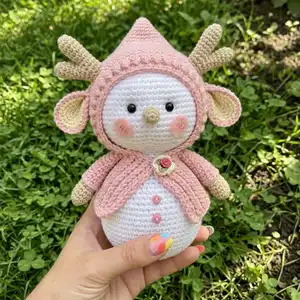
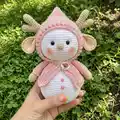
Create a sweet amigurumi called Nieves, a tiny snow-inspired friend dressed in a cozy pink cap and mittens. This pattern guides you step-by-step through crocheting the body, head, arms, cap, ears, horns and finishing details. You will enjoy clear photos and assembly instructions to bring personality to your handmade toy. Perfect for gifting or keeping as a charming decor piece.
Progress Tracker
0% Complete
— Body :
Round 1 :
6 sc in magic ring / 6 sts
Round 2 :
inc in each st of the previous round / 12 sts
Round 3 :
(1 sc, 1 inc) repeat 6 times / 18 sts
Round 4 :
(2 sc, 1 inc) repeat 6 times / 24 sts
Round 5 :
(3 sc, 1 inc) repeat 6 times / 30 sts
Round 6 :
(4 sc, 1 inc) repeat 6 times / 36 sts
Round 7 :
(5 sc, 1 inc) repeat 6 times / 42 sts
Round 8 :
(6 sc, 1 inc) repeat 6 times / 48 sts
Round 9 :
(7 sc, 1 inc) repeat 6 times / 54 sts
Info :
When you\'re on the second piece don\'t cut the thread, you must join both pieces with the instruction of round 10, taking both backloop of the base pieces. Don\'t forget to put between both pieces a piece of cardboard to give more stability to the base.
Round 10 :
4 sc, 1 inc, (8 sc, 1 inc) repeat 5 times, and 4 sc / 60 sts
Round 11 :
(9 sc, 1 inc) repeat 6 times / 66 sts
Round 12 :
5 sc, 1 inc (10 sc, 1 inc) repeat 5 times, 5 sc /72 sts
Round 13 :
(11 sc, 1 inc) repeat 6 times / 78 sts
Round 14 to 26 :
78 sc /78 sts
Round 27 :
(11 sc, 1 dec) repeat 6 times /72 sts
Round 28 :
5 sc, 1 dec, (10 sc, 1 dec) repeat 5 times, 5 sc /66 sts
Round 29 :
(9 sc, 1 dec) repeat 6 times /60 sts
Round 31 :
4 sc, 1 dec, (8 sc, 1 dec) repeat 5 times, 4 sc / 54 sts
Round 33 :
(7 sc, 1 dec) repeat 6 times / 48 sts
Round 35 :
3 sc, 1 dec, (6 sc, 1 dec) repeat 5 times, 3 sc / 42 sts
Round 36 to 39 :
42 sc. Finish with slst and cut the thread. Add stuffing.
— Head :
Round 1 :
6 sc in magic ring / 6 sts
Round 2 :
inc in each st of the previous round / 12 sts
Round 3 :
(1 sc, 1 inc) repeat 6 times / 18 sts
Round 4 :
(2 sc, 1 inc) repeat 6 times / 24 sts
Round 5 :
1 sc, 1 inc, (3 sc, 1 inc) repeat 5 times, 2 sc / 30 sts
Round 6 :
(4 sc, 1 inc) repeat 6 times / 36 sts
Round 7 :
2 sc, 1 inc, (5 sc, 1 inc) repeat 5 times, 3 sc / 42 sts
Round 8 :
(6 sc, 1 inc) repeat 6 times / 48 sts
Round 9 :
(7 sc, 1 inc) repeat 6 times / 54 sts
Round 10 :
5 sc, 1 inc, (8 sc, 1 inc) repeat 5 times, sc / 60 sts
Round 11 :
(9 sc, 1 inc) repeat 6 times / 66 sts
Round 12 :
(10 sc, 1 inc) repeat 6 times / 72 sts
Round 13 to 28 :
72 sc /72 sts. Insert the safety eyes between rounds 20 and 21 with 7 sts apart.
Round 29 :
5 sc, 1 dec, (10 sc, 1 dec) repeat 5 times, 5 sc /66 sts
Round 30 :
(9 sc, 1 dec) repeat 6 times /60 sts
Round 31 :
4 sc, 1 dec, (8 sc, 1 dec) repeat 5 times, 4 sc / 54 sts
Round 32 :
(7 sc, 1 dec) repeat 6 times / 48 sts
Round 33 :
3 sc, 1 dec, (6 sc, 1 dec) repeat 5 times, 3 sc / 42 sts
— Arms :
Info :
It consists of gloves and arms. The gloves are beige and the arms are white. Start with Beige color. Inside a magic ring 6 hdc, finish with slst and cut the thread. Reserve as this will be the finger.
Round 1 :
Ch 4, then 1 sc on the next chain, 1 sc, 3 sc on the 1 chain, 2 sc, 3 sc on the 1 st / 10 sts
Round 2 :
3 sc, 3 sc on 1 st, 4 sc, 3 sc on 1 st, 1 sc / 14 sts
Round 3 :
4 sc, 3 sc on 1 st, 6 sc, 3 sc on 1 st, 2 sc / 18 sts
Round 4 :
5 sc, 1 inc, 11 sc /18 sts
Round 9 :
Here we\'ll incorporate the previously made finger. Make 4 sc, fold the finger in half so you\'ll only make 3 sc of the finger joining it to the glove, complete the round /18 sts
Round 10 :
7 sc, 1 dec, 7 sc, 1 dec. Now we\'ll change color, so we\'re going to secure the beige color with a stitch marker /16 sts
Round 11 :
With pink color, Backloop (6 sc, 1 dec) repeat 2 times / 14 sts
Round 12 to 21 :
14 sc. Finish with slst
Info :
Through the frontloop. Back to beige color. We\'ll make the arcs, ch 3, on the base of the 3 chains you need to make a puff stitch of 2 hdc, then skip 1 st and slip stitch, repeat (ch 3, on the base of the 3 chains puff stitch of 2 hdc, then skip 1 st and slip stitch). I total you\'ll 8 arcs.
— Nose :
Info :
With beige color. Inside a magic ring, chain 2 and 7 hdc, then slip stitch on the second chain from the beginning. Close the magic ring and leave a long tail to sew to the head. Put the nose between rounds 20 to 23. Don\'t worry if it looks too close to the eyes.
— Horns :
Info :
Make 2. With beige color, work in continues spiral. Make 2 pieces (piece A).
Round 1 :
6 sc in magic ring /6 sts
Round 2 :
(1 sc, 1 inc) repeat 3 times /9 sts
Info :
Make 2 pieces (piece B)
Round 1 :
6 sc in magic ring /6 sts
Round 2 :
(1 sc, 1 inc) repeat 3 times /9 sts
Round 6 :
(1 sc, 1 dec) repeat 3 times / 6 sts
Info :
We\'ll continue to make the complete horn.
Round 8 :
Now you must attach to piece A. Crochet 9 sc on the piece A and then crochet 6 sc on the piece B. You\'ll have 15 sts.
Round 9 and 10 :
15 sc /15 sts
— Cap :
Row 1 :
With light pink, chain 57 for the base, chain 3, now we\'ll make a "bobble stitch inside" of 5 hdc using: The second chain from the hook, the third, the fourth, the fifth and the sixth, close the bobble stitch. Repeat this stitch until the row is completed, we\'ll have a total of 28 "bobble stitch inside"
Row 2 :
Then turn the piece and chain 1, crochet 56 sc (one on each stitch)
Info :
We\'ll finish until we complete row 13, which will be on the right side. With the odd rows as described in row 1 (except for the 57 chains of the base) and for the even rows you must do as described for row 2. Leave a long tail to sew, fold the rectangle in half as shown in the photo and sew stitch by stitch. The sewn part is the back of the cap.
Info :
Now we\'ll make the lower part, that is, the part covering the body. Position of the cap to start crocheting: Lay the piece on the table like this, the side just sewn is on the right, the opening that will be left to the face is on the left, the folded side is on top. * join in the lower left rear corner. Chain 15, finish and cut the thread (these chains will be waiting for us to use them later).
Info :
* Join the pink thread in the lower left front corner, chain 31
Row 1 :
chain 2, 9 hdc, 6 sc.
Row 2 :
skip one stitch, slip stitch in the next stitch, turn and crochet 16 slst through the backloop
Row 3 to 39 :
we repeat row 1 and 2 alternating them, always making them both through the backloop until we finish in row 49, you\'ll notice that at the end we\'ll have used the 15 chains that we left at the beginning.
— Edge of the Cap :
Info :
From where you are chain 7 (this will form the buttonhole), then 1 sc in the corner. Now we\'ll start to make the edge of the neck and the face. To do this, you must crochet 1 sc on each stitch until you reach the angle that is formed. Slip stitch in the next stitch, *skip 1 stitch and shell stitch of 3 hdc, skip 1 stitch and slip stitch in the next stitch*. Repeat the instruction from * to*, obtaining 14 shell stitches in total. Now make 1 sc on each stitch on the side of the neck, you\'ll start making the lapel part, crochet 1 sc and slip stitch in the next stitch, * skip 1 stitch and crochet shell stitch of 3 hdc, skip 1 stitch and slip stitch in the next stitch*. Repeat the instruction from * to* to obtain 4 curves. The last curve should be of 5 hdc and it will be in the corner.
Info :
Next, we\'ll make the lower edge of the cap, it will also be done with shell stitch of 3 hdc, each shell stitch must come out of the line of slip stitches and you must crochet the slip stitch of separation in the space that remains between lines of slip stitches, it is the one that is formed by half double crochets. You must work in this way the whole bottom edge until you reach the last row de slst, slst on the corner. On the same place of the slst of the corner, crocheta a shell stitch of 5 hdc and continue with the previous instruction for edge execution. You finish where you made the buttonhole.
— Ears of the cap :
Info :
Make 2 ecru pieces and 2 pink pieces
Round 1 :
Chain 4, 1 sc on the second chain from the hook, 1 sc, 5 hdc on the last chain, 2 sc, 3 sc on the latest available ch /12 sts
Round 2 :
2 sc, 5 inc of hdc, 3 sc, 3 sc in 1 stitch, 1 sc /19 sts
Round 3 :
2 sc, 2 hdc, 6 inc of hdc, 2 hdc, 4 sc, 3 sc in 1 stitch, 2 sc /25 sts
Info :
Now you must join 1 pink piece and 1 ecru piece, to do this put the pieces with the back inside, right sides outwards and with the pink color facing you. The pink piece is worked normally and the white piece is worked through the frontloop, you must crochet 1 sc in each stitch.
— Assembly :
Item Name (P1) :
Union head to body: With the help of a tapestry needle and white thread, sew stitch by stitch joining both pieces. Finish stuffing the neck when you have little space left to finish sewing.
Info :
The horns are placed between round 10 (single crochet) and rounds 11 (bobble stitch inside), leaving 8 groups of bobble stitches separating them.
Info :
The ears should be placed on the same line as the horns below them. You must fold them at the base. To join them you must skip 1 group of bobble stitches to put them on the base.
Info :
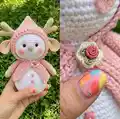
The floral button on the cap should be placed on the second line of the line of the slip stitches.
Info :
Small buttons: the first should be between round 22 and 23, the second between round 26 and 27.
Info :
Arms: You should put a beige ribbon on the cuff of the gloves as decoration.
Info :
To place the arms to the body you must place them on the cap following the line of the ears and horns and the hands must be with the fingers or thumbs forward.
Info :
Facial features: Join stitches 1 and 2 (between rounds 28 and 29 goes stitch 2) with the tapestry needle and transparent thread, forming this vertical dividing fold under the nose. Stitch 3 is attached to the back of the neck, the same with stitch 4, both independent of each other; take care of the tension so that both eyes are equally sunken.
This sweet Nieves amigurumi pattern lets you crochet a tiny, heartwarming friend with a cozy cap and mittens. It combines neat amigurumi shaping with textured cap stitches and playful details like horns, ears and buttons. Make one for a gift or a shelf companion and enjoy the finishing touches that bring personality. 🧶✨