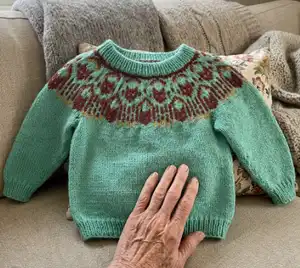
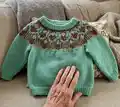
Make a cozy, colorwork childrens sweater inspired by fox motifs. This pattern includes both top-down and bottom-up constructions and full charted yoke designs so you can choose your preferred method. Clear measurements and yarn notes help you pick the right size, and helpful finishing instructions make assembly easy. Knit a treasured handmade sweater for the little adventurer in your life.
Progress Tracker
0% Complete
— Sizes :
Info :
(6 month, 12 month, 18 month) (2 , 4, 6) (8 , 10, 12) years - {A, B, C} {D, E, F} {G, H, I}{J, K, L} {M, N, O} (or about {00, 0, 2,2XS } {XS, XS, S}{ M, L, L }{ XL, XL, 2XL}{3XL, 4XL, 5XL })
Info :
#sizeinclusive Remember these are just names so look at the measurements for the right size!
— Measurements :
Info :
Chest: (50, 55, 60)( 65, 70, 75) (84, 88, 94) - {81, 85, 91}{97,102 , 108}{112 , 118, 124} {130, 135 ,140} {146, 151 ,157 } cm // (20, 22, 24)( 26, 28, 30) (32, 34, 36) - {32, 34, 36}{ 38, 40, 42 }{44 , 46, 48} {50, 52 ,54} {56, 59 ,62 } Inches
Info :
Body length: (17, 19, 21)( 22, 25, 28) (32, 34, 38) - {38, 38, 40} {42, 45, 45} {45, 45, 46} {46, 47 ,47} {48, 48, 48 } cm // (7, 7.5, 8.25)( 8.75, 9.5, 11) (12.5 , 13.5 , 15) - 15, 15, 16} {16, 17.8, 17.8} {17.8, 17.8, 18.2}{18.2, 18.6 ,18.6}{18.9 , 18.9, 18.9 } Inches or desired lenght.
Info :
Arm length: (17, 19, 21)( 24, 28, 32) (34, 36, 40) - {44, 45, 47} {50, 50, 50} {50, 52, 52} {52, 52 ,52} {53, 53, 53} cm // (7, 7.5, 8.25) ( 9.5, 11, 12.5) (13.5 , 14.25 , 15.75) - {17.5, 17.8, 18.5}{19.7, 19.7, 19.7} {19.7, 20.5, 20.5} {20.5, 20.5 ,20.5} {21, 21, 21} Inches
— Yarn :
Info :
Light/DK Weight (11 wpi) Sample uses Merinoull by Sandnes Meterage : 105 meters (115 yards) Unit weight : 50 grams (1.76 ounces)
Info :
Needed Yarn Col 1: BL�5 TURKIS 7213 : (150, 200, 200) (250, 300, 350) (350, 400, 400) - {400, 450, 450}{500, 550, 600}{650, 700, 750}{850, 900, 950}{1000, 1050, 1100} g (315, 420, 420) (525, 630, 735) (735, 840, 840) - {840, 945, 945}{1050, 1155, 1260}{1365, 1470, 1575}{1680, 1785, 1890}{1995, 2100, 2205} meter
Info :
Col 2: RUST 3355: (50, 50, 50) (50, 50, 50) (50, 50, 50)- {100, 100, 100}{100, 100, 150}{150, 150, 150}{200, 200, 200}{200, 250, 250}g (105, 105, 105, ) (105, 105, 105)(105, 105, 105) - {210, 210, 210}{210, 210, 315}{315, 315, 315} (420, 420, 420){420, 525, 525} meters
Info :
Col 3: HONNINGGUL 2325: (50, 50, 50) (50, 50, 50) (50, 50, 50) - {50, 50, 50}{50, 50, 50}{50, 50, 50}{100, 100, 100} g (105, 105, 105,) (105, 105, 105) (50, 50, 50)- {100, 100, 100}{100, 100, 150}{150, 150, 150}{200, 200, 200}{200, 200, 200} meters
— Needles :
Info :
Double pointed: 3 og 3,5 mm (Double pointed 2.5 and 4 ) Circular 40 or 60 cm: 3 og 3,5 mm (Circular 16" or 24" 2.5 and 4 ) Circular 80 cm: 3 og 3,5 mm (Circular 32" 2.5 and 4 )
Info :
The needle size is for guidance only. Begin by knitting a swatch to determine which needle size you need to achieve the correct gauge before starting the project - note that the gauge needs to be correct for you to be able to achieve the measurements stated in the Pattern.
— Notes :
Info :
To block your knitted garment, soak it first in lukewarm water. I usually like to add wool soap and vinegar. You can also add silicone-free shampoo or fragrance oils if you wish. Leave the garment in the water for about 30 minutes. When removing the garment carefully from the water, wrap it in a towel to squeeze out as much water as possible. Then lay the garment flat to dry.
Info :
Magic tip! Do not let the garment dry on top of towels. The towels will stay damp and the garment will take longer to dry. If you do not have a mat to put the garment on, you can use a trash bag, plastic bag, or for example, an Ikea bag. The plastic will repel and not preserve the water. Voila!
Info :
If you are unsure which colors you want to use after choosing a recipe, you can get inspiration from my Instagram profile @loparefur, the hashtags for each individual recipe or design or the hashtag #Loparefur and #AnnaSofiaVintersol #PepperTheFox (#adventureknitting ). Let me know if I can share your work!
Info :
Pay attention to color dominance and be consistent with holding the same color in the same position at all times. The dominant color is held in the left hand and the background color is held in the right hand. For better tension, I recommend catching the floats of the changing color when working 3-5 stitches in a different color. Should the colorwork pull together and produce a tighter fabric and higher gauge, consider going up a needle size.
— Bottom-up :
Body :
Cast on (108, 120, 132)( 144, 156, 172) (184, 192, 200) - {176, 188, 200}{ 212, 224, 236}{ 248, 260, 272}{284,296,308 }{320, 332,344 } stitches on needle size 3 mm/2.5 with Main color. Position a stitch marker to mark the start of the round. Work (3, 3, 3) (4, 4, 4) (5, 5, 5) - {7, 7, 7}{7, 7, 7}{7, 7, 7}{7, 7, 7}{7, 7, 7} cm // (1.2, 1.2, 1.2) (1.6, 1.6, 1.6) (2, 2, 2) - {2.8, 2.8, 2.8}{2.8, 2.8, 2.8}{2.8, 2.8, 2.8}{2.8, 2.8, 2.8} Inches rib 1 knit, 1 purl sts. Change to needle size 3.5 mm/4.
Info :
Place a marker after (54, 60, 66)( 72, 78, 86) (92, 96, 100) - {88, 94, 100}{106, 112, 118}{124, 130, 136}{142, 148, 154 }{ 160, 166, 172 } stitches to separate front from the back.
Info :
Continue in stockinette stitch with maincolor until work measures (17, 19, 21)( 22, 25, 28) (32, 34, 38) - {38, 38, 40} {42, 45, 45} {45, 45, 46} {46, 47 ,47} {48, 48, 48 } cm // (7, 7.5, 8.25) ( 8.75, 9.5, 11) (12.5 , 13.5 , 15) - 15, 15, 16} {16, 17.8, 17.8} {17.8, 17.8, 18.2}{18.2, 18.6 ,18.6}{18.9 , 18.9, 18.9 } Inches or desired lenght.
Info :
Place the first (3, 3, 3) (3, 4, 5) (5, 5, 4) - {5, 5, 5}{5, 5, 5}{5, 5, 5}{5, 5, 5}{5, 5, 5} stitches and the last (4, 4, 4) (4, 5, 5) (6, 5, 5) - {6, 6, 6}{6, 6, 6}{6, 6, 6}{6, 6, 6}{6, 6, 6} stitches on the round on a sleeve holder for armholes, a total of (7, 7, 7) (7, 9, 10) (11, 10, 9) - {11, 11, 11} {11, 11, 11}{11, 11, 11}{11, 11, 11}{11, 11, 11} stitches. The stitches for the second armhole are set off when you start on the support piece. Set the work aside and knit the sleeves.
— Arms :
Arms :
Cast on (36, 36, 36) (36, 36, 40) (40, 40, 40) - {40, 40, 40}{42, 42, 42}{42, 42, 42}{44, 44, 44}{44, 46, 46} stitches on needle size 3 mm/2.5 with Main color. Position a stitch marker to mark the start of the round. Work (3, 3, 3) (4, 4, 4) (5, 5, 5) - {7, 7, 7}{7, 7, 7}{7, 7, 7}{7, 7, 7}{7, 7, 7} cm // (1.2, 1.2, 1.2) (1.6, 1.6, 1.6) (2, 2, 2) - {2.8, 2.8, 2.8}{2.8, 2.8, 2.8}{2.8, 2.8, 2.8}{2.8, 2.8, 2.8}{2.8, 2.8, 2.8} Inches rib 1 knit, 1 purl sts. Change to needle size 3.5 mm/4.
Info :
Continue in stockinette stitches with maincolor and increase 2 sts on underside of sleeve (1 st after the first st on round, and 1 st before the last st on round). Then repeat every 4 rounds until you have (50, 52, 54) (56, 58, 60) (64, 68, 72) - {70, 72, 74}{76, 78, 80}{82, 84, 86}{88, 90, 92}{94, 96, 98} stitches. Knit until sleeve measures (17, 19, 21)( 24, 28, 32) (34, 36, 40) - {44, 45, 47} {50, 50, 50} {50, 52, 52} {52, 52 ,52} {53, 53, 53} cm // (7, 7.5, 8.25)(9.5, 11, 12.5) (13.5 , 14.25 , 15.75) - {17.5, 17.8, 18.5}{19.7, 19.7, 19.7} {19.7, 20.5, 20.5} {20.5, 20.5 ,20.5} {21, 21, 21} Inches or desired length.
Info :
Place the first (3, 3, 3) (3, 4, 5) (5, 5, 4) - {5, 5, 5}{5, 5, 5}{5, 5, 5}{5, 5, 5}{5, 5, 5} stitches and the last (4, 4, 4) (4, 5, 5) (6, 5, 5) - {6, 6, 6}{6, 6, 6}{6, 6, 6}{6, 6, 6}{6, 6, 6} stitches on the round on a sleeve holder for armholes, a total of (7, 7, 7) (7, 9, 10) (11, 10, 9) - {11, 11, 11} {11, 11, 11}{11, 11, 11}{11, 11, 11}{11, 11, 11} stitches. Set the sleeve aside and knit the second sleeve the same as the first.
— Yoke :
Info :
Assemble body and sleeves on a 3.5 mm/4 circular needle. Place a stitch marker at the first join to mark the start of the round. Work stockinette st over first sleeve. Then work the front piece of the body and place the next (7, 7, 7) (7, 9, 10) (11, 10, 9) - {11, 11, 11}{11, 11, 11}{11, 11, 11}{11, 11, 11}{11, 11, 11} stitches on a sleeve holder for armholes. Knit over the other sleeve and back piece. You should now have (176, 192, 208) (224, 240, 256) (272, 288, 304) - {272, 288, 304}{ 320, 336, 352}{ 368, 384, 400}{416, 432, 448 }{464, 480, 496 } stitches.
Info :
Knit Knit (1, 1, 1) (2, 3, 4) (5, 5, 5) - {1, 2, 4}{ 5, 6, 7}{ 8, 9, 10}{11, 12, 13}{14, 15, 16 } rounds with main color straight. Then work pattern according to Chart and decrease as directed. Choose the right size according to the size you are knitting. Change to shorter circular needle when needed.
— Neck :
Neck :
Change to needle size 3 mm/2.5 and work 1 round straight in maincolor while at the same time decreasing the stitchcount evenly over the round to (80, 82, 84) (86, 86, 86) (86, 86, 86 ) - {98, 98, 98} {98, 98, 104}{104, 110, 110}{110, 120, 120}{130, 130, 140} stitches. Work (5, 5, 5) (6, 6, 6) (7, 7, 7) - {8, 8, 8}{8, 8, 8}{8, 8, 8}{8, 8, 8}{8, 8, 8} cm // (2, 2, 2) (2.4, 2.4, 2.4) (2.8, 2.8, 2.8) - {3.2, 3.2, 3.2}{3.2, 3.2, 3.2}{3.2, 3.2, 3.2}{3.2, 3.2, 3.2}{3.2, 3.2, 3.2} Inches rib 1 knit, 1 purl sts. Use a stretchy Bind off. This is espacially important for the childrens sizes. I have listed helpful tutorials below! Fold neck.
Finalizing :
Kitchener stitch the underarms. Weave in loose ends. Enjoy :-)
Infos :
Useful Tutorials: Cast on: https://www.youtube.com/watch?v=cLzBSrIO96E&ab_channel=Anna-SofiaVintersol Join body with arms: https://www.youtube.com/watch?v=gVcHBQ2m-go&ab_channel=Anna-SofiaVintersol Stretchy Bind off: https://www.youtube.com/watch?v=SbzeEg6XMwM&ab_channel=VeryPinkKnits
— Top-Down :
Neck :
Cast on (80, 82, 84) (86, 86, 86) (86, 86, 86) - {98, 98, 98} {98, 98, 104}{104, 110, 110}{110, 120, 120}{130, 130, 140} stitches on needle size 3 mm/2.5 with Main color. Position a stitch marker to mark the start of the round. Work (5, 5, 5) (6, 6, 6) (7, 7, 7) - {8, 8, 8}{8, 8, 8}{8, 8, 8}{8, 8, 8}{8, 8, 8} cm // (2, 2, 2) (2.4, 2.4, 2.4) (2.8, 2.8, 2.8) - {3.2, 3.2, 3.2}{3.2, 3.2, 3.2}{3.2, 3.2, 3.2}{3.2, 3.2, 3.2}{3.2, 3.2, 3.2} Inches rib 1 knit, 1 purl sts. Change to needle size 3.5 mm/4 circular needle.
Yoke :
Work Chart according to the size your are knitting. Increase according to Chart and use a longer circular needle if necessary. Once you have finished the Chart you will have (176, 192, 208) (224, 240, 256) (272, 288, 304) - {272, 288, 304}{320, 336, 352}{368, 384, 400}{416, 432, 448}{464, 480, 496 } stitches on your needle. Knit (1, 1, 1) (2, 3, 4) (5, 5, 5) - {1, 2, 4}{ 5, 6, 7}{ 8, 9, 10}{11, 12, 13}{14, 15, 16 } rounds with main color straight. On the following round, the garment is divided for the body and sleeves by placing the sleeve stitches on hold in order to work the body first. Separate the your work the following: Place a stitchmarker to mark the beginning of the round. Place a stitchmarker after stitches (101, 113, 115)( 137, 147, 162) (173, 182, 191) - {165, 177, 189}{ 201, 213, 225}{ 237, 249, 261}{273,285,297 }{309, 321, 333 } stitches to mark the backside. Place another stitchmarker after (43, 45, 47) (49, 49, 50) (53, 58, 63) - {59, 61, 63}{65, 67, 69}{71, 73, 75}{77, 79, 81}{83, 85, 87} for the first arm. Place the next stitchmarker after {165, 177, 189}{ 201, 213, 225}{ 237, 249, 261}{273,285,297 }{309, 321, 333 } stitches stitches to mark the front side.
Info :
Start knitting over the back side of the sweater. Now we cast on a total of (7, 7, 7) (7, 9, 10) (11, 10, 9) - {11, 11, 11} {11, 11, 11}{11, 11, 11}{11, 11, 11}{11, 11, 11} stitches for the underarm. Place first arm stitches on a piece of scrap yarn. Join Front side with back side by knitting over the front side. Cast on (7, 7, 7) (7, 9, 10) (11, 10, 9) - {11, 11, 11}{11, 11, 11}{11, 11, 11}{11, 11, 11}{11, 11, 11} more stitches for the underarm of the otherside. Place second arm on a piece of scrap yarn.
— Top-Down Body :
Body :
From here on we will knit the body. Knit in stockinette stitch with maincolor until work measures (14, 16, 18)( 18, 21, 24) (27, 29, 33) - {31, 31, 33} {39, 39, 39} {39, 39, 40} {40, 41 ,41} {42, 42, 42 } cm // (5.8, 6.3, 7)( 7.15, 7.9, 8.5) (10.5 , 11.5 , 12) - {12.2, 12.2, 13.2}{13.4, 15, 15} {15, 15, 15.4}{15.4, 15.8,15.8}{16.1 , 16.1, 16.1 } Inches or desired lenght. Change to needle size size 3 mm/2.5 and work rib (3, 3, 3) (4, 4, 4) (5, 5, 5) - {7, 7, 7}{7, 7, 7}{7, 7, 7}{7, 7, 7}{7, 7, 7} cm // (1.2, 1.2, 1.2) (1.6, 1.6, 1.6) (2, 2, 2) - {2.8, 2.8, 2.8}{2.8, 2.8, 2.8}{2.8, 2.8, 2.8}{2.8, 2.8, 2.8}{2.8, 2.8, 2.8} Inches rib 1 knit, 1 purl sts. Bind off. Continue with arms.
Arms :
Place stitches from the piece of scrap yarn on a needle size 3.5 mm/4 circular needle ( or double pointed if you prefer to knit your arms like that). Pick up the (7, 7, 7) (7, 9, 10) (11, 10, 9) - {11, 11, 11}{11, 11, 11}{11, 11, 11}{11, 11, 11}{11, 11, 11} stitches we have cast on for the underarm. Join in a round. You now have (50, 52, 54) (56, 58, 60) (64, 68, 72) - {70, 72, 74}{76, 78, 80}{82, 84, 86}{88, 90, 92}{94, 96, 98} stitches. Continue in stockinette stitches with maincolor and decrease 2 sts on underside of sleeve (1 st after the first st on round and 1 st before the last st on round). Then repeat every 4 rounds until you have (36, 36, 36) (36, 36, 40) (40, 40, 40) - {40, 40, 40}{42, 42, 42}{42, 42, 42}{44, 44, 44}{44, 46, 46} stitches and your sleeve measures (14, 16, 18)( 20, 24, 28) (29, 31, 35) - {37, 38, 40}{43, 43, 43}{43, 45, 45}{45, 45 ,45}{46, 46, 46} cm // (5.8, 6.3, 7)( 7.9, 9.4, 10.9) (11.5 , 12.25 , 13.75) - {14.7, 15, 15.7}{16.9, 16.9, 16.9}{16.9, 17.7, 17.7}{17.7, 17.7 ,17.7}{18.2, 18.2, 18.2} Inches or desired lenght. Change to needle size size 3 mm/2.5 and work rib (3, 3, 3) (4, 4, 4) (5, 5, 5) - {7, 7, 7}{7, 7, 7}{7, 7, 7}{7, 7, 7}{7, 7, 7} cm // (1.2, 1.2, 1.2) (1.6, 1.6, 1.6) (2, 2, 2) - {2.8, 2.8, 2.8}{2.8, 2.8, 2.8}{2.8, 2.8, 2.8}{2.8, 2.8, 2.8}{2.8, 2.8, 2.8} Inches rib 1 knit, 1 purl sts. Bind off. Knit the second sleeve the same as the first.
Finalizing :
Fold Neck. Kitchener stitches the underarms if you didn't knit them close. Weave in loose ends. Enjoy :-)
— Charts :
Info :
Chart sizes and coloring charts are included in this pattern PDF. Use upper Chart if you knit bottom up and lower chart if you knit top down. Legend: knit, right leaning decrease, left leaning decrease, increase 1. Colours: MC (main), CC1, CC2. Chart sizes pages show stitch counts corresponding to sizes; follow the arrows for skip sizes where noted.
Pepper the Fox brings playful colorwork and practical design together to make a sweater kids will love. This pattern includes full charts, yarn quantities, and both top-down and bottom-up instructions to suit your knitting style. Make one for your child, a friend, or as a cherished handmade gift! 🧶✨