🧢 Beautiful ✨ Detailed πŸ’ Adorable

Ostin The Octopus Amigurumi Pattern

Ostin The Octopus Amigurumi Pattern
4.5β˜… Rating
5-7 Hours Time Needed
3.7K Made This
βœ‚οΈ

Intermediate Level

Ideal for those with basic crochet experience, featuring slightly more advanced stitches and techniques to expand your skills.

⏱️

Weekend Treat

Takes 5-7 hours, making it an enjoyable project to finish over a couple of days.

🧸

Cute Companion

An adorable friend to cherish, handcrafted with love to bring comfort and joy for years to come.

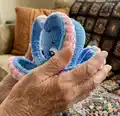
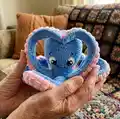
About This Ostin The Octopus Amigurumi Pattern

This pattern creates a soft plush octopus with eight curly tentacles, cute embroidered face details and removable tiny blushes. It uses plush yarn for a cuddly texture and semi-cotton for eyes and facial embroidery. The tentacles are crocheted as two layered pieces and assembled to give a realistic, wavy look.

Ostin The Octopus Amigurumi Pattern crochet pattern - detailed view of completed project

Step-by-step rounds and assembly instructions are included with clear notes on hook sizes and yarn choices. The finished toy is approximately 18 cm without tentacles and 42 cm including tentacles.

Why You'll Love This Ostin The Octopus Amigurumi Pattern

I absolutely love this pattern because it turns simple stitches into a charming, huggable octopus with personality. I enjoy the combination of plush yarn and textured puff-style tentacles that give excellent tactile appeal. The technique of crocheting and joining the tentacle inner and outer parts creates a beautiful layered look I am proud of. Making the eyes and embroidered smile always brings the character to life and is so rewarding each time. This design is playful, soothing to crochet, and perfect for gifting or decorating a nursery.

Ostin The Octopus Amigurumi Pattern step 1 - construction progress Ostin The Octopus Amigurumi Pattern step 2 - assembly progress Ostin The Octopus Amigurumi Pattern step 3 - details and accessories Ostin The Octopus Amigurumi Pattern step 4 - final assembly and finishing

Switch Things Up

I love offering ideas to customize this pattern: change the colors to make a rainbow octopus or go neutral for a modern nursery piece.

You can make a mini version by using thinner yarn and a smaller hook for a keychain-sized octopus.

Try bulky plush yarn with a larger hook to get an extra squishy, huggable toyβ€”perfect for toddlers who like soft textures.

I often add tiny crocheted hats, bows or scarves to give each octopus its own personality and seasonal flair.

Embroider different expressions by altering the eye placement and mouth curve to create sleepy, smiling, or surprised faces.

For a wearable twist, stitch a loop to the top to turn your octopus into a bag charm or hanging decor for a nursery mobile.

You can also experiment with adding wire into tentacles for posabilityβ€”just make sure to wrap securely and hide ends safely.

Swap the puff stitch rows for bobble or popcorn stitches to get different suckered textures on the tentacles.

I recommend trying contrasting thread for the eye highlights, or adding small safety beads if making the toy for an adult collector.

Lastly, assemble a set with different sizes and colors to create a playful family of octopuses as a gift set or market items.

Common Mistakes & How to Fix Them

βœ— Skipping stitch markers during tentacle attachment can cause misaligned tentacles; always place markers where each tentacle will be joined and count stitches frequently. βœ— Overstuffing the body makes shaping difficult and the tentacles stiff; stuff gradually while assembling so tentacles can twist and bend naturally. βœ— Tightening the magic ring too much with plush yarn can create a puckered hole; if the ring cannot be tightened, start with 2 CH and work into the second chain instead. βœ— Not working into the side loops when joining tentacles creates gaps; insert the hook into both the body and tentacle side loops simultaneously for a secure join. βœ— Changing colors without securing ends neatly will create messy edges; weave and hide thread ends between loops on the wrong side as instructed.

Ostin The Octopus Amigurumi Pattern

Make a cuddly, plush octopus named Ostin with this clear, photo-led crochet pattern. You will work with plush yarn for a soft, squishy body and contrasting semi-cotton for facial details. The pattern guides you step-by-step through tentacles, head-body shaping, eyes, blushes and final assembly so your octopus will be ready to hug. Perfect as a handmade gift or nursery friend.

Intermediate 5-7 Hours

Materials Needed for Ostin The Octopus Amigurumi Pattern

β€” Main Fabric

  • 01
    Plush yarn (120 m / 100 gr) - YarnArt Dolce or Himalaya Dolphin Baby, blue main color (approx. 1.5-2 balls)
  • 02
    Plush yarn (120 m / 100 gr) - pink for tentacles and blushes (approx. 1.5-2 balls)
  • 03
    Semi-cotton yarn (~330 m / 100 gr) - black for eyes and eyebrow/smile embroidery (small amount)
  • 04
    Semi-cotton yarn (~330 m / 100 gr) - white for eye highlights (small amount)

β€” Tools Required

  • 01
    Crochet hook size 3.5 mm (for plush yarn/body and tentacles)
  • 02
    Crochet hook size 2 mm (for eyes with semi-cotton yarn)
  • 03
    Crochet hook size 2-2.5 mm (optional for small details)
  • 04
    Yarn needle for sewing and embroidery
  • 05
    Stitch markers
  • 06
    Scissors
  • 07
    Pins for positioning eyes and blushes during assembly
  • 08
    Polyester stuffing (fiber filling)
  • 09
    Thin pink cotton thread for blush sewing
  • 10
    Embroidery needle for facial details

Progress Tracker

0% Complete

β€” Tentacles (8 details) :

Info :

INNER PART (8 details): *pink plush yarn, 3.5 mm hook *make a turn and work a turning CH at the end of each row

Round 0 :

Chain 9;

Round 1 :

start in the 2nd chain from the hook: 8 SC;

Round 2 :

2 SC, 4 PS, 2 SC (8);

Round 3 :

FLO: skip the St, 7 SC (7);

Round 4 :

skip the St, SC, 4 PS, SC (6);

Round 5 :

FLO: skip the St, 5 SC (5);

Round 6 :

SC, 3 PS, SC (5);

Round 7 :

FLO: 5 SC (5);

Round 8 :

SC, 3 PS, SC (5);

Info :

then repeat the combination of Rows 7 and 8 12 more times up to Row 32;

Round 33 :

FLO: skip the St, 4 SC (4);

Round 34 :

skip the St, SC, PS, SC (3);

Round 35 :

FLO: skip the St, 2 SC (2);

Info :

fix and cut the thread; fix thread ends between the loops on the wrong side.

Info :

OUTER PART (8 details): *blue plush yarn, 3.5 mm hook *make a turn and work a turning CH at the end of each row

Round 0 :

Chain 9;

Round 1 :

start in the 2nd chain from the hook: 8 SC;

Round 2 :

8 SC;

Round 3 :

skip the St, 7 SC (7);

Round 4 :

skip the St, 6 SC (6);

Round 5 :

skip the St, 5 SC (5);

Round 6-32 :

27 rounds 5 SC;

Round 33 :

skip the St, 4 SC (4);

Round 34 :

skip the St, 3 SC (3);

Round 35 :

skip the St, 2 SC (2);

Info :

fix and cut the thread; fix thread ends between the loops on the wrong side.

Item Name (P1) :

ASSEMBLY: attach two details and crochet them around together with SC, at the end of the tentacle work 2 SC in each 2 stitches on the top; stuff in process of assembling not tight, so that the tentacles bend and twist; don't work in the upper edge stitches of the tentacle; tie the ends of the threads together and hide inside, so that they do not comes out.

β€” Head-Body :

Info :

*blue plush yarn, 3.5 mm hook *stuff in process, not tight

Round 1 :

8 SC in MR;

Round 2 :

8 INC (16);

Round 3 :

(SC, INC)*8 (24);

Round 4 :

(2 SC, INC)*8 (32);

Round 5 :

(3 SC, INC)*8 (40);

Round 6 :

(4 SC, INC)*8 (48);

Round 7 :

(5 SC, INC)*8 (56);

Round 8 :

(6 SC, INC)*8 (64);

Round 9-20 :

12 rounds 64 SC;

Round 21 :

(14 SC, DEC)*4 (60);

Round 22 :

(13 SC, DEC)*4 (56);

Round 23 :

(12 SC, DEC)*4 (52);

Round 24 :

(11 SC, DEC)*4 (48);

Round 25 :

(10 SC, DEC)*4 (44);

Round 26 :

(9 SC, DEC)*4 (40);

Round 27 :

(8 SC, DEC)*4 (36);

Round 28 :

(7 SC, DEC)*4 (32);

Round 29 :

(3 SC, INC)*8 (40);

Round 30 :

(4 SC, INC)*8 (48);

Round 31 :

(5 SC, INC)*8 (56);

Round 32 :

(6 SC, INC)*8 (64);

Infos :

in Round 33 we are going to attach the tentacles; work SC inserting the hook simultaneously into the both sides of the tentacle and the body; also, work into side loops of the tentacle; if there are missed loops on the sides and gaps, then work the side loops of the first and second tentacles with the body together;

Round 33 :

(8 SC together with tentacle)*8 (64);

Info :

*change thread color to pink

Round 34 :

(6 SC, DEC)*8 (56);

Round 35 :

(5 SC, DEC)*8 (48);

Round 36 :

(4 SC, DEC)*8 (40);

Round 37 :

(3 SC, DEC)*8 (32);

Round 38 :

(2 SC, DEC)*8 (24);

Round 39 :

(SC, DEC)*8 (16);

Round 40 :

8 DEC (8);

Info :

tighten the hole, fix the thread and hide the end inside.

β€” Blushes (2 details) :

Info :

*pink plush yarn, 3.5 mm hook

Round 1 :

6 SC in MR;

Info :

fix the thread and leave a long end for sewing.

β€” Eyes (2 details) :

Info :

*start with black semi-cotton yarn, 2 mm hook

Round 1 :

6 SC in MR;

Round 2 :

6 INC;

Round 3 :

(SC, INC)*3, change thread color to white, BLO: (SC, INC)*3 (18);

Round 4 :

BLO: SC, INC, SS, turn (4);

Round 5 :

skip SS of the previous round, 2 SC, 7 INC HDC, 2 SC (18);

Info :

fix the thread, leave long ends of black and white threads for sewing, and embroidering the glare; embroider the glare with white thread end.

β€” Final Assembly :

Info :

fix the eyes on the head between Rounds 20 and 25 at the distance of 5 SC in the middle of the eyes;

Info :

sew them along the contour (you may glue them with non-toxic glue);

Info :

embroider eyebrows (you may also embroider eyelashes);

Info :

embroider the smile, stretching the thread under the pins and fixing the curve (2 bottom points) with thread;

Info :

sew blushes with thin pink cotton thread.

Assembly Instructions

  • Attach tentacles by working Round 33: insert the hook simultaneously into the body and the tentacle, working SC through both layers; if you miss side loops, work the tentacle side loops and the body together to close gaps.
  • When assembling tentacles, join the inner pink detail and outer blue detail by crocheting them around together with SC; at the end of the tentacle work 2 SC in each 2 stitches on the top for a neat finish.
  • Stuff the tentacles during assembly; do not stuff tightly so they can bend and twist naturally and keep a wavy look.
  • Position and fix eyes between Rounds 20 and 25, spacing them 5 SC apart; sew them along the contour and optionally glue with non-toxic glue before final stitching.
  • Embroider eyebrows and eyelashes as desired, then embroider the smile with black thread stretching under pins to set the curve and fix 2 bottom points with thread.
  • Sew blushes with thin pink cotton thread and hide all thread ends in seams; tie thread ends together and hide inside so they do not come out.

Important Notes

  • πŸ’‘Use stitch markers to mark the beginning of each round and to mark positions for the tentacles before joining to the body.
  • πŸ’‘Stuff gradually while assembling and do not overfill the head or tentacles; moderate stuffing gives the best flexibility and shape.
  • πŸ’‘When changing colors or finishing rounds, hide thread ends between the loops on the wrong side to keep the outside neat.
  • πŸ’‘Work into side loops of tentacles when joining to the body to avoid gaps; if gaps appear, join adjacent tentacle loops with the body together.
  • πŸ’‘If the magic ring with plush yarn cannot be tightened, use 2 CH and work the first round into the second chain from the hook as an alternative.

Thank you for crocheting Ostin β€” your charming octopus friend is now ready to bring smiles and cuddles! 🧢 This pattern blends soft plush textures with playful tentacles and sweet facial details for a lovable result. πŸ’• Enjoy gifting, decorating, or keeping your handmade octopus closeβ€”happy crocheting and may your stitches always be joyful! ✨

You ask,

we answer.

FAQs

What size will the finished piece be?

The toy measures approximately 18 cm (7") tall without tentacles and about 42 cm (15.5") including tentacles using the recommended plush yarn and hook sizes.

Can I use different yarn weights for this pattern?

Yes, you can use different yarn weights but that will change the final size; adjust hook sizes accordingly and remember the recommended yarn thickness ratio of 2:1 (body yarn twice as thick as eye yarn).

Do I need prior crochet experience for this pattern?

This pattern is rated intermediate and requires working in the round, increases and decreases, puff stitches, and joining pieces; basic amigurumi experience is recommended.

How long does this project typically take to complete?

Most crocheters will complete this project in 5-7 hours, depending on experience, yarn choice and how quickly you work through assembly and embroidery.

What hooks should I use for the body and the eyes?

Use a 3.5 mm hook for the plush yarn body and tentacles, and a 2 mm hook for the semi-cotton yarn used in the eyes and embroidery details.