Make your very own Jigglypuff amigurumi with this complete crochet pattern. You will get step-by-step rounds for the body, eyes, ears, feet, arms, and signature poof so you can recreate the character in soft yarn. This pattern is full of helpful notes and photo references to guide you through assembly and finishing. Perfect for gifting or keeping as a cute handmade collectible.
Progress Tracker
0% Complete
— Introduction :
Info :
This pattern will show you how to create the Pokemon Jigglypuff in amigurumi form. Jigglypuff measures six inches tall, however, the final size of your amigurumi may vary depending on the crochet hook size, weight yarn, and how tight your stitch work is. Once finished, do not sell or redistribute the pattern, but you are free to sell whatever creations you make using this pattern.
— Materials :
Info :
5.5 mm Crochet Hook. Vanna's Choice Yarn—Pink (~1 skein). Vanna's Choice Yarn—Black (<1 skein). Vanna's Choice Yarn—White (<1 skein). Red Heart Super Saver Economy Yarn—Real Teal (<1 skein). Poly-fil. Yarn Needle. Scissors.
— Terminology :
Infos :
Magic ring—Method for starting amigurumi in the round. sc—single crochet. ch—chain. inc—increase (add one stitch). dec—decrease (remove one stitch). (A) x B—Repeat A, B times. [X]—Total number of stitches for the round/row. pr x—partial row starting at stitch x. '** "pr x" is my own terminology and will be better explained in the sections of the pattern where it is used'
— Body :
Info :
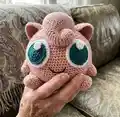
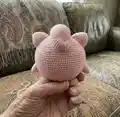
Jigglypuff's body is one of the easiest pieces to crochet for this pattern, however, it is one of the most time consuming simply due to its size. Once you finish crocheting the body, stuff it full of Poly-fil and close it up. Once closed up, it should look similar to Image 2.
Round 1 :
Magic ring 6 [6]
Round 3 :
(inc, sc 1) x 5, inc, inc [19]
Round 4 :
(inc, sc 2) x 6, sc 1 [25]
Round 5 :
sc 1, (inc, sc 3) x 6 [31]
Round 6 :
sc 3, (inc, sc 4) x 5, inc, sc 2 [37]
Round 7 :
sc 6, (inc, sc 7, inc, sc 6) x 2, inc [42]
Round 8 :
sc 3, inc, (sc 6, inc) x 5, sc 3 [48]
Round 9 :
sc 5, inc, sc 8, inc, sc 9, inc x 2, sc 4 [53]
Round 10 :
sc 8, inc, (sc 9, inc, sc 10, inc) x 2, sc 2 [58]
Round 11 :
sc 3, inc, (sc 10, inc, sc 11, inc) x 2, sc 8 [63]
Round 12 :
(sc 12, inc, sc 11, inc) x 2, sc 12, inc [68]
Round 13 :
sc 6, inc, (sc 16, inc) x 3, sc 10 [72]
Round 14 :
sc 11, inc, (sc 17, inc) x 3, sc 6 [76]
Round 15 :
sc 3, inc, (sc 24, inc) x 2, sc 22 [79]
Round 16 :
sc 18, inc, (sc 25, inc) x 2, sc 8 [82]
Round 17 :
sc 6, inc, (sc 26, inc) x 2, sc 21 [85]
Round 18 :
sc 14, inc, (sc 27, inc) x 2, sc 14 [88]
Round 19 :
(sc 43, inc) x 2 [90]
Round 20 :
sc 20, inc, sc 69 [91]
Round 21 :
sc 3, inc, sc 44, inc, sc 42 [93]
Round 22 :
sc 92, inc [94]
Round 26 :
dec, sc 92 [93]
Round 27 :
sc 42, dec, sc 44, dec, sc 3 [91]
Round 28 :
sc 69, dec, sc 20 [90]
Round 29 :
(dec, sc 43) x 2 [88]
Round 30 :
sc 14, (dec, sc 27) x 2, dec, sc 14 [85]
Round 31 :
sc 21, (dec, sc 26) x 2, dec, sc 6 [82]
Round 32 :
sc 8, (dec, sc 25) x 2, dec, sc 18 [79]
Round 33 :
sc 22, (dec, sc 24) x 2, dec, sc 3 [76]
Round 34 :
sc 6, (dec, sc 17) x 3, dec, sc 11 [72]
Round 35 :
sc 10, (dec, sc 16) x 3, dec, sc 6 [68]
Round 36 :
dec, sc 12, (dec, sc 11, dec, sc 12) x 2 [63]
Round 37 :
sc 8, (dec, sc 11, dec, sc 10) x 2, dec, sc 3 [58]
Round 38 :
sc 2, (dec, sc 10, dec, sc 9) x 2, dec, sc 8 [53]
Round 39 :
sc 4, (dec, sc 9, dec, sc 8) x 2, dec, sc 5 [48]
Round 40 :
sc 3, (dec, sc 6) x 5, dec, sc 3 [42]
Round 41 :
dec, (sc 6, dec, sc 7, dec) x 2, sc 6 [37]
Round 42 :
sc 2, dec, (sc 4, dec) x 5, sc 3 [31]
Round 43 :
(sc 3, dec) x 6, sc 1 [25]
Round 44 :
sc 1, (sc 2, dec) x 6 [19]
Round 45 :
dec, dec, (sc 1, dec) x 5 [12]
— Eyes :
Info :
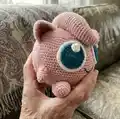
Each eye is made up of three circles: the sclera (large white circle), the iris (teal circle), and the highlight (small white circle). The circles are stacked on each other and then stitched to the body. You will need to make 2 eyes total (six circles total). Once finished and attached to the body, your amigurumi should look like Image 3.
— Sclera—White :
Round 1 :
Magic ring 6 [6]
Round 3 :
(inc, sc 1) x 6 [18]
Round 4 :
(sc 1, inc, sc 1) x 6 [24]
Round 5 :
(sc 3, inc) x 6 [30]
— Iris—Teal :
Round 1 :
Magic ring 6 [6]
Round 3 :
(inc, sc 1) x 6 [18]
Round 4 :
(sc 1, inc, sc 1) x 6 [24]
— Highlight :
Round 1 :
Magic ring 6 [6]
— Ears :
Info :
Each ear is made up of two triangles: the outer ear (pink) and the inner ear (black). Neither of these pieces will be crocheted in the round. Instead the piece will be turned at the end of each row. Once both triangles are finished, the two will be crocheted together along the two side edges by inserting the crochet hook through a hole along the edge of the inner ear and then through the corresponding hole along the edge in the outer ear and pulling the yarn through both and continuing along the 2 edges. Do not crochet the two triangles together along the initial chained edge; this needs to stay open for the ears to maintain the proper shape. If the black yarn shows through under the pink, use a needle to thread some pink yarn between the stitches to hide the black. Once complete, attach to the body and stuff with Poly-fil if desired.
— Inner Ear—Black :
Row 2 :
sc in second ch, sc 5, ch 1, turn [6]
Row 3 :
dec, sc 4, ch 1, turn [5]
Row 4 :
dec, sc 3, ch 1, turn [4]
— Outer Ear—Pink :
Row 2 :
sc in second ch, sc 11, ch 1, turn [12]
Row 3 :
dec, sc 3, dec, sc 3, dec, ch 1, turn [9]
Row 4 :
dec, sc 1, dec, sc 2, dec, ch 1, turn [6]
— Feet :
Info :
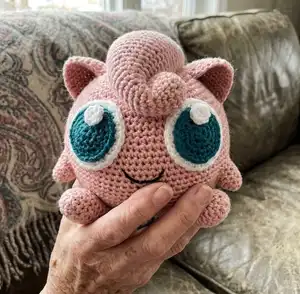
Each foot is made in the round. Follow the pattern, stuff with Poly-fil, and close up once complete. Reference Image 1 for foot placement if you want Jigglypuff in a sitting position. There should be a flatter spot on the bottom of the foot which is the bottom of the foot.
Round 1 :
Magic ring 7 [7]
Round 2 :
inc, (inc, sc 1) x 3 [11]
Round 3 :
inc, sc 1, inc, sc 4, inc, sc 3 [14]
Round 5 :
sc 8, inc, sc 3, inc, sc 2 [17]
Round 7 :
sc 5, inc, sc 4, dec, sc 5 [17]
Round 9 :
dec, sc 9, inc, sc 5 [17]
Round 10 :
sc 9, dec, sc 6 [16]
Round 11 :
sc 12, dec, sc 2 [15]
Round 12 :
sc 4, dec, sc 3, dec, sc 4 [13]
Round 13 :
dec, sc 6, dec, sc 3 [11]
Round 14 :
(dec) x 4, sc 1, dec [6]
— Arms :
Info :
Each arm is made in the round and will consist of a few partial rows. Partial rows are used in the pattern for shaping; after the third round you will tie off the current strand and start new strands as described. Once complete, give the arm a clean edge (crochet once around the outer edge), stuff with Poly-fil, and attach to the body.
Round 1 :
Magic ring 5 [5]
Round 2 :
(inc, sc 1) x 2, inc [8]
Round 3 :
sc 3, inc, sc 4 [9]
Round 4 :
pr 2: sc 2, inc, sc 3 [7]
— Poof :
Info :
The poof is constructed with partial rows and multiple colors. You will start crocheting in the round and then work partial rows for shaping. Do not cut the main pink strand at the end of round 7; leave it alone and work partial teal rows as instructed, then return to the held stitch to continue. This helps curvature match the rest of the body.
Round 1 :
Magic ring 6 [6]
Round 2 :
(inc) x 5, sc 1 [11]
Round 3 :
sc 2, inc x 3, sc 1, inc [15]
Round 4 :
sc 3, inc, sc 7, inc, sc 3 [17]
Round 5 :
sc 8, dec, sc 7 [16]
Round 6 :
dec, sc 3, dec, sc 4, dec, sc 3 [13]
Round 7 :
dec, sc 1, dec, dec, sc 1, dec, sc 1, dec [8]
Round 8 :
pr 3: inc, sc 2, inc [6]
Round 12 :
sc 4, inc, sc 5 [11]
Round 13 :
inc, sc 10 [12]
Round 15 :
sc 3, inc, sc 5, inc [14]
Round 17 :
sc 1, inc, sc 6, inc, sc 5 [16]
Round 18 :
sc 6, inc, sc 6, inc, sc 1 [18]
Round 19 :
sc 3, inc, sc 8, inc, sc 5 [20]
Round 20 :
pr 3: sc 18 [18]
Round 21 :
pr 1: sc 8, inc, sc 9 [19]
Round 22 :
pr 1: sc 4, inc, sc 14 [20]
Round 23 :
pr 1: sc 20 [20]
Round 24 :
pr 1: sc 20 [20]
Round 25 :
pr 1: sc 20 [20]
Round 26 :
pr 1: sc 8, dec, sc 10 [19]
Round 27 :
pr 1: sc 12, dec, sc 5 [18]
Round 28 :
pr 1: sc 5, dec, sc 11 [17]
Round 29 :
pr 1: sc 4, dec, sc 5, dec, sc 4 [15]
Round 30 :
pr 1: sc 6, dec, sc 7 [14]
Round 31 :
pr 1: sc 8, dec, sc 4 [13]
Round 32 :
pr 1: sc 3, dec, sc 3, dec, sc 3 [11]
Round 33 :
pr 1: sc 5, dec, sc 4 [10]
Round 34 :
pr 1: sc 2, dec, sc 2, dec, sc 2 [8]
— Closing Thoughts :
Info :
At this point your Jigglypuff should be complete. You can optionally crochet a microphone or hat for style. Patterns are a guide—feel free to interpret and have fun. If you have questions, contact the designer for help and send images of creations made with this pattern.
This Jigglypuff amigurumi pattern brings a bit of Pokemon magic to your crochet hook! 🧶
Follow the detailed rounds and photo tips to shape the body, eyes, ears, arms, feet, and signature poof with confidence. ✨
Have fun personalizing colors or accessories and share your finished Jigglypuff with others!