🧢 Beautiful ✨ Detailed πŸ’ Adorable

Ocean Mix Relaxed Crochet Cardigan Pattern

Ocean Mix Relaxed Crochet Cardigan Pattern
4.0β˜… Rating
12-15 Hours Time Needed
3.9K Made This
βœ‚οΈ

Beginner Friendly Level

Perfect for those just starting their crochet journey, with clear instructions and simple techniques

⏱️

Multi-Day Project

A rewarding 12+ hour journeyβ€”perfect for dedicated crafters who love detailed work.

πŸ§₯

Layered Comfort

Perfect for cozy, stylish layering through changing seasons with versatile, mix-and-match potential.

About This Ocean Mix Relaxed Crochet Cardigan Pattern

This pattern creates a relaxed, open-front crochet cardigan worked in a striped V-stitch pattern using Bernat Lattice. It features simple shaping for the V-neck and easy sleeve construction for a comfortable fit. The finished cardigan has a soft textured look and is perfect for layering over tees and dresses.

Ocean Mix Relaxed Crochet Cardigan Pattern crochet pattern - detailed view of completed project

Worked in one piece to the armholes then divided for back and fronts, the pattern uses a repeatable Stripe Pattern for a consistent look. Clear row-by-row instructions and schematic measurements are provided for multiple sizes.

Why You'll Love This Ocean Mix Relaxed Crochet Cardigan Pattern

I absolutely love this pattern because it turns a simple V-stitch into a cozy, textured cardigan that feels and looks more complex than it is. I enjoy how the stripe pattern comes together with easy color changes that give it depth and interest. The relaxed fit makes it comfortable to wear and easy to style with many outfits. I also love that the cardigan is worked mostly flat, so seaming is minimal and the finishing is straightforward.

Ocean Mix Relaxed Crochet Cardigan Pattern step 1 - construction progress Ocean Mix Relaxed Crochet Cardigan Pattern step 2 - assembly progress Ocean Mix Relaxed Crochet Cardigan Pattern step 3 - details and accessories Ocean Mix Relaxed Crochet Cardigan Pattern step 4 - final assembly and finishing

Switch Things Up

I love how easy it is to customize this cardigan by swapping the Stripe Pat colors; try pastel shades for a softer look or bold contrasting colors for a modern vibe.

To make a smaller or larger version, change yarn weight and hook size β€” bulky yarn with a larger hook creates a chunky cardigan while lighter yarn makes a delicate layer.

I often adjust sleeve length to suit my style; simply work fewer or more rows in the sleeve until you reach a 3/4 or full-length measurement you prefer.

For a fitted look, reduce the initial chain (in multiples of 3 + 16) proportionally and check gauge frequently; for a more oversized look, increase the initial chain accordingly.

Add pockets by crocheting rectangular panels and sewing them to the fronts between the repeat rows for a functional and stylish addition.

Experiment with textured edgings such as crab stitch or a picot border on the neckband to give the cardigan a polished finish.

I like to add simple embroidery or crocheted appliques to the back or fronts to personalize the piece and make it unique.

To make the cardigan warmer, line the inside with a lightweight fleece or sew a removable fabric lining into the body and sleeves.

Make a matching hat or scarf using the same Stripe Pat and yarn to create a coordinated set β€” it makes a lovely gift when paired together.

If you want a buttoned version, add buttonholes to one front and sew buttons to the opposite front, spacing them evenly along the neckband extension.

Common Mistakes & How to Fix Them

βœ— Not checking gauge can lead to an ill-fitting cardigan; make a swatch and adjust hook size to obtain the stated gauge before starting. βœ— Forgetting that Ch 2 at the beginning of a row does not count as a stitch will shift your stitch counts; always count actual stitches and adjust where instructed. βœ— Changing color incorrectly by cutting yarn creates loose ends; work to last 3 loops on the hook and draw new color through the last 3 loops to change color neatly. βœ— Skipping stitch markers when dividing for fronts and back causes misalignment; place a marker at the dividing row and at the end of rows to keep track of sections. βœ— Stuffing or over-blocking the neckband extension can distort shaping; measure carefully and sew neckband extensions to meet at center back without stretching.

Ocean Mix Relaxed Crochet Cardigan Pattern

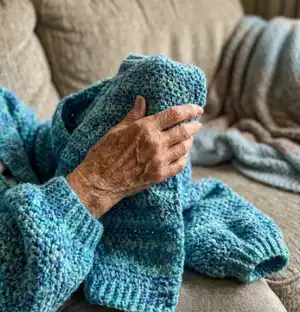
Make a relaxed, easy-to-wear crochet cardigan using Bernat Lattice for a soft, textured finish. This pattern walks you through a striped V-stitch pattern and easy shaping for a cozy layering piece. Perfect for gifting or updating your wardrobe with a handmade touch.

Beginner Friendly 12-15 Hours

Materials Needed for Ocean Mix Relaxed Crochet Cardigan Pattern

β€” Main Fabric

  • 01
    Bernat Lattice (7.8 oz / 220 g; 389 yds / 356 m) - Teal Mix (19010) Contrast A: XS/S 635 yds / 572 m, M 692 yds / 630 m, L 775 yds / 705 m (2 balls each for XS/S, M, L)
  • 02
    Bernat Lattice (7.8 oz / 220 g; 389 yds / 356 m) - Ocean Blues (19011) Contrast B: XS/S 635 yds / 572 m, M 692 yds / 630 m, L 775 yds / 705 m (2 balls each for XS/S, M, L)
  • 03
    Bernat Lattice (7.8 oz / 220 g; 389 yds / 356 m) - Teal Mix (19010) Contrast A: XL 845 yds / 768 m, 2/3XL 946 yds / 865 m, 4/5XL 1067 yds / 970 m (3 balls each for XL, 2/3XL, 4/5XL)
  • 04
    Bernat Lattice (7.8 oz / 220 g; 389 yds / 356 m) - Ocean Blues (19011) Contrast B: XL 845 yds / 768 m, 2/3XL 946 yds / 865 m, 4/5XL 1067 yds / 970 m (3 balls each for XL, 2/3XL, 4/5XL)

β€” Tools Required

  • 01
    Crochet hook size U.S. I/9 (5.5 mm) Susan Bates Silvalume or size needed to obtain gauge
  • 02
    Susan Bates stitch markers
  • 03
    Susan Bates yarn needle
  • 04
    Scissors
  • 05
    Measuring tape
  • 06
    Pins for assembly (optional)

Progress Tracker

0% Complete

β€” Notes :

Infos :

Body is worked in one piece to armholes, then divided into Back and Fronts. Ch 2 at beg of row does not count as st. To change color, work to last 3 loops on hook and draw new color through last 3 loops, then proceed in new color.

Info :

Keeping cont of Stripe Pat, rep last row for V-st Pat until work from beg measures 15" [38 cm], ending on a WS row.

β€” Stripe Pat :

Info :

With A, work 2 rows. With B, work 2 rows. These 4 rows form Stripe Pat.

β€” Body :

Info :

With A, ch 172 (187-205-223-241-262) (multiple of 3 + 16). See diagram on page 3.

1st row :

(RS). 1 hdc in 3rd ch from hook and each of next 6 ch. Skip next ch. *V-st in next ch. Skip next 2 ch. Rep from * to last 9 ch. V-st in next ch. Skip next ch. 1 hdc in each of last 7 ch. Turn. 52 (57-63-69-75-82) V-sts.

2nd row :

Ch 2. 1 hdchb in each of first 7 hdc. *V-st in next V-st. Rep from * to last 7 hdc. 1 hdchb in each of last 7 hdc. Turn.

Info :

First 2 rows of Stripe Pat are complete.

3rd row :

Ch 2. V-st in each V-st to last 7 hdc. 1 hdchb in each of last 7 hdc. Turn.

4th row :

Ch 2. 1 hdchb in each of first 7 hdc. V-st in each V-st to end of row. Turn.

Info :

Keeping cont of Stripe Pat, rep 1st to 4th rows 1 (3-2-4-3-4) time(s) more. 10 (10-12-12-14-15) V-sts.

Next row :

(RS). Ch 2. V-st in each V-st to last 7 hdc. 1 hdchb in each of last 7 hdc. Turn.

Next row :

Ch 2. 1 hdchb in each of first 7 hdc. V-st in each V-st to end of row. Turn.

Info :

Keeping cont of Stripe Pat, rep last 2 rows until work from dividing row measures 10 (10-11-11-12-13)" [25.5 (25.5-28-28-30.5-33) cm], ending on a WS row. PM at end of last row.

Info :

Keeping cont of Stripe Pat, proceed as follows:

β€” Divide for Right Front and shape V-neck :

1st row :

(RS). Ch 2. 1 hdchb in each of first 7 hdc. (V-st in next V-st) 12 (14-15-17-18-20) times. Turn. Leave rem sts unworked.

2nd row :

Ch 2. V-st in each V-st to last 7 hdc. 1 hdchb in each of last 7 hdc. Turn.

3rd row :

Ch 2. 1 hdchb in each of first 7 hdc. 1 hdc in next V-st. V-st in each V-st to end of row. Turn. 11 (13-14-16-17-19) V-sts.

4th row :

Ch 2. V-st in each V-st to last 8 hdc. Skip next hdc. 1 hdchb in each of last 7 hdc. Turn.

5th row :

Ch 2. 1 hdchb in each of first 7 hdc. V-st in each V-st to end of row. Turn.

Info :

Keeping cont of Stripe Pat, rep 2nd to 5th rows 1 (3-2-4-3-4) time(s) more. 10 (10-12-12-14-15) V-sts.

Next row :

(WS). Ch 2. V-st in each V-st to last 7 hdc. 1 hdchb in each of last 7 hdc. Turn.

Info :

Keeping cont of Stripe Pat, rep last row until work from beg measures 15" [38 cm], ending on a WS row.

β€” Neckband extension :

1st row :

Ch 2. 1 hdchb in each of first 7 hdc. 1 hdc in first hdc of next V-st. Turn. Leave rem sts unworked.

2nd row :

Ch 2. 1 hdchb in each of next 8 hdc. Turn. Keeping cont of Stripe Pat, rep last row until neckband extension from marked row measures 3 (3ΒΌ-3ΒΌ-4-4-4Β½)" [7.5 (8.5-8.5-10-10-11.5) cm], ending on a RS row. Fasten off.

β€” Back :

Info :

With RS facing, join appropriate color with sl st to first hdc of next unworked V-st. Keeping cont of Stripe Pat, proceed as follows:

1st row :

Ch 2. V-st in same sp as last sl st. V-st in each V-st to last 27 (28-32-34-38-41) V-sts. Turn. Leave rem sts unworked.

2nd row :

Ch 2. V-st in each V-st to end of row. Turn.

Info :

Keeping cont of Stripe Pat, rep last row until work from dividing row measures 10 (10-11-11-12-13)" [25.5 (25.5-28-28-30.5-33) cm], ending on a WS row. Fasten off.

β€” Left Front and shape V-neck :

Info :

With RS facing, join appropriate color with sl st to first hdc of next unworked V-st. Keeping cont of Stripe Pat, proceed as follows:

1st row :

(RS). Ch 2. V-st in same sp as last sl st. V-st in each of next 7 hdc. 1 hdchb in each of last 7 hdc. Turn. 28 (29-33-35-39-42) V-sts. Leave rem sts unworked.

2nd row :

Ch 2. V-st in each V-st to end of row. Turn.

Info :

Keeping cont of Stripe Pat, rep last row until work from dividing row measures 10 (10-11-11-12-13)" [25.5 (25.5-28-28-30.5-33) cm], ending on a WS row. Fasten off.

β€” Sleeves :

Note :

Foundation ch for Sleeve is different than for Body to create "puffy cuff".

Info :

With A, ch 25 (25-26-26-27-28).

1st row :

(RS). 1 hdc in 3rd ch from hook. *V-st in each ch to end of chain. Turn. 23 (23-24-24-25-26) V-sts.

2nd row :

Ch 2. 1 hdc in first hdc. V-st in each V-st to last hdc. 1 hdc in last hdc. Turn.

Info :

First 2 rows of Stripe Pat are complete.

Info :

Keeping cont of Stripe Pat, rep last row 4 (4-2-2-0-0) times more.

Shape sides: 1st row :

(RS). Ch 2. 2 hdc in first hdc. V-st in each V-st to last hdc. 2 hdc in last hdc. Turn.

2nd row :

Ch 2. 1 hdc in each of first 2 hdc. V-st in each V-st to last 2 hdc. 1 hdc in each of last 2 hdc. Turn.

3rd row :

Ch 2. 2 hdc in first hdc. V-st in each V-st to last 2 hdc. 2 hdc in last hdc. Turn.

4th row :

Ch 2. 1 hdc in each of first 3 hdc. V-st in each V-st to last 3 hdc. 1 hdc in each of last 3 hdc. Turn.

5th row :

Ch 2. 2 hdc in first hdc. 1 hdc in each of next 2 hdc. V-st in each V-st to last 3 hdc. 1 hdc in each of next 2 hdc. 2 hdc in last hdc. Turn.

6th row :

Ch 2. 1 hdc in each of first 4 hdc. V-st in each V-st to last 4 hdc. 1 hdc in each of last 4 hdc. Turn.

7th row :

Ch 2. 1 hdc in first hdc. Skip next hdc. V-st in next hdc. Skip next hdc. V-st in each V-st to last 4 hdc. Skip next hdc. V-st in next hdc. Skip next hdc. 1 hdc in last hdc. Turn. 25 (25-26-26-27-28) V-sts.

8th row :

Ch 2. 1 hdc in first hdc. V-st in each V-st to last hdc. 1 hdc in last hdc. Turn. Keeping cont of Stripe Pat, rep last 8 rows 1 (1-2-2-3-3) time(s) more. 27 (27-30-30-33-34) V-sts.

Next row :

Ch 2. 1 hdc in first hdc. V-st in each V-st to last hdc. 1 hdc in last hdc. Turn.

Info :

Keeping cont of Stripe Pat, rep last row until work from beg measures 16" [40.5 cm], ending on a RS row. Fasten off.

β€” Finishing :

Info :

Sew shoulder seams. Sew sleeve seams. Sew in sleeves. Sew neckband extensions across back neck edge, meeting them at center back neck edge. Sew back seam. Weave in ends.

β€” Gauge :

Info :

5Β½ V-sts and 9Β½ rows = 4" [10 cm] in V-st Pat.

Assembly Instructions

  • Sew shoulder seams together matching stitch pattern and aligning neck edges, using mattress or whipstitch for a neat finish.
  • Sew sleeve seams by folding each sleeve in half lengthwise and stitching from cuff to underarm using a matched color yarn for invisibility.
  • Set sleeves into armholes, easing the sleeve cap to fit the armhole opening and pinning evenly before sewing with a whipstitch or mattress stitch.
  • Sew neckband extensions across back neck edge, meeting them at center back neck edge and securing firmly before weaving in ends.

Important Notes

  • πŸ’‘Work a gauge swatch before starting to ensure fit β€” adjust hook size if necessary to match the stated gauge.
  • πŸ’‘Use stitch markers at the dividing row and at the end of rows to keep track of sections when shaping the V-neck and dividing for fronts.
  • πŸ’‘When changing colors, catch and carry yarn neatly or change color as instructed to avoid bulky joins in the body of the cardigan.
  • πŸ’‘Fasten off neckband extensions and back pieces securely to prevent stretching, and measure as you go to match the schematic measurements.

This relaxed crochet cardigan pattern is a delightful, easy project that creates a cozy, textured wardrobe staple. The striped V-stitch gives beautiful depth with simple stitches, and the relaxed shape is perfect for layering this season. Make one in Bernat Lattice for a soft, airy finish you will reach for again and again. 🧢πŸ§₯

You ask,

we answer.

FAQs

What sizes are included with this pattern?

The pattern is written for sizes XS/S, M, L, XL, 2/3XL, and 4/5XL with numbers for each size shown throughout the instructions.

What hook and yarn are recommended?

Use a U.S. I/9 (5.5 mm) Susan Bates Silvalume crochet hook or size needed to obtain gauge, and Bernat Lattice yarn (listed in Contrast A and B).

How important is the gauge and how do I check it?

Gauge is important for proper fit: 5Β½ V-sts and 9Β½ rows = 4" in V-st Pattern. Make a swatch in the V-st pattern and adjust hook size as needed.

Is this pattern suitable for beginners?

Yes, this pattern is rated Easy and is suitable for confident beginners who are comfortable with half double crochet and V-stitch repeats.