🧢 Beautiful ✨ Detailed πŸ’ Adorable

Niahs Balloon Dog Amigurumi Pattern

Niahs Balloon Dog Amigurumi Pattern
4.3β˜… Rating
5-7 Hours Time Needed
3.9K Made This
βœ‚οΈ

Intermediate Level

Ideal for those with basic crochet experience, featuring slightly more advanced stitches and techniques to expand your skills.

⏱️

Weekend Treat

Takes 5-7 hours, making it an enjoyable project to finish over a couple of days.

🧸

Cute Companion

An adorable friend to cherish, handcrafted with love to bring comfort and joy for years to come.

About This Niahs Balloon Dog Amigurumi Pattern

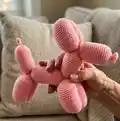
This pattern creates a charming balloon dog amigurumi crocheted in spirals from tail to nose. It uses simple single crochet shaping and repeated bump segments to mimic a real balloon dog. The finished toy measures approximately 20 cm tall and 23 cm from tail to nose. Photos and a step-by-step shaping guide are included to help you sew the joints together.

Niahs Balloon Dog Amigurumi Pattern crochet pattern - detailed view of completed project

Worked in continuous rounds with clear increase and decrease sequences for each bump. The pattern is written with full round-by-round instructions so you can follow easily from start to finish.

Why You'll Love This Niahs Balloon Dog Amigurumi Pattern

I absolutely love this pattern because it turns simple single crochet stitches into a delightful, sculptural toy that makes people smile. I enjoy how the repetitive rounds are meditative yet rewarding as the balloon shape emerges. The photo-driven shaping guide makes assembly approachable and satisfying, even for those new to amigurumi assembly. I also love that you can customize color and scale easily to create unique giftable pieces.

Niahs Balloon Dog Amigurumi Pattern step 1 - construction progress Niahs Balloon Dog Amigurumi Pattern step 2 - assembly progress Niahs Balloon Dog Amigurumi Pattern step 3 - details and accessories Niahs Balloon Dog Amigurumi Pattern step 4 - final assembly and finishing

Switch Things Up

I love how easily this pattern can be customized with color choices, so try different yarn shades for a unique personality.

I often make mini versions by using thinner yarn and a smaller hook to create keychain-sized balloon dogs.

I sometimes use bulky yarn with a larger hook to make a chunky, oversized balloon dog that is super squishy.

I also experiment with adding embroidered eyes or tiny felt details to give the dog a face or collar for added charm.

You can change the proportions by adding or removing rounds in the leg or body sections to lengthen or shorten bumps.

I like to add a small loop at the tail tip so the piece can hang as an ornament or keychain.

For a washable toy, choose machine-washable cotton yarn and secure all seams very tightly before gifting to children.

If you want more poseability, consider inserting a thin wire in the neck or legs, securing it well, to create a slightly posable figure.

I often combine two colors in stripes by switching yarn at the start of a round for playful banding effects on the bumps.

Don't be afraid to play with texture: a slightly fuzzier yarn will give a softer finish, while smooth cotton gives crisp balloon-like bumps.

Common Mistakes & How to Fix Them

βœ— Skipping the magic loop start can leave a large hole at the tail tip; always begin with a proper magic loop to keep the end neat and minimal. βœ— Forgetting to check your gauge will change the finished size dramatically; make a 10 cm swatch and adjust hook size so you have 24 sc across 10 cm. βœ— Not stuffing as you go makes shaping difficult and lumps likely; add small amounts of stuffing gradually where indicated to keep smooth bumps. βœ— Failing to count stitches after increases and decreases causes mis-shaped bumps; count at the end of each round to ensure you have the correct stitch total. βœ— Pulling yarn too tight when closing the nose hole can distort the shape; close gently or tie a tight knot around the outside as suggested to keep the form even.

Niahs Balloon Dog Amigurumi Pattern

Make a playful balloon dog amigurumi using simple single crochet rounds and clever shaping. This pattern guides you from the tail to the nose with clear rounds and photo-based shaping steps. You will enjoy the repetitive, meditative stitching and satisfying assembly to create a charming toy. Perfect as a handmade gift or whimsical decor for your home.

Intermediate 5-7 Hours

Materials Needed for Niahs Balloon Dog Amigurumi Pattern

β€” Main Fabric

  • 01
    Cotton yarn 8/4 (50 g = about 170 m) - approximately 60 g main color (as recommended)
  • 02
    Any brand of cotton yarn 8/4 that suits a 2.0-2.5 mm hook - choose color(s) you like

β€” Tools Required

  • 01
    Crochet hook size 2.0-2.5 mm (US B-1)
  • 02
    Needle (tapestry/sewing needle) for sewing joints
  • 03
    Scissor
  • 04
    Stuffing (polyester filling)

Progress Tracker

0% Complete

β€” The balloon :

Info :

The balloon dog is crocheted in the same way as an actual balloon dog, by crocheting the balloon first, and then shaping it as a dog afterwards. The balloon dog is about 20 cm tall, and 23 cm from tail to nose.

Info :

The balloon itself is made with bumps. It should end up looking like the picture on the right. It is crocheted from the tail to the nose. It is worked in spirals. Start off with a ml.

Round 1 :

6 sc in ml (6)

Round 2-6 :

sc all the way around (6) – 5 rounds (tip of the tail)

Round 7 :

*sc inc* x6 (12)

Round 8 :

*1 sc, sc inc* x6 (18)

Round 9 :

*2 sc, sc inc* x6 (24)

Round 10 :

*3 sc, sc inc* x6 (30)

Round 11-25 :

sc all the way around (30) – 15 rounds (tail)

Round 26 :

*3 sc, sc dec* x6 (24)

Round 27 :

*2 sc, sc dec* x6 (18)

Info :

Put some stuffing in it.

Round 28 :

*1 sc, sc dec* x6 (12)

Round 29 :

*sc dec* x6 (6)

Round 30 :

sc all the way around (6)

Round 31 :

*sc inc* x6 (12)

Round 32 :

*1 sc, sc inc* x6 (18)

Round 33 :

*2 sc, sc inc* x6 (24)

Round 34 :

*3 sc, sc inc* x6 (30)

Round 35-51 :

sc all the way around (30) - 17 rounds (leg 1)

Round 52-60 :

repeat round 26-34 (30)

Round 61-77 :

sc all the way around (30) - 17 rounds (leg 2)

Round 78-86 :

repeat round 26-34 (30)

Round 87-106 :

sc all the way around (30) - 20 rounds (body)

Round 107-115 :

repeat round 26-34 (30)

Round 116-132 :

sc all the way around (30) - 17 rounds (leg 3)

Round 133-141 :

repeat round 26-34 (30)

Round 142-158 :

sc all the way around (30) - 17 rounds (leg 3)

Round 159-167 :

repeat round 26-34 (30)

Round 168-179 :

sc all the way around (30) - 12 rounds (neck)

Round 180-188 :

repeat round 26-34 (30)

Round 189-203 :

sc all the way around (30) - 15 rounds (ear 1)

Round 204-212 :

repeat round 26-34 (30)

Round 213-227 :

sc all the way around (30) - 15 rounds (ear 2)

Round 228-236 :

repeat round 26-34 (30)

Round 237-249 :

sc all the way around (30) - 13 rounds (nose)

Round 250 :

*3 sc, sc dec* x6 (24)

Round 251 :

*2 sc, sc dec* x6 (18)

Info :

Put some stuffing in it.

Round 252 :

*1 sc, sc dec* x6 (12)

Round 253 :

*sc dec* x6 (6)

Round 254 :

sc all the way around (6)

Round 255 :

*sc inc* x6 (12)

Round 256 :

*1 sc, sc inc* x6 (18)

Info :

Slip st in the next stitch, cut the yarn pull it through and weave in the ends. It should now look like the piece on the picture.

β€” Shaping the balloon :

Step 1 :

Throughout the picture guide I have given all the joints numbers, like on the picture above.

Step 2 :

For the first pair of legs, you will need to sew joint no 1 and 3 together, as shown on the pictures above.

Step 3 :

When they have been sewn together, it should look like the picture above.

Step 4 :

For the second pair of legs, you will need to sew joint no 4 and 6 together, as shown on the pictures above.

Step 5 :

When they have been sewn together, it should look like the picture above.

Step 6 :

For the ears, you will need to sew joint no 7 and 9 together, as shown on the pictures above.

Step 7 :

When they have been sewn together it should look like the picture above.

Step 8 :

The last thing to do is to close the hole at the tip of the nose. You can either sew it together, or you can tie a tight knot about the outside.

Info :

You balloon dog is now done!

Assembly Instructions

  • Sew joint 1 and joint 3 together to form the first pair of legs, making sure the seams are secure and the bumps align.
  • Sew joint 4 and joint 6 together to form the second pair of legs, matching the position and tension to the first pair.
  • Sew joint 7 and joint 9 together to create the ears and position them at the top of the neck area as shown in the picture guide.
  • Close the hole at the tip of the nose by sewing it together neatly or tying a tight knot around the outside, then weave in ends.
  • Add stuffing at indicated stages (after round 27 and round 251) to ensure smooth, even bumps before closing segments.

Important Notes

  • πŸ’‘Work in continuous spirals as instructed and avoid joining rounds to keep the bump shapes even and smooth.
  • πŸ’‘Check your gauge: 10 cm = 24 sc; change hook size if you have more or less stitches across 10 cm.
  • πŸ’‘Stuff gradually while shaping: add stuffing when indicated to maintain round forms and avoid lumps.
  • πŸ’‘Weave in ends and secure joins firmly after sewing the joints to prevent seams from coming undone.

This playful balloon dog pattern brings handmade joy to any room with a whimsical, colorful twist. The simple single crochet bumps and step-by-step shaping make assembly satisfying and fun to sew. Create one in a day and gift a bright, cheerful companion to someone special. 🧢🎁

You ask,

we answer.

FAQs

What size will the finished piece be?

The finished amigurumi measures approximately 20 cm tall and about 23 cm from tail to nose when using the recommended cotton 8/4 yarn and 2.0-2.5 mm hook.

Can I use a different yarn weight for this pattern?

Yes, but changing yarn weight will change the finished size; if you use thicker yarn, use a larger hook for a chunkier dog and adjust yarn quantity accordingly.

Do I need to join rounds or work in spirals?

Work in continuous spirals as specified in the pattern to achieve the correct bump shapes and smooth surface; do not join rounds with slip stitch unless you prefer a visible seam.

How much stuffing do I need and when should I add it?

You will need polyester stuffing and should add small amounts during shaping: add stuffing after round 27 and again after round 251 (as indicated) to keep the bumps even and well-shaped.