🧢 Beautiful ✨ Detailed πŸ’ Adorable

My little Fox Amigurumi Pattern

My little Fox Amigurumi Pattern
4.0β˜… Rating
5-7 Hours Time Needed
1.3K Made This
βœ‚οΈ

Beginner Friendly Level

Perfect for those just starting their crochet journey, with clear instructions and simple techniques

⏱️

Weekend Treat

Takes 5-7 hours, making it an enjoyable project to finish over a couple of days.

🧸

Cute Companion

An adorable friend to cherish, handcrafted with love to bring comfort and joy for years to come.

About This My little Fox Amigurumi Pattern

This pattern creates a small, plush fox amigurumi worked in chenille/velvet yarn with sweet facial details. You will work in continuous spiral rounds and change colors to create the fox face markings. The pattern includes separate pieces for head, body, arms/legs, ears, and tail, plus step-by-step sewing instructions.

My little Fox Amigurumi Pattern crochet pattern - detailed view of completed project

Detailed round-by-round instructions are provided for each part, including color change notes and stuffing guidance. Photos show assembly placement to help you sew the parts together for a neat finish.

Why You'll Love This My little Fox Amigurumi Pattern

I absolutely love this pattern because it transforms soft chenille yarn into an irresistibly squishy little fox that’s fun to make and cuddle. I enjoy the clear color-change sections that let you create the fox’s facial markings with simple sequences. I love how quickly the parts come together β€” the head and body shape up in only a few rounds each. Most of all, I love seeing how small adjustments in stuffing and eye placement give each fox its own personality.

My little Fox Amigurumi Pattern step 1 - construction progress My little Fox Amigurumi Pattern step 2 - assembly progress My little Fox Amigurumi Pattern step 3 - details and accessories My little Fox Amigurumi Pattern step 4 - final assembly and finishing

Switch Things Up

I love experimenting with colors to personalize this fox; try soft pastels for a sleepy nursery friend or bright oranges for a classic look.

I sometimes use a slightly thicker chenille yarn and a bigger hook to make a chunkier, cuddlier fox that’s great for toddlers.

I also enjoy making mini versions by switching to fingering yarn and a smaller hook to create keychain-sized foxes.

I often add tiny crocheted accessories like a scarf or bow to give each fox its own personality and make lovely gifts.

I recommend trying embroidered brows or a tiny mouth placement to change the fox’s expression for different moods.

I sometimes insert a short piece of floral wire into limbs for posability when I want the fox to sit or hold a tiny prop.

I like to vary eye sizes β€” using 10 mm eyes for a more delicate look or 14 mm for a more cartoonish, expressive face.

I occasionally swap the white face panel for cream or light gray to create woodland or arctic-themed friends.

I suggest testing different stuffing densities: a firmer fill gives structure while a softer fill creates a squishier companion.

I always pin parts in place and take a photo before sewing so I can replicate a balanced placement on future makes.

Common Mistakes & How to Fix Them

βœ— Skipping the stitch marker will make it hard to keep track of rounds; always place a marker at the beginning of each round and move it after completing each round. βœ— Forgetting to count stitches after increases or decreases causes uneven shaping; count your stitches at the end of each round to maintain the correct stitch count. βœ— Overstuffing the head or body will distort the shape and make sewing difficult; stuff gradually, checking shape frequently, and stop when you achieve a smooth, firm but not overfilled form. βœ— Not closing openings correctly will leave visible gaps; flatten the opening and single crochet through both layers as instructed, then weave the tail through front loops and pull tight to close. βœ— Changing color without securing ends can create messy joins; change color on the last yarn-over as shown and securely weave in ends before continuing to avoid loose tails.

My little Fox Amigurumi Pattern

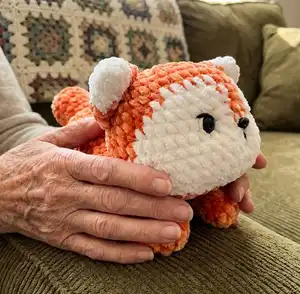
Bring a sweet, plush fox to life with this friendly amigurumi pattern you can finish at home. The pattern uses chenille/plush yarn and step-by-step rounds so you can follow along easily. You will learn simple shaping, color changes, and assembly techniques to create a cuddly little fox. Perfect for gifting or keeping as a tiny handmade companion.

Beginner Friendly 5-7 Hours

Materials Needed for My little Fox Amigurumi Pattern

β€” Main Fabric

  • 01
    Plush/Velvet/Chenille yarn (examples: Himalaya Velvet, Himalaya Dolphin Baby, YarnArt Dolce, Premier Parfait Chunky)
  • 02
    Orange chenille yarn - approximately 120 m (about 1-1.2 skein)
  • 03
    White chenille yarn - approximately 40 m (about 0.5 skein)
  • 04
    Small amounts of black or cotton yarn for nose/eyelashes (embroidery)

β€” Tools Required

  • 01
    Crochet hook size 4.0 mm
  • 02
    Safety eyes 14 mm (2 pieces)
  • 03
    Safety nose 8 mm (1 piece)
  • 04
    Polyester stuffing (fiberfill)
  • 05
    Tapestry needle (white and black)
  • 06
    Scissors
  • 07
    Pins for assembly
  • 08
    Stitch marker

Progress Tracker

0% Complete

β€” Head :

Info :

Start with Orange yarn.

Round 1 :

MR 8sc. (8)

Round 2 :

8 inc. (16)

Round 3 :

(1 sc, inc) x 8 times. (24)

Round 4 :

1 sc, inc, (2 sc, inc) x 7 times, 1 sc. (32)

Round 5 :

(3 sc, inc) x 8 times. (40)

Round 6 :

40 sc. (40)

Info :

Use both Orange and White yarn.

Round 7 :

Orange 9 sc, inc, 3 sc, White 5 sc, Orange 1 sc, inc, 1 sc, White 5 sc, Orange 3 sc, inc, 9 sc, inc. (44)

Round 8 :

Orange 13 sc, White 7 sc, Orange 2 sc, White 7 sc, Orange 15 sc. (44)

Round 9 :

Orange 12 sc, White 8 sc, Orange 2 sc, White 8 sc, Orange 14 sc. (44)

Round 10 :

Orange 5 sc, inc, 5 sc, White 5 sc, inc, 3 sc, Orange 2 sc, White 3 sc, inc, 5 sc, Orange 5 sc, inc, 7 sc. (48)

Round 11 :

Orange 12 sc, White 22 sc, Orange 14 sc. (48)

Round 12 :

Orange 11 sc, White 24 sc, Orange 13 sc. (48)

Round 13 :

Orange 12 sc, White 22 sc, Orange 14 sc. (48)

Round 14 :

Orange 13 sc, White 20 sc, Orange 15 sc. (48)

Round 15 :

Orange (4 sc, dec) x 2 times, 2 sc, White 2 sc, dec, (4 sc, dec) x 2 times, 2 sc, Orange 2 sc, dec, (4 sc, dec) x 2 times. (40)

Round 16 :

Orange (3 sc, dec) x 3 times, White (3 sc, dec) x 2 times, Orange (3 sc, dec) x 3 times. (32)

Info :

Insert the safety eyes between rounds 10 and 11, the distance between 2 eyes is 7 sts. Insert the safety nose between 2 eyes. You can embroider the nose with yarn cotton. Use Orange yarn, and cut White yarn. Start stuffing the head.

Round 17 :

16 dec. (16)

Info :

Stuff the head firmly with fiberfill.

Round 18 :

8 dec, slst. (8)

Info :

Fasten off, leaving a long tail for sewing. Weave the yarn tail through the front loops of the last round and pull it tight to close the hole. Hide the yarn tail inside the head. (see some tips on page 3)

β€” Body :

Info :

Use Orange yarn.

Round 1 :

MR 8 sc. (8)

Round 2 :

8 inc. (16)

Round 3 :

(1 sc, inc) x 8 times. (24)

Round 4 :

(1 sc, inc, 1 sc) x 8 times. (32)

Round 5 :

(3 sc, inc) x 8 times. (40)

Round 6-10 :

40 sc. (40)

Round 11 :

(3 sc, dec) x 8 times. (32)

Round 12-14 :

32 sc. (32)

Round 15 :

(14 sc, dec) x 2 times. (30)

Round 16 :

30 sc, slst. (30)

Info :

Fasten off, leaving a long tail for sewing. Stuff the body firmly with fiberfill.

β€” ARMS/LEGS (Make 4) :

Info :

Use Orange yarn.

Round 1 :

MR 6 sc. (6)

Round 2 :

6 inc. (12)

Round 3-12 :

4 sc, inc, 5 sc, dec. (12)

Info :

Stuff the arms/ legs firmly with fiberfill. Flatten the opening of the arm/leg and work the next round through both layers to close. (see some tips on page 3)

Round 13 :

6 sc, slst. (6)

Info :

Fasten off, leaving a long tail for sewing.

β€” EARS (Make 2) :

Info :

Start White yarn.

Round 1 :

MR 6 sc. (6)

Round 2 :

(1 sc, inc) x 3 times. (9)

Round 3 :

9 sc. (9)

Info :

Change Orange yarn, and cut White yarn.

Round 4 :

1 sc, inc, (2 sc, inc) x 2 times, 1 sc. (12)

Round 5 :

(3 sc, inc) x 3 times. (15)

Info :

Do not stuff the ears. Flatten the opening of the ear and work the next round through both layers to close. (see some tips on page 3)

Round 6 :

7 sc, slst. (7)

Info :

Fasten off, leaving a long tail for sewing.

β€” Tail :

Info :

Start White yarn.

Round 1 :

MR 6 sc. (6)

Round 2 :

(1 sc, inc) x 3 times. (9)

Round 3 :

(2 sc, inc) x 3 times. (12)

Info :

Change Orange yarn, and cut White yarn.

Round 4 :

(3 sc, inc) x 3 times. (15)

Round 5 :

(4 sc, inc) x 3 times. (18)

Round 6 :

(4 sc, dec) x 3 times. (15)

Round 7 :

(3 sc, dec) x 3 times. (12)

Round 8 :

6 dec, slst. (6)

Info :

Fasten off, leaving a long tail for sewing. Stuff the tail lightly with fiberfill.

Info :

So you have crocheted all the parts of the little fox: 1 head, 1 body, 2 arms, 2 legs, 2 ears, 1 tail.

β€” Sewing :

Info :

Sewing the ears of the head, between round 4 & 8, the distance between 2 ears is 8 sts.

Info :

Create eye sockets for the little fox.

Info :

Create the eyelashes with White and Black yarn.

Info :

Sew the body with the head. Place the body and the head on a flat surface. Then use pins to mark. We will sew the body to the head: one stitch on the body, one stitch on the head.

Info :

Sew the legs. Sew the legs at the round 6 of the body, the distances between 2 legs is 10 sts.

Info :

Sew the arms. Sew the legs at the round 12 - 15 of the body. (See the below pictures ^^)

Info :

Sew the tail on the body.

Assembly Instructions

  • Sew the ears to the head between rounds 4 and 8, spacing the two ears 8 stitches apart and pinning them before sewing for symmetry.
  • Create eye sockets by positioning the safety eyes between rounds 10 and 11 with 7 stitches between them; secure and then embroider eyelashes with white and black yarn as shown in the photos.
  • Place the body and the head on a flat surface and use pins to mark placement. Sew the body to the head by stitching one stitch on the body and one stitch on the head all around the join for a neat seam.
  • Sew the legs to the body at round 6; space the legs so that the distance between the two legs is 10 stitches for balanced placement and stability.
  • Sew the arms to the body between rounds 12 and 15, aligning each arm as shown in the photos; use pins to position and check symmetry before stitching.
  • Attach the tail to the back of the body in the position shown in the photos, sew securely, and hide and weave in all yarn tails.

Important Notes

  • πŸ’‘Work in a continuous spiral unless otherwise stated; do not join rounds unless instructed otherwise.
  • πŸ’‘Use a stitch marker to mark the beginning of each round and move it after you complete the round.
  • πŸ’‘If you use the same materials, the finished size is approximately 11 cm height (4.3 inches) and 19 cm length (7.5 inches).
  • πŸ’‘Stuff firmly but not overly tight; overstuffing can distort shaping and make sewing parts difficult.

This little fox pattern is designed to be fun and approachable for crocheters who love plush toys. It uses soft chenille yarn for a squishy, huggable finish and clear step-by-step instructions to guide you through every part of the process. Make one for yourself or stitch several in different colors for sweet handmade gifts. 🧢🧑

You ask,

we answer.

FAQs

What size will the finished piece be?

The finished amigurumi measures approximately 11 cm in height and 19 cm in length when using the recommended chenille yarn and 4.0 mm hook.

Can I use different yarn weights for this pattern?

Yes, you can use different yarn weights, but changing yarn weight and hook size will affect the final size and texture; choose an appropriate hook and expect different dimensions.

Do I need prior crochet experience for this pattern?

This pattern is rated beginner friendly; basic knowledge of single crochet, increases, decreases, magic ring, and working in continuous rounds is recommended.

How long does this project typically take to complete?

Most crocheters complete this project in 5-7 hours, depending on experience and how long you spend on sewing and finishing details.