🧢 Beautiful ✨ Detailed πŸ’ Adorable

Mushroom Bag Pattern

Mushroom Bag Pattern
3.9β˜… Rating
5-7 Hours Time Needed
2.1K Made This
βœ‚οΈ

Intermediate Level

Ideal for those with basic crochet experience, featuring slightly more advanced stitches and techniques to expand your skills.

⏱️

Weekend Treat

Takes 5-7 hours, making it an enjoyable project to finish over a couple of days.

✨

Stylish Touch

An elegant detail to elevate any look, combining traditional techniques with contemporary design sensibilities.

About This Mushroom Bag Pattern

This Mushroom Bag pattern teaches you to crochet a small drawstring bag with a decorative mushroom top and flower embellishments. Youll work the body in two strands for structure, add a strap and drawstring, then finish with spots and flowers. The design is playful, practical, and perfect for gifts or everyday use.

Mushroom Bag Pattern crochet pattern - detailed view of completed project

Includes complete round-by-round instructions, hook changes, and finishing tips. Suitable for crafters comfortable with double crochet and simple post stitches.

Why You'll Love This Mushroom Bag Pattern

I absolutely love this pattern because it blends practical design with delightfully whimsical details that make each bag feel special. I enjoy how the two-strand construction gives the body a sturdy, textured finish that holds its shape well. The separate mushroom top and spot embellishments let me customize colors and sizes to suit any style or recipient. Sewing the spots and adding little flowers is my favorite part β€” it transforms a simple bag into a charming handmade gift.

Mushroom Bag Pattern step 1 - construction progress Mushroom Bag Pattern step 2 - assembly progress Mushroom Bag Pattern step 3 - details and accessories Mushroom Bag Pattern step 4 - final assembly and finishing

Switch Things Up

I love experimenting with color combinations on this pattern; try pastel shades for a soft, whimsical look or bright contrasting colors for a bold statement.

You can change the finished size by switching yarn weight and hook size β€” a bulkier yarn with a larger hook makes a chunky tote, while thinner yarn makes a mini purse or keychain bag.

I often adjust strap length to suit the wearer; make a shorter strap for a child-sized purse or a longer strap for a crossbody style.

Try adding additional increase rounds at the base if you want a wider bag β€” this will require slightly more top increases so the top fits over the bag comfortably.

Swap the mushroom spots for embroidered motifs, buttons, or felt circles for different textures and a unique finish.

For a sturdier bag, consider lining the interior with fabric and hand-sewing the lining in so small items dont poke through the stitches.

I sometimes add a little internal pocket by crocheting a small rectangle and sewing it inside before attaching the top; its handy for coins or keys.

If you want a more grown-up look, use neutral or tonal yarns and skip the flower embellishments for a sleek, modern accessory.

I like to make a set with matching drawstring pouches in different sizes using the same color palette for gift sets that look cohesive and thoughtful.

Experiment with decorative stitches on the body such as a shell stitch row or additional FPdc rows to add texture and personality to your bag.

Common Mistakes & How to Fix Them

βœ— Skipping stitch markers during the body rounds can cause misaligned strap openings; place markers where indicated and count stitches frequently to maintain symmetry. βœ— Switching hooks without adjusting tension may change your finished size unexpectedly; check gauge after changing to the 4 mm hook and adjust your hook or tension as needed. βœ— Not leaving long tails for attaching spots and flowers makes finishing difficult; leave enough tail on each spot to sew it securely to the mushroom top. βœ— Pulling the drawstring too tight or threading it unevenly can distort the opening; thread the drawstring through every other skipped stitch opening and test the closure before final finishing. βœ— Working with inconsistent tension on the two strands will create uneven fabric; practise holding both strands together and maintain steady, even tension throughout.

Mushroom Bag Pattern

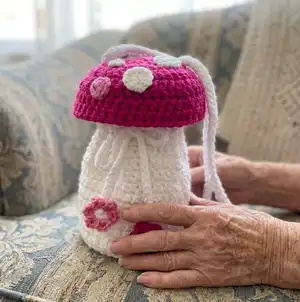
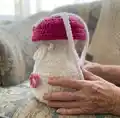
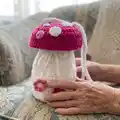
Make a charming mushroom drawstring bag that doubles as a playful accessory or gift. This pattern uses two-strand construction for a sturdy body and a separate crocheted mushroom top for a whimsical finish. Youll get step-by-step rounds, strap and drawstring instructions, and simple flower embellishments to personalize your bag.

Intermediate 5-7 Hours

Materials Needed for Mushroom Bag Pattern

β€” Main Fabric

  • 01
    DK weight yarn (4 ply) - Color A (white) approx. 210 yards for body, strap, and drawstring
  • 02
    DK weight yarn (4 ply) - Color B (red) approx. 100 yards for mushroom top
  • 03
    Yarn for embellishments - small amounts of accent colors for spots and flowers

β€” Tools Required

  • 01
    Crochet hook size 5.5 mm
  • 02
    Crochet hook size 4 mm
  • 03
    Scissors
  • 04
    Darning needle
  • 05
    2 stitch markers
  • 06
    Tape measure

Progress Tracker

0% Complete

β€” Body :

Info :

Use two strands together of color A, work in the round, join with a sl st into the first dc at the end of each round

Info :

Begin with a magic ring - ch 2, 12 dc in magic ring (12)

Round 1 :

ch 2, 2 dc in each st (24)

Round 2 :

ch 2, *1 dc, 2 dc, repeat from * to last st (36)

Round 3 :

ch 2, *1 dc, 1 dc, 2 dc, repeat from * to last st (48)

Info :

work should measure approximately 5 in. diameter (if you would like your bag to be bigger, add another increase round of *1 dc, 1 dc, 1 dc, 2 dc)

Round 4 :

ch 2, BLO dc in each st (48)

Round 5 :

ch 2, *FPdc in dc row below, dc in next st, repeat from * to last st (48)

Round 6-12 :

ch 2, dc in each st (48) (if you want your bag taller, add more rounds of dc)

Round 13 :

ch 2, *dc, ch 1, skip a stitch, repeat from * to last st (48)

Round 14 :

drop 1 strand, but do not cut - continue with other strand ch 2, 1 dc, 3 dc, *2 dc, 3 dc repeat from * to last st (120) (bag should measure approximately 7" tall)

STRAP :

grab the dropped strand of yarn and work two strands together

STRAP :

ch until you reach your desired strap length (32" suggested for kid, 36" for adult)

STRAP :

turn, sc into the back bump of each chain stitch, sl st to fasten (strap will only be attached to 1 side at this time)

β€” Top :

Info :

use 2 strands together with color B, work in the round, join with a sl st in first dc at the end of each round

Info :

Begin with a magic ring - ch 2, 10 dc in the magic ring (10)

Round 1 :

ch 2, 2 dc in each stitch (20)

Round 2 :

ch 2, *1 dc, 2 dc repeat from * to last st (30)

Round 3 :

ch 2, *1 dc, 1 dc, 2 dc repeat from * to last st (40)

Round 4 :

ch 2, *1 dc, 1 dc, 1 dc, 2 dc repeat from * to last st (50) (if you made your bag bigger than 5" diameter, add at least one more increase round - you'll want your top wider than the bag)

Round 5-6 :

ch 2, 1 hdc in each stitch (50)

Round 7 :

drop 1 strand of yarn, fasten off, and work with remaining strand only, ch 3, tr BLO in each stitch (50)

Round 8 :

ch 1, sl st each stitch, fasten off and weave in ends (50)

β€” Mushroom Spots, Finishing the Strap, Drawstring :

Info :

Create as many small, medium, and large spots as you want in color A; leave enough of a tail so you can use it to attach to the mushroom top

Info :

Switch to a 4 mm hook

Small :

magic ring - ch 1, 5-6 sc, sl st to join

Medium :

magic ring - ch 2, 8-10 hdc, sl st to join

Large :

magic ring - ch 2, 10-12 dc, sl st to join

Info :

Note: Before attaching your spots, place a marker between the stitches in either the 3rd or 4th row from the center on opposite sides for your straps.

Info :

Use your darning needle to attach spots to the top.

Info :

Starting under the mushroom top, thread your strap up between your marked stitches and back down through the other marked stitches.

Info :

Attach the strap to the bag securely on the opposite side.

DRAWSTRING :

Using the 5.5 mm hook and 2 strands of color A yarn, chain until desired length (about 30") and tie off. Leave 4" on each end of the drawstring for flower embellishments.

DRAWSTRING :

Thread the finished drawstring through every other skipped stitch opening (round 13 of body)

Flower Embellishments :

For flower embellishments, use 4 mm hook: With color A - Start with a magic ring, ch 2 - 5 hdc in the ring, sl st to join and fasten off

Flower Embellishments :

With color B - Pull up a loop and *ch 1, (hdc, dc, hdc, sl st), repeat from * 4 more times and sl st to join and fasten off

Flower Embellishments :

Use your darning needle to sew flowers to drawstring ends

Assembly Instructions

  • Place mushroom spots on the top and use your darning needle to sew them to the mushroom top; leave tails long enough for secure sewing.
  • Thread the strap under the mushroom top between the marked stitches (placed in the 3rd or 4th row from center) and bring it down through the opposite marked stitches.
  • Attach the strap securely to the opposite side of the bag where indicated; ensure strap anchors are reinforced with extra stitches.
  • Thread the drawstring through every other skipped stitch opening (round 13 of the body) and knot ends, leaving 4" tails for flower embellishments.
  • Sew flower embellishments to the drawstring ends using a darning needle and secure knots to prevent unraveling.

Important Notes

  • πŸ’‘The first chain(s) of each round do not count as a stitchβ€”begin rounds as instructed and adjust stitch counts accordingly.
  • πŸ’‘Use stitch markers to mark the start of rounds and strap placement; this helps keep the opening and strap alignment symmetrical.
  • πŸ’‘Switch to the 4 mm hook for spots and the 5.5 mm hook for the body and drawstring as indicated to maintain correct sizing.
  • πŸ’‘Leave tails on spots and flowers to make sewing them to the mushroom top and drawstring easier and more secure.

This sweet mushroom bag pattern is perfect for gift-giving, play, or a whimsical everyday accessory. Customize the colors and embellishments to make each bag uniquely yours. Enjoy the process and happy crocheting! πŸ„πŸ§Ά

You ask,

we answer.

FAQs

What size will the finished piece be?

The finished bag measures approximately 5" base diameter and about 7" tall when following the pattern and recommended hooks.

Can I use different yarn weights for this pattern?

Yes, you can use different yarn weights, but this will affect the final size and stitch counts; adjust hook size and possibly add or remove increase rounds to fit.

Do I need prior crochet experience for this pattern?

This pattern is rated intermediate and uses techniques like FPdc and BLO; basic knowledge of double crochet and working in rounds is recommended.

How long does this project typically take to complete?

Most crocheters complete this project in 5-7 hours, though time may vary depending on experience and customizations.