๐Ÿงถ Beautiful โœจ Detailed ๐Ÿ’ Adorable

Minimals Rabbit Amigurumi Pattern

Minimals Rabbit Amigurumi Pattern
4.8โ˜… Rating
5-7 Hours Time Needed
2.9K Made This
โœ‚๏ธ

Intermediate Level

Ideal for those with basic crochet experience, featuring slightly more advanced stitches and techniques to expand your skills.

โฑ๏ธ

Weekend Treat

Takes 5-7 hours, making it an enjoyable project to finish over a couple of days.

๐Ÿงธ

Cute Companion

An adorable friend to cherish, handcrafted with love to bring comfort and joy for years to come.

About This Minimals Rabbit Amigurumi Pattern

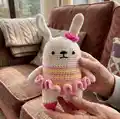
This pattern creates a sweet, minimalist rabbit amigurumi with a ruffled skirt and tiny ribbon detail. You will work the head and body in continuous rounds, divide for the legs, then make separate ears, arms, a ribbon and a ruffled skirt. Color change instructions are shown in the symbol chart and photos so you can recreate the striped body and pink ruffle exactly.

Minimals Rabbit Amigurumi Pattern crochet pattern - detailed view of completed project

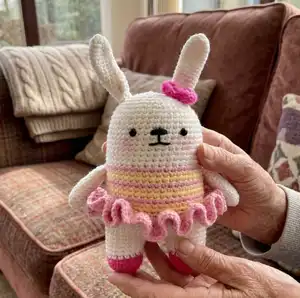
The finished rabbit measures approximately 15 cm (5.9 in) using worsted yarn and a 3mm hook. Complete stitch counts and every round are written out so you can follow along precisely.

Why You'll Love This Minimals Rabbit Amigurumi Pattern

I absolutely love this pattern because it combines a simple amigurumi base with playful details like the ruffled skirt and tiny bow that bring lots of character. I enjoy the clean, minimal aesthetic that still feels cozy and handmade. The pattern is thoughtfully written with every round spelled out so I can relax and crochet without guessing where color changes happen. I also appreciate the included photos and symbol chart โ€” they make placement of eyes, ears and features so much easier and more reliable.

Minimals Rabbit Amigurumi Pattern step 1 - construction progress Minimals Rabbit Amigurumi Pattern step 2 - assembly progress Minimals Rabbit Amigurumi Pattern step 3 - details and accessories Minimals Rabbit Amigurumi Pattern step 4 - final assembly and finishing

Switch Things Up

I love how easy it is to customize this rabbit by changing yarn colors โ€” try pastel shades for a baby-friendly look or bold brights for a playful shelf buddy.

I sometimes use a slightly thicker yarn and a larger hook to create a chunkier, cuddlier version that stands out on a shelf.

I often swap the ruffled skirt for a simple embroidered dress or tiny applique hearts for a seasonal theme.

I add little accessories like a tiny crocheted scarf or a felt flower sewn to the ear for more personality.

I like to vary eye size โ€” 4mm safety eyes for a smaller face or embroidered eyes for a softer, child-safe toy.

I occasionally add a little wire armature inside the arms for posability if I want the rabbit to hold a miniature prop.

I sometimes embroider different expressions โ€” a small smile, an open mouth, or a surprised 'O' โ€” to change the character completely.

I suggest experimenting with texture by using boucle or boucle-accent yarn for the skirt so it looks fluffier and more tactile.

If you want a keyring, make the pattern at half size using fingering yarn and a 2.25mm hook, then attach a small keyring loop to the top of the head.

I also enjoy making sets in matching colorways for gifts โ€” a rabbit with a matching fox or bear in complementary colors is always charming.

For holiday versions, swap the ribbon color or add tiny embroidered details (like a heart or star) to make the rabbit festive and gift-ready.

Common Mistakes & How to Fix Them

โœ— Skipping the stitch marker at the start of rounds causes miscounts and mismatched color rows; place a marker at the first stitch of each round to track the beginning. โœ— Forgetting to change yarn color according to the symbol chart will give you an incorrect striped body; check page 1 and change colors exactly where shown in the illustration. โœ— Overstuffing the head or body will distort the shape and ruffle placement; stuff gradually, using small amounts to keep a firm but soft shape. โœ— Not sewing the 6 stitches between the legs tightly can cause a gap between legs; weave the yarn tail through the front loops and pull tightly before securing to close the space. โœ— Flattening the arm or ear without leaving a long tail for sewing makes attachment difficult; always leave a long sewing tail when finishing those pieces. โœ— Ignoring the sctbl instruction on Round 29 will change the skirt join appearance; work single crochet through the back loop only on Round 29 as instructed.

Minimals Rabbit Amigurumi Pattern

Create an adorable mini rabbit amigurumi with clear, step-by-step instructions for head, body, legs, ears, arms, skirt, ribbon and assembly. This pattern uses simple single crochet construction with helpful photos and symbol charts so you can change colors and add cute details. Perfect for gifting or decorating, you will end up with a 15 cm tall cuddly rabbit made with worsted yarn and a 3mm hook. Follow every round exactly to achieve the neat, minimal finish shown in the photos.

Intermediate 5-7 Hours

Materials Needed for Minimals Rabbit Amigurumi Pattern

โ€” Main Fabric

  • 01
    Worsted weight yarn (#4) - White yarn - main body (ample for 15 cm rabbit)
  • 02
    Worsted weight yarn (#4) - Light pink yarn - stripes, ruffle and foot tips
  • 03
    Worsted weight yarn (#4) - Hot pink yarn - ribbon/bow
  • 04
    Worsted weight yarn (#4) - Light yellow yarn - stripe color
  • 05
    Worsted weight yarn (#4) - Black yarn - facial details and small accents
  • 06
    If using fingering weight yarn, finished size approximately 15 cm on a 3mm hook

โ€” Tools Required

  • 01
    Crochet hook size 5/0 (3mm)
  • 02
    Yarn needle for sewing and weaving ends
  • 03
    Scissors
  • 04
    Stitch markers
  • 05
    Fiberfill stuffing
  • 06
    Glue to secure plastic eyes (optional)
  • 07
    5mm black plastic safety eyes x2
  • 08
    Wooden pin for straightening doll feet (optional)

Progress Tracker

0% Complete

โ€” Head / Body / Legs :

Info :

*Change the color of the yarn according to the SYMBOL PATTERNS on page 1. Changing the yarn color is not mentioned in the descriptive design below.

Rnd Use the White yarn to make MAGIC RING :

scx6 in the yarn loop, tighten the loop [6 sts]

Round 2 :

(2-sc inc) x 6 [12]

Round 3 :

(scx1, 2-sc inc) x 6 [18]

Round 4 :

(scx2, 2-sc inc) x 6 [24]

Round 5 :

(scx3, 2-sc inc) x 6 [30]

Round 6 :

(scx4, 2-sc inc) x 6 [36]

Round 7 :

(scx5, 2-sc inc) x 6 [42]

Round 8 :

(scx6, 2-sc inc) x 6 [48]

Round 9~28 :

sc in all 48 st [48]

Round 29 :

sctbl in all 48 st [48]

Round 30~36 :

sc in all 48 st [48]

Info :

To make a leg, identify the center space between the legs by the 6 stitches, and each leg identifies the other by 18. (Use stitch markers to help.)

Info :

Sc at the 31th st of the Rnd 36. *1 This sc is the first st of the first leg (left leg). Continue working on the first leg (left leg).

Round 37~40 :

sc in all 18 st [18]

Round 41 :

(scx1, sc2tog) x 6 [12]

Round 42 :

(sc2tog) x 6 [6]

Info :

Fasten off, leaving a long tail. Stuff the leg. Using a yarn needle, weave the yarn tail through the front loop of each remaining st and pull tight to close.

Info :

SECOND LEG (Right leg): Rejoin the White yarn to 7th back unworked st of Rnd 36. *2 This sc is the first st for the second leg (right Leg). Continue working the second leg (right leg) the same way as the first leg (left leg), from Rnd 37-42. Using a yarn needle, sew the 6 sts between the legs.*3

โ€” Arm x2 :

Rnd Use the White yarn to make MAGIC RING :

scx5 in the yarn loop, tighten the loop [5 sts]

Round 2 :

(2-sc inc) x 5 [10]

Round 3~11 :

sc in all 10 st [10]

Info :

Fasten off, Leaving a long tail for sewing. Flatten the ARM, do not stuff.

โ€” Skirt :

Info :

*Use Light pink yarn to combine skirt and body at the first stitch of Rnd 29.*4 Place the rabbit head towards your body and start making skirt leftward

Rnd :

1. (ch3, dcx1) in first st, (2-dc inc) x 47, slst [96 sts] *ch 3 = dcx1

Round 2 :

(ch3, dcx1) in first st, (2-dc inc) x 95, slst [192]

Info :

Fasten off and weave in the yarn end.

โ€” Ribbon :

Rnd Use the Hot pink yarn to make 14 chains :

1. slst in the first ch [14 sts]

Round 2 :

ch1, (sc, hdc, dcx3, hdc, sc) x 2, slst [14]

Round 3 :

make 6 chains, wind around and slst in the first ch

Info :

Fasten off, Leaving a long tail for sewing.

โ€” Ear x2 :

Rnd Use the White yarn to make MAGIC RING :

scx6 in the yarn loop, tighten the loop [6 sts]

Round 2 :

(scx2, 2-sc inc) x 2 [8]

Round 3 :

(scx3, 2-sc inc) x 2 [10]

Round 4~14 :

sc in all 10 st [10]

Info :

Fasten off, Leaving a long tail for sewing. Flatten the EAR, do not stuff. (Fold the ears.)

โ€” Face & Assembly NOTES :

Info :

*Complete face details and doll assemblies by referring to illustrations showing location for each part and pictures in the following description. Thank you.

Info :

Placement reminders from illustrations: Eyes located between Rnd 13 and 14; place plastic eyes and glue if desired. Arms location between Rnd 20 and 21. Sew the ribbon to the bottom of the left ear as shown in photos.

Info :

TIP - How to straighten a doll: Plug wooden pin on the back of the doll's feet to help it stand straight.

Assembly Instructions

  • Attach the head/body/legs assembly so the head and body remain continuous as worked; after finishing the second leg, sew the 6 stitches between the legs securely using the yarn tail and a yarn needle.
  • Position and sew the arms on either side of the body between rounds 20 and 21, angling slightly forward and using the long sewing tails to secure neatly.
  • Flatten and sew the ears to the top of the head; place ears approximately as shown in the illustration with spacing so the ribbon can be secured on the bottom of the left ear.
  • Place the safety eyes between rounds 13 and 14, spacing them as shown in the diagram, then glue lightly if desired and embroider the nose and mouth using black yarn or thread.
  • Sew the ribbon onto the bottom of the left ear and weave in all ends; for a neat standing finish, insert a small wooden pin into the back of the feet as shown in the tip photo.

Important Notes

  • ๐Ÿ’กUse stitch markers to keep track of your rounds and the start of the round especially when changing colors.
  • ๐Ÿ’กChange yarn colors following the SYMBOL PATTERN on page 1; color changes are not described line-by-line in the text.
  • ๐Ÿ’กPin all parts in place and check photo references before sewing to ensure correct positioning and symmetry.
  • ๐Ÿ’กLeave long tails when fastening off arms, ears and ribbon so you have enough yarn for secure sewing.
  • ๐Ÿ’กWork single crochet through the back loop only on Round 29 as instructed to create the skirt join effect.

This sweet Minimal Rabbit is designed to be a compact, handmade companion you can finish in a weekend. ๐Ÿงถ The pattern combines straightforward amigurumi construction with charming details โ€” a ruffled skirt and a tiny bow โ€” for delightful results. โœจ Make one as a gift, keychain-sized friend, or a cute shelf sitter for nursery decor. ๐Ÿฐ

You ask,

we answer.

FAQs

What size will the finished piece be?

The finished amigurumi measures approximately 15 cm (5.9 inches) when using worsted yarn and a 3mm crochet hook.

Can I use different yarn weights for this pattern?

Yes, you can use different yarn weights but this will change the final size. Using fingering weight on a 3mm hook will give a similar size to the sample; adjust hook accordingly for neat tension.

Do I need prior crochet experience for this pattern?

This pattern is rated intermediate โ€” basic knowledge of single crochet, increases, decreases and working in the round is recommended.

How long does this project typically take to complete?

Most crocheters complete this project in 5-7 hours, though time may vary depending on experience level and how carefully you sew and finish details.

Where should I place the eyes and facial features?

Place the eyes between rounds 13 and 14 as shown in the diagram and photos; embroider the nose and mouth centered below the eyes according to the face illustration.