🧶 Beautiful ✨ Detailed 💝 Adorable

Mini Sunflower Turtle Amigurumi Pattern

Mini Sunflower Turtle Amigurumi Pattern
4.8★ Rating
2-4 Hours Time Needed
3.0K Made This
✂️

Intermediate Level

Ideal for those with basic crochet experience, featuring slightly more advanced stitches and techniques to expand your skills.

⏱️

Bite-Sized Project

Finishes in 2-4 hours—perfect for an afternoon of creative relaxation.

🧸

Cute Companion

An adorable friend to cherish, handcrafted with love to bring comfort and joy for years to come.

About This Mini Sunflower Turtle Amigurumi Pattern

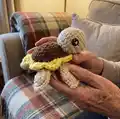
This pattern creates a small, plush sunflower-inspired turtle with a textured chenille shell and soft ivory body. It uses bulky chenille yarn and a size 3.5mm hook to make a cuddly mini amigurumi. The project includes step-by-step rounds for legs, tail, head, body, and assembly guidance. Ideal for gifting or as a desk-sized companion.

Mini Sunflower Turtle Amigurumi Pattern crochet pattern - detailed view of completed project

You will learn simple shaping, working in front and back loops, and attaching parts as you crochet. Photos and placement notes help make assembly easy and accurate.

Why You'll Love This Mini Sunflower Turtle Amigurumi Pattern

I absolutely love this pattern because it combines a playful sunflower shell with a classic amigurumi turtle shape that always brings a smile. I love how the chenille yarn gives the shell a plush, velvety texture that feels luxurious to touch. I enjoyed designing the leg and tail placement so the finished turtle looks balanced and cute from every angle. This pattern is a satisfying quick make that still offers little challenges to keep experienced crocheters engaged.

Mini Sunflower Turtle Amigurumi Pattern step 1 - construction progress Mini Sunflower Turtle Amigurumi Pattern step 2 - assembly progress Mini Sunflower Turtle Amigurumi Pattern step 3 - details and accessories Mini Sunflower Turtle Amigurumi Pattern step 4 - final assembly and finishing

Switch Things Up

I love changing yarn colors to make seasonal variations; try pastel yellows and pinks for spring or rich oranges and browns for autumn.

I sometimes swap the chenille for a lighter-weight plush yarn to create a smaller, more delicate turtle—just use a smaller hook for best results.

If I want a keychain, I make the turtle smaller by using lighter yarn and attach a split ring to a short chain sewn into the top of the shell.

I like adding embroidered facial details instead of safety eyes for a softer, baby-safe option—simple French knots or satin stitch eyes work well.

For extra personality I crochet tiny accessories like a mini hat or flower to sew onto the shell, which makes each turtle unique and gift-ready.

I sometimes add a bit of wire inside the legs if I want a posable toy; be sure to cover and secure wire ends safely inside the stuffing.

To make a matching set, I change the sunflower petal color to different shades and line them up for a coordinated display on a shelf.

I recommend experimenting with hook size and yarn weight to scale the pattern up or down—just remember to adjust stuffing and eye size accordingly.

I often change the number of triple crochet petals for a denser shell look, which alters the shell diameter and texture in a pleasing way.

If you enjoy embellishment, try adding beads or tiny buttons to the shell center (secure them well) for an extra decorative touch.

Common Mistakes & How to Fix Them

✗ Skipping stitch markers when working in BLO or FLO can make it hard to find the correct loops; place markers where suggested and count your stitches each round. ✗ Folding and joining legs incorrectly can change the shape of the turtle; follow the photo placement instructions carefully and attach legs in the correct clockwise order. ✗ Not stuffing evenly will cause lumps or a misshapen body; stuff gradually and add filling as you complete the shaping rounds to maintain an even form. ✗ Cutting yarn tails too short before sewing parts will make assembly difficult; leave a longer tail for sewing or use the single crochet attachment method described in the pattern.

Mini Sunflower Turtle Amigurumi Pattern

Make a charming Mini Sunflower Turtle with this friendly crochet pattern. You will create a plush turtle with a sunflower-style shell using bulky chenille yarn and a cozy ivory body. The pattern includes clear instructions for each leg, tail, head, and the decorative sunflower shell so you can assemble a sweet little companion. Perfect as a handmade gift or cute decor for your craft shelf.

Intermediate 2-4 Hours

Materials Needed for Mini Sunflower Turtle Amigurumi Pattern

— Main Fabric

  • 01
    Yarn: Size 5 and/or 6 bulky yarn (pattern uses bulky chenille)
  • 02
    Yarn Bee Velvety Smooth - Ivory (size 5)
  • 03
    Premier Just Chenille - Yellow (size 6)
  • 04
    Premier Just Chenille - Cocoa (size 6)

— Tools Required

  • 01
    Crochet hook size 3.5mm (E-5)
  • 02
    Tapestry needle
  • 03
    Scissors
  • 04
    Safety eyes 12mm (2 pieces)
  • 05
    Poly-Fil stuffing
  • 06
    Stitch markers
  • 07
    Pins for assembly (optional)

Progress Tracker

0% Complete

— Front Legs :

R1 :

6SC in MR

R2 :

Inc (12)

R3 :

SC, Inc (18)

R4 :

2SC, Inc (24)

Info :

SlSt into next St. Fold your circle in half to make a half circle, SC around the half circle through both stitches.

Info :

SlSt into the last stitch, BO, weave in the yarn tail. You do not need to leave a tail for sewing, it will be single crocheted into the body later.

— Back Legs :

R1 :

6SC in MR

R2 :

Inc (12)

R3 :

SC, Inc (18)

Info :

SlSt into next St. Fold your circle in half to make a half circle, SC around the half circle through both stitches.

Info :

SlSt into the last stitch, BO, weave in the yarn tail. You do not need to leave a tail for sewing, it will be single crocheted into the body later.

— Tail :

R1 :

3SC in MR

R2 :

Inc (6)

R3-4 :

SC (6)

Info :

SlSt into the last stitch, BO, weave in the yarn tail. You do not need to leave a tail for sewing, it will be single crocheted into the body later.

— Head :

R1 :

8SC in MR

R2 :

Inc (16)

R3 :

SC, Inc (24)

R4 :

3SC, Inc (30)

R5-6 :

SC (30)

R7 :

3SC, Dec (24)

R8 :

SC, Dec (16)

R9 :

SC (16)

Info :

SlSt and leave a pretty long tail for sewing (I leave about a foot of yarn)

Info :

Add Safety Eyes and stuffing. I added my safety eyes between row 4 and 5, about 8 stitches apart.

— Body :

R1 :

8SC into MR

R2 :

Inc (16)

R3 :

SC, Inc (24)

R4 :

3SC, Inc (30)

R5 :

4SC, Inc (36)

R6 :

3SC, Inc (45)

Info :

Color change to Yellow yarn using your preferred method

R7 :

Working in FLO (You may want to put stitch markers in the back loops so you can find them in the next round) 5SC, [(SC, TC, TC2*, TC, SC) x 7], 5SC (52)

Info :

*Triple crochet two times in one stitch

Info :

Color change to Ivory yarn using your preferred method

R8 :

SC into BLO of R6 where you placed your stitch markers (45)

R9 :

This is the row you will crochet the legs and tail into. When attaching, push your hook through the stitch(s) of the leg or tail first, then through the stitch of the body and complete your single crochet.

R9 :

5SC

R9 :

Grab the first big leg, attach using 3SC (refer to photo for placement, the curve of the leg should be on your right)

R9 :

5SC

R9 :

Grab the first small leg, attach using 2SC (refer to photo above for placement, the curve of the leg should be on your right)

R9 :

6SC

R9 :

Grab your tail and attach using 3SC (see photo for placement)

R9 :

6SC

R9 :

Grab the second small leg, attach using 2SC (refer to photo below for placement, the curve of the leg should be on your left)

R9 :

5SC

R9 :

Grab the second big leg, attach using 3SC (refer to photo below for placement, the curve of the leg should be on your left)

R9 :

5SC (45)

Info :

You are working clockwise in the direction of the red arrow in the left photo above.

R10 :

3SC, Dec (36)

R11 :

2SC, Dec (27)

Info :

Stuff the body to your desired firmness

R12 :

SC, Dec (18)

R13 :

Dec (9)

Info :

Add stuffing again if necessary

Info :

SlSt, cut yarn leaving a short tail to sew the hole closed. Weave the yarn tail back and forth into the stitches around then pull tight to close. Tie to secure and weave the rest of the yarn tail into the body.

Info :

Sew on the head, placing it between the two front legs. I like to place the head over 3-4 rows of the shell and 1-2 rows of the bottom body. To make it easier and keep placement even, I use long sewing pins to pin it to the body in place.

Assembly Instructions

  • Sew the head to the body between the two front legs, aligning the head over 3-4 rows of the shell and 1-2 rows of the bottom body; use long pins to secure placement before sewing.
  • Attach the legs and tail into R9 by pushing your hook through the leg or tail stitch first, then through the body stitch, and complete a SC to secure each piece.
  • Work clockwise when attaching legs as shown in the photo reference so that the curve of each leg faces the correct direction for natural placement.
  • After attaching all pieces, stuff the body to your desired firmness, then close the opening by SlSt, leaving a short tail to weave and pull tight to secure.

Important Notes

  • 💡Use stitch markers when working in FLO or BLO so you can find the correct loops in subsequent rounds.
  • 💡Stuff gradually while crocheting the body and head to avoid overstuffing or uneven shaping.
  • 💡Weave in yarn tails and secure closures neatly to prevent unraveling and to create a tidy finish.

Create this tiny sunflower turtle to brighten your day and make a thoughtful handmade gift. The chenille shell feels soft and sumptuous while the small size makes it perfect for shelves or desks. Happy crocheting and enjoy every stitch! 🧶🌻

You ask,

we answer.

FAQs

What size will the finished piece be?

The finished amigurumi measures approximately 6 inches long, 6 inches wide, and 2 inches tall using the recommended bulky chenille yarn and 3.5mm hook.

Can I use different yarn weights for this pattern?

Yes, you can use different yarn weights but the final size will change; choose an appropriate hook for your yarn and expect adjustments in stitch tension and piece dimensions.

Do I need prior crochet experience for this pattern?

This pattern is rated intermediate and assumes you are comfortable with single crochet, increases, decreases, working in BLO/FLO, and basic joining techniques.

How long does this project typically take to complete?

Most crocheters complete this project in 2-4 hours, though the time may vary depending on experience level and how much time you spend on assembly and finishing.