🧢 Beautiful ✨ Detailed πŸ’ Adorable

Mini Crossbody Bag Pattern

Mini Crossbody Bag Pattern
4.6β˜… Rating
5-7 Hours Time Needed
2.6K Made This
βœ‚οΈ

Intermediate Level

Ideal for those with basic crochet experience, featuring slightly more advanced stitches and techniques to expand your skills.

⏱️

Weekend Treat

Takes 5-7 hours, making it an enjoyable project to finish over a couple of days.

✨

Stylish Touch

An elegant detail to elevate any look, combining traditional techniques with contemporary design sensibilities.

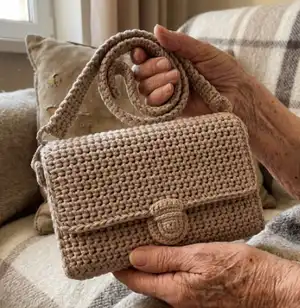
About This Mini Crossbody Bag Pattern

This pattern creates a compact mini crossbody bag worked in single crochet using 2 mm macrame cord. Youll work a rectangular main panel, two side panels, and an optional crocheted handle, then join and finish with metal hardware. The textured fabric is achieved by working in the back loops and joining rows for a neat, structured finish.

Mini Crossbody Bag Pattern crochet pattern - detailed view of completed project

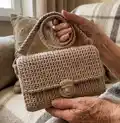
Instructions include shaping, steaming for a crisp rectangle, and step-by-step assembly with photos. A complete materials list and measurements are provided so you can reproduce the sample exactly.

Why You'll Love This Mini Crossbody Bag Pattern

I absolutely love this pattern because it turns simple stitches into a refined, wearable accessory that feels boutique-made. I enjoy how the back-loop technique creates a subtle texture and structure that holds the bag's shape beautifully. The pattern is flexible β€” you can use ready-made hardware or crochet the handle for a fully handmade finish. Sewing on the clasp and D-rings is satisfying and gives a professional final result; I always feel proud gifting this bag.

Mini Crossbody Bag Pattern step 1 - construction progress Mini Crossbody Bag Pattern step 2 - assembly progress Mini Crossbody Bag Pattern step 3 - details and accessories Mini Crossbody Bag Pattern step 4 - final assembly and finishing

Switch Things Up

I love how versatile this pattern is for customization; try changing the cord color to make bold colorblock panels or a striped design for a playful look.

I often adjust the width by adding or removing foundation chainsβ€”just make sure to maintain the same number of stitches each row and re-measure the gauge.

Want a chunkier bag? Use a thicker macrame cord and a larger hook to create a bulky, cozy version with the same construction steps.

For a mini clutch, reduce the number of rows so the panel measures less than the sample; you can also omit the handle and use a wrist loop or small chain instead.

I sometimes add a fabric lining for extra protection and a cleaner interior finish; pick a lightweight cotton and hand-sew it in after assembly.

Try mixing metallic or rope cords for a textured, two-tone effect β€” I like adding a shiny accent cord for a subtle glam detail.

Experiment with different hardware colors (gold, silver, antique brass) to change the whole vibe β€” casual, elegant, or vintage.

I also enjoy embroidering a small motif on the flap before attaching the lock to personalize the bag for gifts.

If youd like a longer strap, increase the number of handle rows or combine a crocheted strap with a leather shoulder pad for comfort.

Dont be afraid to combine techniques: use this pattern as a base and try tunisian or raised stitches for a different surface texture while keeping the same joining and assembly methods.

Common Mistakes & How to Fix Them
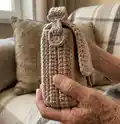
βœ— Skipping the long starting tail and not crocheting it into the second row can leave a loose, uneven beginning; lay the tail on top and crochet it into the second row to secure and neaten the start. βœ— Not counting foundation chains precisely will change the bag width and cause fitting issues for the hardware; chain the recommended number (31 in the sample) or adjust intentionally and re-measure before proceeding. βœ— Working without using the back loop technique as instructed will produce a different fabric and thickness; always insert the hook into the back loop of the current and previous rows to match the sample texture. βœ— Failing to steam and shape the panel before assembly results in an uneven rectangular form and poor alignment; straighten the fabric, steam it gently, and shape it into a clear rectangle prior to marking and joining.

Mini Crossbody Bag Pattern

Make a stylish, compact crossbody bag using macrame cord and a simple single crochet texture. This pattern walks you through the main panel, side panels, assembly, and a crocheted handle or ready-made option. Youll finish with instructions for attaching hardware and shaping for a professional look. Perfect for gifting or making a chic everyday accessory.

Intermediate 5-7 Hours

Materials Needed for Mini Crossbody Bag Pattern

β€” Main Fabric

  • 01
    Sensy 2 mm (100% polypropylene macrame cord), 230 m/251 yads 200g / 7 oz per skein β€” approx. 251 yards total (sample used one skein)
  • 02
    Substitute yarn: macrame cord 2 mm (similar thickness and fiber recommended)
  • 03
    Color used in sample: Latte (neutral beige tone), approx. one skein
  • 04
    Additional small amounts of cord for handle or finishing if you crochet an extended handle (approx. one extra skein if making very long handles)

β€” Tools Required

  • 01
    Crochet hook size 3.50 mm (E/4)
  • 02
    Measuring tape
  • 03
    Scissors
  • 04
    Stitch markers
  • 05
    Tapestry/yarn needle for weaving in ends and sewing
  • 06
    Bag hardware: 16mm (5/8") inner metal D-rings (2)
  • 07
    25mm (1") inner metal swivel clasps (2)
  • 08
    46mm x 44mm bag lock (1 set)
  • 09
    2.5 cm / 1-inch wide carabiner for handle attachment (optional)
  • 10
    Pins for assembly (optional) and an iron/steamer for blocking/steaming fabric

Progress Tracker

0% Complete

β€” Size & Gauge :

Info :

Gauge: 17 sc* 13 rows = 4'' (10cm). Always use a crochet hook size that will result in the correct gauge after blocking.

Info :

SIZE: when using similar materials, the bag will be width = 18.5 cm / 7.3" height = 11 cm / 4.5" depth = 4 cm / 1.5" handle length = 70 cm / 27.5"

β€” Main Part :

Info :

Leave a long tail of yarn approximately 25 cm / 10 inches and make a chain of foundation chain stitches.

Info :

Note: You can make more or fewer stitches depending on the desired width of the bag.

Info :

I made 31 chains [Fig 1].

Row 1 :

30 sc, 1 ch, turn [Fig 2].

Info :

Next, lay the long tail of yarn on top, and will crochet it into the second row.

Info :

Work single crochet stitches, inserting the hook into the back loop of the current row and the loop of the foundation chain [Fig 3-6].

Row 2 :

30 sc, 1 ch, turn [fig 7].

Info :

Straighten the beginning of the crocheted fabric and use the long tail to adjust so that the first rows are not overstretched.

Info :

MAIN PATTERN: Work single crochet stitches, inserting the hook into the back loop of the current row and the back loop of the previous row [Fig 8-10]. Detailed instructions for crocheting this pattern are shown in the video.

Row 3 :

30 sc, 1 ch, turn [Fig 11].

Info :

Repeat Row 3 until the desired length is reached, 35-36 cm / 13.8 - 14 inches.

Info :

I ended up with 90 rows [Fig 12]. Straighten the fabric, steam it, and shape it into a clear rectangular form. Measure the length and width.

Info :

Mark the bottom and sides of the bag with stitch markers.

Info :

Note: You can fold the fabric along these markers to estimate the size of the finished bag.

β€” Bag Sides (Make 2) :

Info :

Make a chain of 5 foundation chain stitches.

Row 1 :

4 sc, 1 ch, turn. Continue with the main pattern.

Row 2 :

4 sc, 1 ch, turn.

Rows 3-25 :

4 sc, 1 ch, turn.

Row 26 :

4 sl-sts [Fig 13]

Info :

Cut the working yarn. Straighten and steam the side piece.

β€” Assembly :

Info :

Attach the side pieces to the main part using sl-sts. Start with the left side piece. Place the side piece onto the main part and connect the corner parts [Fig 14].

Info :

Insert the hook into the back loop of the main part and the front loop of the side piece (3 loops on the hook) and pull the working yarn through all 3 loops [Fig 15]. In this way, work slip stitches along the three sides of the bag side piece [Fig 16-17]. A video of the joining process can be found here.

Info :

Do not cut the working yarn! Continue to crochet slip stitches along the main part to the corner and then to the middle of the closing flap. Cut the yarn [Fig 18-19].

Info :

Attach the right bag side in the same way [Fig 20-21].

Info :

Weave in the ends of the working yarn into the fabric. Mark the center of the flap [Fig 22].

Info :

Attach the clasp to the flap. First, attach the lock to the upper flap [Fig 23], and then the corresponding part of the lock to the main part of the bag [Fig 24-25].

Info :

Sew D-rings to the bag side for attaching the handle [Fig 26].

β€” Handle :

Info :

You can use a ready-made handle or crochet one.

Info :

For easy attachment of the handle to the bag, I use a 2.5 cm / 1-inch wide carabiner [Fig 26].

Info :

Leave a long tail of yarn approximately 15 cm / 6 inches. Make a chain of 4 foundation chain stitches.

Row 1 :

3 sc, 1 ch, turn.

Info :

Continue with the main pattern of the bag.

Row 2 :

3 sc, 1 ch, turn.

Row 3 :

3 sc, 1 ch, turn.

Info :

Crochet rows until the desired length of the handle is reached.

Info :

I made a medium-length handle, 67 cm / 26 inches long. I ended up with 146 rows. Attach the handle to the carabiners [Fig 27]. Weave in the yarn ends.

Info :

Attach the handle, and the bag is ready!

Assembly Instructions

  • Attach the side pieces to the main part using slip stitches; start with the left side piece, aligning corners and working slip stitches through the back loop of the main panel and the front loop of the side piece for a neat join.
  • Continue slip stitching along three sides of each side piece so the bottom and two edges are joined securely, then work slip stitches along the main part to the corner and up to the middle of the closing flap before cutting yarn.
  • Weave in all working yarn ends into the fabric after joining to hide tails and lock seams in place; mark the center of the flap to position the clasp accurately.
  • Attach the bag lock by first fixing the lock plate to the upper flap and then attaching the corresponding locking part to the main body so the clasp aligns and functions correctly.
  • Sew D-rings to both bag sides at the prepared positions for handle attachment using sturdy stitching so they support the weight of the bag contents.
  • Attach a ready-made handle or a crocheted handle to D-rings or carabiners; use a 2.5 cm / 1-inch carabiner for easy attachment and ensure all hardware is secured tightly.

Important Notes

  • πŸ’‘Use stitch markers to mark bottom and side positions before joining so the bag pieces align symmetrically and the flap centers correctly.
  • πŸ’‘Steam and shape the main panel before assembly to ensure a clean rectangular shape; blocking is essential for a professional finish.
  • πŸ’‘Keep consistent tension and use the recommended hook to match the gauge; different hooks or yarns will change final size and hardware placement.
  • πŸ’‘Weave in ends as you go and test hardware alignment before permanently sewing the lock or D-rings to avoid rework.

This mini crossbody bag pattern gives you a polished, boutique-style accessory you can make at home. The structured texture and clean lines make it suitable for everyday wear or gifting. Follow the step-by-step assembly and hardware instructions for a professional finish. 🧢✨❀️

You ask,

we answer.

FAQs

What size will the finished piece be?

When using the recommended materials, the finished bag measures approximately 18.5 cm (7.3") wide, 11 cm (4.5") high and 4 cm (1.5") deep, with a handle length of about 70 cm (27.5") if following the sample.

Can I use different yarn weights for this pattern?

Yes, you can substitute other cords or yarns, but this will change the bag's size and texture; adjust hook size and measure gauge to match the intended dimensions before assembly.

Do I need special tools to attach the hardware?

No special tools are required beyond a tapestry needle and strong stitching; the lock and D-rings are sewn on with the same cord and needle used for finishing, though small pliers may help position metal pieces.

How long does this project typically take to complete?

Most crafters finish this project in about 5-7 hours, depending on your experience and whether you crochet the handle or use a ready-made strap.