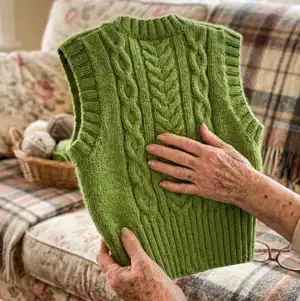
Make a cozy cable-knit vest with rustic charm using chunky yarn and simple shaping. This pattern guides you through cables, shoulder shaping and finishing so you can create a polished wardrobe staple. Perfect for adding a handmade, textured layer to your outfits.
Progress Tracker
0% Complete
— Materials :
Info :
Materiais necessários para tricotar este colete: 4 novelos de lã chunky 100g/110 yds aprox. Agulha de 8mm / US11. Agulha circular de 6mm / US 10. Agulha auxiliar. Marcador de pontos. Aguja de tapeçaria. Tesouras. Tamanho: único. MEDIDAS: Largura: 43 cm (17 in). Comprimento frontal: 53 cm (21 in). Comprimento das costas: 59 cm (23 in). Costas: 59 cm (23 in). Circunferência da cava: 72 cm (28 in). Decote: 26 cm (10 in). Tensão: 10 x 10 cm (4" x 4") = 12 pts x 13 carreiras.
— Points and Techniques :
Infos :
1. Colocar pontos na agulha. 2. Arremate/ tirar os pontos. 3. Arremate de pontos no meio de uma carreira. 4. Ponto meia (pm). 5. Ponto tricô (pt). 6. Diminuição. 7. Frente do trabalho- o lado em que você está trabalhando. Aquele que você pode ver nesse momento. 8. Parte de trás do trabalho- Refere-se ao lado oposto ao que está à sua frente, ou seja, aquele que você não pode ver nesse momento. 9. LD- Lado direito. 10. LA- Lado avesso. 11. *a* - faça/repita conforme indicado entre os asteriscos. 12. Torção para a direita de 3 pontos (LD) - tira 1 ponto da agulha esquerda para a agulha auxiliar e deixe por trás do trabalho, 2 pontos meia da agulha esquerda, trabalhe 1 ponto meia da agulha auxiliar. 13. Torção para a direita de 3 pontos (LA) - tira 2 pontos da agulha esquerda para a agulha auxiliar e deixe por trás do trabalho, trabalhe 1 ponto tricô da agulha esquerda, trabalhe 2 pontos tricô da agulha auxiliar. 14. Torção para a esquerda de 3 pontos (LD) - tira 2 pontos da agulha esquerda para a agulha auxiliar e deixe na frente do trabalho, trabalhe 1 ponto meia da agulha esquerda, trabalhe 2 pontos meia da agulha auxiliar. 15. Torção para a esquerda de 3 pontos (LA) - tira 1 ponto da agulha esquerda para a agulha auxiliar e deixe na frente do trabalho, trabalhe 2 pontos tricô da agulha esquerda, trabalhe 1 ponto tricô da agulha auxiliar. 16. Torção para a direita de 4 pontos (LD) - tira 2 pontos da agulha esquerda para a agulha auxiliar e deixe por trás do trabalho, trabalhe 2 pontos meia da agulha esquerda, trabalhe 2 pontos meia da agulha auxiliar. 17. Torção para a esquerda de 4 pontos (LD) - tira 2 pontos da agulha esquerda para a agulha auxiliar e deixe na frente do trabalho, trabalhe 2 pontos meia da agulha esquerda, trabalhe 2 pontos meia da agulha auxiliar. 18. Torção para a direita de 6 pontos (LD) - tirar 3 pontos da agulha esquerda para a agulha auxiliar e deixe por trás do trabalho, trabalhe 3 pontos meia da agulha esquerda, trabalhe 3 pontos meia da agulha auxiliar. 19. Torção para a esquerda de 6 pontos (LD) - tirar 3 pontos da agulha esquerda para a agulha auxiliar e deixe na frente do trabalho, trabalhe 3 pontos meia da agulha esquerda, trabalhe 3 pontos meia da agulha auxiliar.
Infos :
Legenda e símbolos: LD: ponto tricô. LA: ponto meia. LD: ponto meia. LA: ponto tricô. LD: Diminuir para a esquerda. LA: Diminuir para a direita. LD: Diminuir para a direita. LA: Diminuir para a esquerda. Arrematar ponto. Sem pontos. Costuras. Símbolos gráficos indicados na folha de gráfico para torções e trocas de ponto.
— How to Read This Pattern :
Info :
Você tem que trabalhar esta receita em Plano e você deve tricotar a frente e as costas separadamente. Quando você trabalha em Plano: Trabalhe todas as carreiras impares no LA e leia o gráfico da esquerda para a direita. Trabalhe todas as carreiras pares no LD e leia o gráfico da direita para a esquerda. Quando você trabalha em plano, você deve virar o trabalho quando acabar a carreira e continuar trabalhando do outro lado. Se você estiver trabalhando do LD a próxima carreira será no LA e vice-versa.
— Begin Knitting (COMECE A TRICOTAR!) :
Round 0 :
FRENTE (agulhas de 8mm/US 11)
Round 1 :
Carreira 0: coloque 60 pontos nas agulhas e siga o gráfico (página 9).
Round 2 :
Carreira 46: de agora em diante você tem que trabalhar um ombro de cada vez.
Round 3 :
Carreira 87: Arremate os 10 pontos.
Round 4 :
Depois de terminar o ombro direito, pegue outro fio e continue com o ombro esquerdo pelo LD do trabalho (carreira 46).
— Back (COSTAS) :
Round 0 :
COSTAS (agulhas de 8mm/US 11)
Round 1 :
Carreira 0: montar 60 pontos nas agulhas e siga o gráfico (página 10).
Round 2 :
Carreira 81: Arremate 20 pontos no meio da carreira conforme indicado no gráfico. Você terá 13 pontos de cada lado.
Round 3 :
Carreira 82: de agora em diante você só trabalhará com um ombro de cada vez.
Round 4 :
Carreira 91: arremate os 9 pontos.
Round 5 :
Depois de terminar o ombro esquerdo, pegue outro fio e continue com o ombro direito pelo LD do seu trabalho (carreira 82).
— Sew the Shoulders (COSTURAR OS OMBROS) :
Info :
Coloque o frente e as costas frente a frente; com uma agulha de tapeçaria e um pedaço suficientemente comprido do mesmo fio, costure um ombro pegando um ponto das costas e outro da frente até completar todos os pontos do ombro. Faça o mesmo com o outro ombro.
— Armhole (CAVA) :
Round 0 :
CAVA (agulhas de 6mm/US 10)
Round 1 :
Carreira 0: Começando pela frente, pegue 98 pontos em volta da cava: 49 da frente e 49 do verso.
Round 2 :
Carreira 1: 2 pontos meia *2 pontos tricô, 2 pontos meia*; repita de * a * até o fim da carreira.
Round 3 :
Carreira 2-7: continue trabalhando em ponto barra. Trabalhe os pontos como eles estão.
Round 4 :
Carreira 8: arremate todos os pontos (ponto barra).
— Collar (GOLA) :
Info :
GOLA (agulhas de 6mm/US 10)
Round 1 :
Começando do meio da gola, pegue 40 pontos até a costura dos ombros, 43 pontos das costas e 40 pontos do outro lado da frente. Você terá 123 pontos.
Round 2 :
Você deve trabalhar em Plano, então gire o seu trabalho para iniciar essa carreira. Você estará trabalhando no LA. Você deve girar seu trabalho toda vez que iniciar uma nova carreira.
Round 3 :
Carreira 1: 2pt juntos (2ptJ), *2pm, 2pt*. Repita de * a * até sobrar 2 pontos. 2pmJ.
Round 4 :
Carreira 2: 2ptJ, trabalhe em todos os pontos conforme estão até que restem 2 pontos. 2pmJ.
Round 5 :
Carreira 3 a 7: Repita a carreira nº 2.
Round 6 :
Carreira 8: 2ptJ e coloque um marcador nesse ponto (depois você precisará costurar a costura do decote, assim será mais fácil identificar o primeiro ponto). Arrematar os pontos seguintes seguindo o padrão até que restem 2 pontos. Você terá 1 ponto na agulha direita e 2 pontos na agulha esquerda, faca 2ptJ e feche esse ponto passando o ponto que você tinha na agulha direita sobre o último que tricotou.
— Sew Collar, Armhole and Sides (COSTURE A GOLA, CAVA E OS LADOS) :
Round 1 :
1. Com uma agulha de tapeçaria e um pedaço comprido do mesmo fio, costure a cava.
Round 2 :
2. Costure o decote escondendo o ponto de borda.
Round 3 :
3. Costure as costuras laterais, juntando os 20 pontos indicados no gráfico com uma linha vermelha.
Round 4 :
4. Faça um nó e esconda os fios sobrantes.
Info :
E é isso! Espero que tenha gostado de tricotar este colete. Por favor me envie fotos, eu adoraria ver seu projeto finalizado 💗
— Charts and Diagrams :
Info :
Os gráficos de ponto e símbolos para as torções, diminuições e marcações de costura estão incluídos nas páginas de gráficos (páginas 6-7). Leia a orientação de gráfico: carreiras impares no LA da esquerda para a direita; carreiras pares no LD da direita para a esquerda.
This chunky Colete Guacamole vest is a quick, cozy knit that elevates any outfit with textured cables and clean finishing. Whether you wear it layered or over a tee, it becomes a favorite piece in your wardrobe. Enjoy making this handmade vest and share your finished photos — I cant wait to see your version! 🧶✨