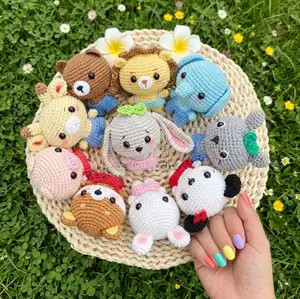
Create an adorable collection of mini animal amigurumi with step-by-step instructions. This pattern walks you through heads, bodies, limbs, ears and clothing so you can make rabbits, elephants, bears, giraffes, dogs, pandas and lions. Perfect for handmade gifts, keychains, or a charming display, these characters are designed for clear construction and delightful details. Grab your yarn and hook and start a cute crafting session!
Progress Tracker
0% Complete
— Abbreviations :
Info :
X: single crochet, V: increase, A: decrease, CH: chain, SS: slip stitch, T: half double crochet, TV: half double crochet increase (make 2T in one stitch), TA:half double crochet decrease (make a T from 2 sts), F: double crochet, W: 3 single crochet in 1 sts, BLO: back loop only, FLO: front loop only, STS: stitches.
— Rabbit (White) :
— Head (white) :
R1: Magic Ring 6X
Round 17 :
(3X, A, 3X) * 6
Round 19 :
(2X, A, 2X) * 6
Info :
Slst and fasten off. Leave long tail for sewing to body.
Info :
Just follow the pattern and finish the head. You may refer photo 1.
— Legs (white) * 2 :
R1-3: Magic Ring 9X
Round 4 :
Join both two legs: 18X
Info :
You may refer photo 2: How to join legs + body.
— Body (white) :
R5-9: Magic Ring 18X
Info :
Slst and fasten off.
— Hand (white) * 2 :
R1: Magic Ring 6X
Info :
Slst and fasten off.
Info :
You may refer photo 3: For tips on hands.
— Ears (white) * 2 :
R1: Magic Ring 6X
Info :
Sew the ears between R3-5 on the head.
Info :
Place safety eyes between R12 and R13. The distance between both safety eyes is 6 stitches.
— Dress (pink) :
R1: 22CH, slip stitch heads with tail into a circle. Do 22F in circle.
Round 2 :
4X, 5CH, skip 3 stitches, 8X, 5CH, skip 3 stitches, 4X5CH to make 2 shoulder straps.
Info :
You may refer Photo 4: The dress and Photo: 5 How to dress straps.
— Rabbit (grey) :
— Head (grey) :
R1: Magic Ring 6X
Round 17 :
(3X, A, 3X) * 6
Round 19 :
(2X, A, 2X) * 6
Info :
Slst and fasten off. Leave long tail for sewing to body.
Info :
Just follow the pattern and finish the head. You may refer photo 1.
— Legs (grey) * 2 :
R1-3: Magic Ring 9X
Round 4 :
Join both two legs: 18X
Info :
You may refer photo 2: How to join legs + body.
— Body (grey) :
R5-9: Magic Ring 18X
Info :
Slst and fasten off.
— Hand (grey) * 2 :
R1: Magic Ring 6X
Info :
Slst and fasten off.
Info :
You may refer photo 3: For tips on hands.
— Ears * 2 :
R1: 16CH, 6X, 8T, Into 1 stitch: 5T, 8T, 6X, 1CH, Turn over
Round 2 :
6X, 8T, 5TV, 8T, 6X
Info :
Sew the ears on R8.
Info :
Sew the eyebrow above the eyes.
Info :
Place safety eyes between R12 and R13. The space between two holes that you put safety eyes is 7 stitches.
— Leaf (green) :
R1: 10CH, reverse 1 stitch: 2T, X, SL, X, 2T, W, 2T, X, SL, X, 2T, V
— Dress 2 (pink) :
R1: 22CH, 22F in circle
Round 2 :
R2: 3X, 4V, 7X, 4V, 4X 5CH to make 2 shoulder straps.
Info :
You may refer Photo 4: The dress and Photo: 5 How to dress straps.
— Elephant (blue) :
— Head (blue) :
R1: Magic Ring 6X
Round 17 :
(3X, A, 3X) * 6
Round 19 :
(2X, A, 2X) * 6
Info :
Slst and fasten off. Leave long tail for sewing to body.
Info :
Just follow the pattern and finish the head. You may refer photo 1.
— Legs (blue) * 2 :
R1-3: Magic Ring 9X
Round 4 :
Join both two legs: 18X
Info :
You may refer photo 2: How to join legs + body.
— Body (blue) :
R5-9: Magic Ring 18X
Info :
Slst and fasten off.
— Hand (blue) * 2 :
R1: Magic Ring 6X
Info :
Slst and fasten off.
Info :
You may refer photo 3: For tips on hands.
— Ears * 2 :
Note: You have to Chain3, turn over every end of the working piece. (Chain 3= also count as 1 Double Crochet in next R)
Info :
Sew the ears on R6-18.
Info :
Place safety eyes between R12 and R13. The space between two holes that you put safety eyes is 6 stitches.
— Nose :
R1: Magic Ring 8X
— Pants (dark blue) * 2 :
R1: 11CH, 11X in circle
Info :
R1 & R2 make 2, then join both pieces into 1: 22X
Round 5 :
4X, 5CH, skip 3 stitches, 8X, 5CH, skip 3 stitches, 4X5CH to make 2 shoulder straps.
Info :
You may refer photo 6: The pants and Photo 7: How to strap the pants.
— Bear (brown) :
— Head (blue) :
R1: Magic Ring 6X
Round 17 :
(3X, A, 3X) * 6
Round 19 :
(2X, A, 2X) * 6
Info :
Slst and fasten off. Leave long tail for sewing to body.
Info :
Just follow the pattern and finish the head. You may refer photo 1.
— Legs (brown) * 2 :
R1-3: Magic Ring 9X
Round 4 :
Join both two legs: 18X
Info :
You may refer photo 2: How to join legs + body.
— Body (brown) :
R5-9: Magic Ring 18X
Info :
Slst and fasten off.
— Hand (brown) * 2 :
R1: Magic Ring 6X
Info :
Slst and fasten off.
Info :
You may refer photo 3: For tips on hands.
— Ears (brown) * 2 :
R1: Magic Ring 6X
Info :
Sew the ears on R4-7.
Info :
Place safety eyes between R12 and R13. The space between two holes that you put safety eyes is 6 stitches
— Mouth (white) :
R1: Magic Ring 8X
Info :
Leave long yarn sew to head. Use black yarn sew out the nose.
— Pants (dark blue) :
R1: 11CH, 11X in circle
Info :
R1 & R2 make 2, then join both pieces into 1: 22X
Round 5 :
4X, 5CH, skip 3 stitches, 8X, 5CH, skip 3 stitches, 4X5CH to make 2 shoulder straps.
Info :
You may refer photo 6: The pants and Photo 7: How to strap the pants.
— Giraffe (light brown) :
— Head (light brown) :
R1: Magic Ring 6X
Round 17 :
(3X, A, 3X) * 6
Round 19 :
(2X, A, 2X) * 6
Info :
Slst and fasten off. Leave long tail for sewing to body.
Info :
Just follow the pattern and finish the head. You may refer photo 1.
— Legs (light brown) * 2 :
R1-3: Magic Ring 9X
Round 4 :
Join both two legs: 18X
Info :
You may refer photo 2: How to join legs + body.
— Body (light brown) :
R5-9: Magic Ring 18X
Info :
Slst and fasten off.
— Hand (light brown) * 2 :
R1: Magic Ring 6X
Info :
Slst and fasten off.
Info :
You may refer photo 3: For tips on hands.
— Ears (light brown) * 2 :
R1: 6X
Info :
Sew the ears on R6-8.
Info :
Place safety eyes between R10 and R11. The space between two holes that you put safety eyes is 6 stitches.
— Horn * 2 :
Begin with dark brown. R1-3: Magic Ring 8X R4-7: Change to yellow, 8X
Info :
Sew the horns on R3-5
— Mouth (white) :
R1: 4CH, working on 2nd stitch: 2X, W, X, V (Slip stitch, Chain 1)
Info :
Sew it on R12-16 to head.
— Dog (light grey) :
— Head (light grey) :
R1: Magic Ring 6X
Round 9 :
16X, 6X (white), 3X, 6X (white), 17X
Round 10 :
15X, 7X (white), 3X, 7X (white), 16X
Round 11 :
14X, 8X (white), 3X, 8X (white), 15X
Round 12 :
13X, 21X (white), 14X
Round 13-16 :
12X, 23X (white), 13X
Round 17 :
3X, A, 6X, [white: A, 6X, A, 6X, A, 5X], X, A, 6X, A, 3X
Round 18 :
5X, A, 4X, [white: X, A, 5X, A, 5X, A, X], 4X, A, 5X, A
Round 19 :
2X, A, 4X, A, [white: 4X, A, 4X, A, 2X], 2X, A, 4X, A, 2X
Round 20 :
3X, A, 3X, A, [white: 3X, A, 3X, A], 3X, A, 3X, A
Round 21 :
X, A, 2X, A, 2X, [white: A, 2X, A], 2X, A, 2X, A, X
Info :
Slst and fasten off. Leave long tail for sewing to body.
Info :
Just follow the pattern and finish the head.
— Body & Legs (light grey) * 2 :
R1: Magic Ring 9X
Info :
R1-R3 Make 2, fasten off 1 leg.
Round 4-8 :
Join both legs into 1: 18X
Info :
You may refer photo 2: How to join legs + body.
— Hand (light grey) * 2 :
R1: Magic Ring 6X
Info :
Slst and fasten off.
Info :
You may refer photo 3: For tips on hands.
— Ears * 2 :
R1: 5X in circle
Round 2 :
2V, white: V, 2X
Round 3 :
4X, white: 2V, 4X
Round 4 :
3X, V, [white: 4X], V, 3X
Round 5 :
X, V, X, V, X, [white: V, 2X, V], X, V, X, V, X
Round 6 :
7X, white: 6X, 7X
Info :
Place safety eyes between R12 and R13. The space between two holes that you put safety eyes is 8 stitches.
— Mouth (white) :
R1: 6CH, reverse 4 stitches: W, 3X, V
Round 2 :
V, 3X, W, 3X, 2V
— Pants (light blue) :
R1: 11CH, 11X in circle
Info :
R1 & R2 make 2, then join both pieces into 1: 22X
Round 5 :
4X, 5CH, skip 3 stitches, 8X, 5CH, skip 3 stitches, 4X5CH to make 2 shoulder straps.
Info :
You may refer Photo 8: Dress 2 and Photo 9: how to Dress 2 straps.
— Dog (light brown) :
— Head (light brown) :
NOTE: R1-11: light brown, R12-21: white. R1: Magic Ring 6X
Round 17 :
(3X, A, 3X) * 6
Round 19 :
(2X, A, 2X) * 6
Info :
Slst and fasten off. Hide the yarn.
— Legs (light brown) * 2 :
R1-3: Magic Ring 9X
Round 4 :
Join both two legs: 18X
Info :
You may refer photo 2: How to join legs + body.
— Body (light brown) :
R5-9: Magic Ring 18X
Info :
Slst and fasten off.
— Hand (light brown) * 2 :
R1: 6X in Magic circle
Info :
Slst and fasten off.
Info :
You may refer photo 3: For tips on hands.
— Inner (yellow) :
R1: 4CH, reverse 1 stitch, T, F
Info :
Place safety eyes between R12 and R13. The space between two holes that you put safety eyes is 8 stitches.
— Dress 2 (pink) :
R1: 22CH, 22X in circle
Round 2 :
R2: 3X, 4V, 7X, 4V, 4X 5CH to make 2 shoulder straps.
Info :
You may refer Photo 8 : Dress 2 and Photo 9: how to Dress 2 straps.
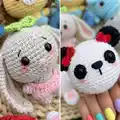
— Panda (white) :
— Head (white) :
R1: Magic Ring 6X
Round 17 :
(3X, A, 3X) * 6
Round 19 :
(2X, A, 2X) * 6
Info :
Slst and fasten off. Leave long tail for sewing to body.
Info :
Just follow the pattern and finish the head. You may refer photo 1.
— Legs (white) * 2 :
R1-3: Magic Ring 9X
Round 4 :
Join both two legs: 18X
Info :
You may refer photo 2: How to join legs + body.
— Body (white) :
R5-9: Magic Ring 18X
Info :
Slst and fasten off.
— Hand (white) * 2 :
R1: Magic Ring 6X
Info :
Slst and fasten off.
Info :
You may refer photo 3: For tips on hands.
— Ears * 2 :
R1: Magic Ring 6X
Info :
Sew the ears on R4-9. Sew the nose on R12-13.
Info :
Place safety eyes between R10 and R12. The space between two holes that you put safety eyes is 7 stitches.
— Bow (red) :
R1: (2CH, 2F, 2CH, SL) * 2
— Dress (red) :
R1: 22CH, 22X in circle
Round 2 :
R2: 3X, 4V, 7X, 4V, 4X 5CH to make 2 shoulder straps.
Info :
You may refer Photo 8 : Dress 2 and Photo 9: how to Dress 2 straps.
— Lion (yellow) :
— Head (yellow) :
(Follow same head rounds as earlier: R1: Magic Ring 6X; R2: 6V; R3: (X, V) * 6; R4: (X, V, X) * 6; R5: (3X, V) * 6; R6: (2X, V, 2X) * 6; R7: (5X, V) * 6; R8: (3X, V, 3X) * 6; R9-16: 48X; R17: (3X, A, 3X) * 6; R18: (5X, A) * 6; R19: (2X, A, 2X) * 6; R20: (3X, A) * 6; R21: (X, A, X) * 6)
Info :
Slst and fasten off. You may refer photo 1 to finish the head.
— Legs (yellow) * 2 :
R1-3: Magic Ring 9X; R4: Join both two legs: 18X
Info :
You may refer photo 2: How to join legs + body.
— End Notes :
Use photos provided as reference for placement of eyes, ears and clothing straps. Follow each round exactly and stuff pieces as indicated before closing. Fasten off and leave long tails where noted for sewing pieces together.
This lovely mini animal amigurumi set brings a pocketful of charm to your craft box and makes perfect small gifts for friends and family. The pattern uses simple repeatable rounds so you can make an entire collection with ease and creativity. Add tiny outfits and color variations to make each animal unique and full of personality. 🧶🐾🎁