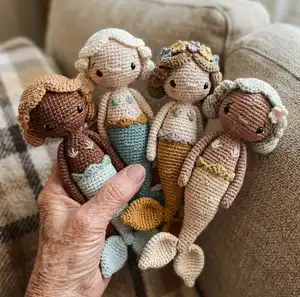
Create a sweet handmade mermaid with this detailed crochet pattern for Lulu. You will make a sculpted head, a flowing tail, a cute wig and little accessories with clear step-by-step rounds and helpful photos. This pattern is perfect for crafters who enjoy finishing and assembly — you will end up with a charming amigurumi companion to gift or display.
Progress Tracker
0% Complete
— Materials :
Info :
Cotton yarn in six different colours (115 yard / 50g). Skin tone / colour A (25 g). Hair / colour B (15g). Tail fin / colour C (17g). Wavy hem / colour D. Flower / colour E. Bustier / colour F. Crochet hook in size 2,5 mm. Safety eyes in size 8 mm (dolls 2 and 3) or 9 mm (dolls 1 and 4). Sharp sewing needle for sewing and embroidering. Thin cotton yarn in black or brown for the eyebrows. White cotton yarn for the white of the eye. Polyfiber fill. Pins. Scissors. Pink blush for cheeks and the flower. Optional: stitch marker. Optional: thin sewing yarn (especially in the colour of the hair) to sew on the hair strands. Optional: foam curler to stabilize the head.
— Colour Codes :
Info :
Doll 1. Skin tone (colour A): Babytoly 610 Chocolate. Hair (colour B): Babytoly 727 Terracotta. Tail fin (colour C): Ecobebek 975 Argentino. Wavy hem (colour D): Babytoly 205 Sage. Bustier (colour F): Babytoly 560 Dusty Rose.
Info :
Doll 2. Skin tone (colour A): Babytoly 434 Ecru. Hair (colour B): Babytoly 014 Natural. Tail fin (colour C): Ecobebek 969 Steel. Wavy hem (colour D): Babytoly 450 Biscuit. Bustier (colour F): Ecobebek 969 Steel.
Info :
Doll 3. Skin tone (colour A): Babytoly 434 Ecru. Hair (colour B): Babytoly 812 Camel. Tail fin (colour C): Babytoly 450 Biscuit. Wavy hem (colour D): Babytoly 560 Dusty Rose. Flowers (colour E): Babytoly 560 Dusty Rose, 780 Mustard, Ecobebek 969 Steel. Bustier (colour F): Babytoly 205 Sage.
Info :
Doll 4. Skin tone (colour A): Babytoly 225 Mocha. Hair (colour B): Babytoly 520 Seaweed. Tail fin (colour C): Babytoly 018 Sand. Wavy hem (colour D): Babytoly 770 Olive. Flower (colour E): Babytoly 014 Natural. Bustier (colour F): Babytoly 120 Powder Pink.
— Abbreviations :
Infos :
MR: Magic Ring. sc: single crochet. ch: chain stitch. sl st: slip stitch. dc: double crochet. rnd(s): round(s). r: row. inc: increase. dec: decrease. BLO: back loop only. [...] x...: repeat the instructions in the brackets as indicated after the brackets. [...]: total number of stitches in this round. st(s): stitch(es).
— Tips before starting :
Infos :
When using similar or the same yarn with the same hook size, the mermaid will be approx. 26 cm tall. When you need to decrease, make Invisible Decrease crochet stitches to have a neater result. Please be aware that when you use different yarns and hook sizes, the outcome may vary and you may have to adjust the size of eyes. Colour change is worked at the end of the previous stitch. Work the last stitch before the colour change as usual but don't complete the last stitch. When you have 2 loops on your hook, yarn over in the new yarn colour and finish the stitch. Continue working with the new colour.
— Head :
Info :
Crochet in spiral rounds. Colour A.
Round 1 :
6 sc into a MR (6)
Round 3 :
(1 sc, inc) x 6 (18)
Round 4 :
1 sc, inc, (2 sc, inc) x 5, 1 sc (24)
Round 5 :
(3 sc, inc) x 6 (30)
Round 6 :
2 sc, inc, (4 sc, inc) x 5, 2 sc (36)
Round 7 :
(5 sc, inc) x 6 (42)
Round 8 :
3 sc, inc, (6 sc, inc) x 5, 3 sc (48)
Round 9-18 :
48 sc (48) (10 rounds)
Info :
Attach the eyes between rnd 16 & 17, with a distance of 11 visible stitches.
Round 19 :
3 sc, dec, (6 sc, dec) x 5, 3 sc (42)
Round 20 :
(5 sc, dec) x 6 (36)
Round 21 :
2 sc, dec, (4 sc, dec) x 5, 2 sc (30)
Round 22 :
(3 sc, dec) x 6 (24)
Round 23 :
1 sc, dec, (2 sc, dec) x 5, 1 sc (18)
Info :
Start to stuff the head with polyfiber.
Round 24 :
(1 sc, dec) x 6 (12)
Info :
Finish the head with 1 sl st, fasten off and cut the yarn, leaving a long tail for sewing onto the body later. Continue to stuff the head, especially in the neck area (if you use a piece of a foam curler to stabilize the head which is explained later, you can leave the neck area unfilled). The head should be filled evenly without any bulges and it should have a complete round form. But also be aware to not fill too much. When you notice that the stitches stretch and the holes between them get bigger so you can see the polyfiber fill through them, then you have stuffed too much. In this case remove some of it.
— Hair wig :
Info :
Crochet in spiral rounds. Colour B.
Round 1 :
6 sc into a MR (6)
Round 3 :
(1 sc, inc) x 6 (18)
Round 4 :
1 sc, inc, (2 sc, inc) x 5, 1 sc (24)
Round 5 :
(3 sc, inc) x 6 (30)
Round 6 :
2 sc, inc, (4 sc, inc) x 5, 2 sc (36)
Round 7 :
(5 sc, inc) x 6 (42)
Round 8 :
3 sc, inc, (6 sc, inc) x 5, 3 sc (48)
Round 9-15 :
48 sc (48) (7 rounds)
Round 16 :
3 sc, dec, (6 sc, dec) x 5, 3 sc (42)
Info :
Finish the work with 1 sl st, fasten off and cut the yarn. Sew the thread inside of the wig. (If the doll is for a smaller child, you can sew the wig onto the head.)
— Hairstrand (make 2) :
Info :
Crochet in rows. Colour B. Crochet ch 20, turn the chain. (20)
Round 1 :
start into the 3rd chain from hook and crochet dc inc (36)
Info :
Cut the yarn and pull it through the loop.
— Bun (make 2) :
Info :
Crochet in spiral rounds. Colour B.
Round 1 :
6 sc into a MR (6)
Round 3 :
(1 sc, inc) x 6 (18)
Round 4 :
1 sc, inc, (2 sc, inc) x 5, 1 sc (24)
Round 6 :
1 sc, dec, (2 sc, dec) x 5, 1 sc (18)
Info :
Finish the work with 1 sl st, fasten off and leave a long thread to sew the bun onto the hair later. Stuff the bun slightly.
— Ear (make 2) :
Info :
(optional) colour A. Mostly I make my dolls without ears but if you prefer your doll with ears, you can crochet it this way: Crochet 3 sc into a MR. Cut the yarn and pull it through the loop. At the end pull the initial thread slightly to close the MR.
— Arm (make 2) :
Info :
Crochet in spiral rounds. Colour A.
Round 1 :
6 sc into a MR (6)
Round 2 :
(2 sc, inc) x 2 (8)
Round 3-17 :
8 sc (8) (15 rounds)
Info :
Do not stuff the arm. Flatten the arm and crochet both sides together with 3 sc. Cut the yarn, leaving a long thread, and fasten off.
— Tail & Body :
Info :
Crochet in spiral rounds from the bottom of the tail up to the body. Colour A and C. Start with colour C. Start to fill the tail very early as you go. At the bottom fill it very loose but fill it more tense the wider the tail gets.
Round 1 :
6 sc into a MR (6)
Round 2 :
(1 sc, inc) x 3 (9)
Round 3 & 4 :
9 sc (9) (2 rounds)
Round 5 :
(2 sc, inc) x 3 (12)
Round 6 :
dec, 4 sc, inc, 5 sc (12)
Round 7 :
(3 sc, inc) x 3 (15)
Round 8 :
dec, 6 sc, inc, 6 sc (15)
Round 9 :
(4 sc, inc) x 3 (18)
Round 10 :
dec, 7 sc, inc, 8 sc (18)
Round 11 :
(5 sc, inc) x 3 (21)
Round 12 :
dec, 9 sc, inc, 9 sc (21)
Round 13 :
(6 sc, inc) x 3 (24)
Round 14 :
dec, 10 sc, inc, 11 sc (24)
Round 15 :
(7 sc, inc) x 3 (27)
Round 16 :
dec, 12 sc, inc, 12 sc (27)
Round 17 :
(8 sc, inc) x 3 (30)
Round 18 :
dec, 13 sc, inc, 14 sc (30)
Round 19 :
(9 sc, inc) x 3 (33)
Round 20 :
dec, 15 sc, inc, 15 sc (33)
Round 21 :
(10 sc, inc) x 3 (36)
Round 22 & 23 :
dec, 16 sc, inc, 17 sc (36) (2 rounds)
Round 24-26 :
36 sc (36) (3 rounds)
Round 27 :
(10 sc, dec) x 3 (33)
Info :
Colour change to colour A.
Round 28 :
33 sc, into BLO! (33)
Round 29 & 30 :
33 sc (33) (2 rounds)
Round 31 :
(9 sc, dec) x 3 (30)
Round 32 & 33 :
30 sc (30) (2 rounds)
Round 34 :
(8 sc, dec) x 3 (27)
Round 35 & 36 :
27 sc (27) (2 rounds)
Round 37 :
(7 sc, dec) x 3 (24)
Round 39 :
1 sc, dec, (2 sc, dec) x 5, 1 sc (18)
Round 40 :
(1 sc, dec) x 6 (12)
Info :
Finish the work with 1 sl st, cut the yarn and fasten off. Sew the thread carefully.
— Fin (make 2) :
Info :
Crochet in spiral rounds. Colour C.
Round 1 :
6 sc into a MR (6)
Round 3 :
(1 sc, inc) x 3 (9)
Round 4 :
1 sc, inc, (2 sc, inc) x 2, 1 sc (12)
Round 5 :
(1 sc, inc) x 6 (18)
Round 6 :
1 sc, inc, (2 sc, inc) x 5, 1 sc (24)
Round 7-14 :
24 sc (24) (8 rounds)
Info :
Do not stuff the fin with polyfill.
— Wavy hem :
Info :
Colour D. Take the yarn and make a standing sc into the first front loop of rnd 28 of the tail. Continue as follows: (skip 2 sts, 5 dc into a st, skip 2 sts, 1 sc into a st) x 5 (in the last unit just skip only 1st, so that you achieve 6 waves all around). Crochet 1 sl st into the first sc of the previous round. Cut the yarn, fasten off and sew both threads carefully.
— Flower in the hair :
Info :
Colour E. Start with a MR (leave a long starting yarn tail). (1 sc, ch 2, 1 sc into 2nd chain from hook) x 5. Sl st into the first st. Cut the yarn and fasten off by pulling the tail of yarn until the MR is closed. Sew the thread. With pink blush and a brush paint the centre of the flower with a pink dot. Alternatively you can crochet several flowers to make a flower crown across the hair line (as you can see on doll 3).
— Modelling the eyes :
Info :
After you have crocheted all body parts, you can now start to shape the eyes by bringing the eyes inwards. Take a sharp sewing needle and a long thread of colour A. Pull both ends of the thread through the head very close to the eye and bring them out at the head opening. Take one of the thread ends and repeat the same with the second eye. Pull on both thread ends as tight as possible until the eyes move inwards. Knot both ends very tightly. At the end stuff both threads into the head. If necessary you can now add some more stuffing into the head with the help of the end of the crochet hook.
— White of the eye :
Info :
Once the eyes have been modelled, you can add the white of the eyes to the outer edge of the eye. Use a long cotton thread in a white colour and embroider a small stitch at the outer part of the eye. Repeat these steps on the second eye as well. Knot the ends at the bottom of the head and stuff the threads into the head.
— Eyebrows :
Info :
Take a thin sewing or embroidering yarn in colour black or brown and a thin sharp needle. Embroider the eye brows 2 rounds above the eye, diagonally over 1,5 stitches. (Or alternatively as you can see at doll 4 embroidered directly over the eye, diagonally over 2,5 stitches).
— Nose :
Info :
For embroidering the nose cut a long tail from colour A. Between rnd 16 and 17 you can embroider 2 horizontal stripes, running over 2-3 sts. Don't sew the thread but wrap it with the needle tightly around the horizontal stripes. At the end take a small brush and put some pink blush onto the cheeks of your mermaid.
— Sewing the hair parts (plus optional the ears) :
Info :
Put the hair wig onto the head of your mermaid. Be sure that it is symmetrical around the head and at the right distance from the eyes. If the doll will be played by a small child, you can now sew the wig onto the head with some sts. Otherwise it's not necessary to sew it as the wig is quite tight on the head. In this case just sew the thread carefully. Now you place the 2 hairstrands symmetrically across the hairline and pin them. For sewing them you can either use one of the remaining threads or a thin sewing thread and a thinner needle. But be sure to take a very long sewing needle which makes it easier for you (for reference: my needle is about 6-7 cm long). Start to sew the first strand beginning at the top downwards, ending approximately at the level of the eyes. Make the same with the 2nd hair strand on the other side of the head.
— Sew both buns :
Info :
Now sew both buns. Position them below the hair strands at the hair line and fix them with pins. Sew them around all 9 sts from the last rnd of the bun. Sew the thread carefully.
— Ears (if chosen) :
Info :
If you have chosen to crochet the ears, you can now sew them at eye level directly next to the hair line. Use both threads of the ear above and below for sewing. Sew the threads carefully.
This Lulu mermaid pattern guides you to crochet a sweet, poseable doll with a detailed tail, wig and tiny accessories. It includes colour codes for four pretty looks and step photos to help you place features and hair with confidence. Make one as a special gift, display piece, or start a small series of mermaid friends to mix and match palettes. 🧜♀️🧶