🧢 Beautiful ✨ Detailed πŸ’ Adorable

Low Sew Spider Amigurumi Pattern

Low Sew Spider Amigurumi Pattern
4.0β˜… Rating
5-7 Hours Time Needed
2.3K Made This
βœ‚οΈ

Intermediate Level

Ideal for those with basic crochet experience, featuring slightly more advanced stitches and techniques to expand your skills.

⏱️

Weekend Treat

Takes 5-7 hours, making it an enjoyable project to finish over a couple of days.

🧸

Cute Companion

An adorable friend to cherish, handcrafted with love to bring comfort and joy for years to come.

About This Low Sew Spider Amigurumi Pattern

This pattern creates a soft, plush spider amigurumi using chunky or sweet snuggles-type yarn for extra squish. You will make eight stuffed legs, a fuzzy fang accent, a head worked top-down, and a round body that sews on low for an easy finish. Techniques include working in continuous rounds, simple increases/decreases, and sewing legs in place as you crochet.

Low Sew Spider Amigurumi Pattern crochet pattern - detailed view of completed project

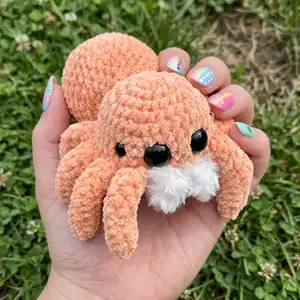
The finished spider measures approximately 8" using the recommended yarn and hook sizes. The pattern includes tips for eye placement, stuffing, and optional floppy or poseable legs.

Why You'll Love This Low Sew Spider Amigurumi Pattern

I absolutely love this pattern because it turns plush yarn into an irresistibly soft and squishy companion that is quick to work up. I enjoy the low-sew assembly approach which keeps finishing time to a minimum while still producing a neat, professional-looking toy. The leg attachment technique is clever and satisfying β€” you attach legs as you crochet the head which saves sewing later. I also adore the fuzzy fang detail; it adds so much personality with very little extra work.

Low Sew Spider Amigurumi Pattern step 1 - construction progress Low Sew Spider Amigurumi Pattern step 2 - assembly progress Low Sew Spider Amigurumi Pattern step 3 - details and accessories Low Sew Spider Amigurumi Pattern step 4 - final assembly and finishing

Switch Things Up

I love customizing this pattern by changing yarn colors to create different personalities for each spider.

I often use pastel shades for a soft nursery version or bright colors for playful gifts.

To make a larger spider, I switch to a bulkier plush yarn and a larger hook, which increases overall size significantly.

For a mini keychain version, I use a finer plush yarn and a smaller hook, and reduce some rounds to keep proportions balanced.

I sometimes add embroidered brows or tiny felt accessories to change the expression and character of the face.

Try swapping the fuzzy fang color for contrast to make the mouth area popβ€”white or cream looks great against bright bodies.

If you want poseable legs, close the leg ends with 3 sc as suggested to create floppy, movable limbs.

I also like to use safety eyes of different sizes for a more whimsical or realistic look depending on the effect I want.

For collectors, making a family of spiders in coordinated colors creates a cute set perfect for display or gifting.

Finally, adding a small loop of yarn at the top of the head lets you turn your spider into an ornament or hanging decoration.

Common Mistakes & How to Fix Them

βœ— Not stuffing the legs as you go can lead to awkward shaping and difficulties closing the leg; stuff each leg gradually while crocheting so the shape stays even and consistent. βœ— Failing to secure leg tails with knots before trimming can cause legs to come loose over time; stop and tie the yarn tails with a secure knot and weave them in for durability. βœ— Placing eyes without checking stitch counts may result in uneven spacing; count stitches carefully and place the center eyes between rows 7-8 above the legs in the 7-st space as instructed. βœ— Skipping stitch markers when working continuous rounds can make it easy to lose your round start; use a stitch marker at the first stitch of each round to track progress accurately.

Low Sew Spider Amigurumi Pattern

Make a cuddly, low-sew spider amigurumi using plush yarn for a soft, squishy finish. This pattern guides you through simple rounds, leg construction, and easy assembly so you can create a charming little companion. Perfect for gifting or keeping as a cute handmade accent, the design uses basic stitches with helpful placement tips.

Intermediate 5-7 Hours

Materials Needed for Low Sew Spider Amigurumi Pattern

β€” Main Fabric

  • 01
    Plush yarn (parfait chunky) - 75 grams recommended for main color
  • 02
    Sweet Snuggles Lite plush yarn (alternative option) - small skein
  • 03
    Small amount of fuzzy or accent yarn for fangs (small quantity)

β€” Tools Required

  • 01
    Crochet hook size 5.0 mm (for Parfait chunky)
  • 02
    Crochet hook size 6.0 mm (for Sweet Snuggles Lite alternative)
  • 03
    Polyfil stuffing
  • 04
    Darning needle
  • 05
    Safety eyes 20 mm (pair)
  • 06
    Safety eyes 12 mm (pair)
  • 07
    Scissors
  • 08
    Stitch markers

Progress Tracker

0% Complete

β€” Legs :

Info :

Make 8. Be sure to stuff the leg as you go.

Round 1 :

4 sc in mc (4)

Round 2 :

sc, (inc x3) (7)

Round 3-7 :

sc around (7)

Info :

Start Stuffing and continue as you go.

Round 8 :

2 sc, inc, 2 sc, dec (7)

Round 9-10 :

repeat round 8 (7)

Round 11 :

sc around (7)

Round 12 :

2 sc. (5 sts left unworked)

Info :

sl st, FO

Info :

*Note: if you would like floppy legs that can be easily posed. You can close the legs with 3 sc. This is an option and will make them move more. I like stiffer legs so I leave mine open.

β€” Fangs :

Info :

Make 2 using fuzzy yarn. Leave a yarn tail on both ends because we tie them on later.

Instruction :

Chain 5, starting in second chain from hook sc 4.

β€” Head :

Info :

We will be working from the top of the head down.

Round 1 :

9 sc in mc (9)

Round 2 :

inc x 9 (18)

Round 3 :

(2 sc, inc) x 6 (24)

Round 4 :

(3 sc, inc) x 6 (30)

Round 5 :

(4 sc, inc) x 6 (36)

Round 6 :

(5 sc, inc) x 6 (42)

Round 7-8 :

sc around (42)

Round 9 :

3 sc with first leg, go through the front and back sts of the leg then through the body as shown (3 sts per leg). Repeat till you have attached 4 legs, 7 sc (this is the front where the eyes will be placed), 3 sc with leg x4, sc 11. (42)

Round 10 :

sc around (42)

Info :

Stop and secure the leg tails with knots.

Info :

Attach eyes between row 7-8 above legs in the 7 st space. 3 sts between the center eyes. Smaller outer eyes are placed 2-3 sts back. Some testers liked to place the smaller eyes between rows 6-7.

Round 11 :

(5 sc, dec) x 6 (36)

Info :

Attach the fangs on row 8 below the eyes, 1-2 sts apart. Note they have a natural curve. Place them so they curve into the head. I just slip my yarn tail through and tie a knot on the inside.

Round 12 :

(4 sc, dec) x 6 (30)

Round 13 :

(3 sc, dec) x 6 (24)

Round 14 :

(2 sc, dec) x 6 (18)

Info :

STUFF

Round 15 :

dec x 9 (9)

Info :

sl st, FO

Info :

close.

β€” Body :

Round 1 :

6 sc in mc (6)

Round 2 :

inc x 6 (12)

Round 3 :

sc around (12)

Round 4 :

(sc, inc) x 6 (18)

Round 5 :

(2 sc, inc) x 6 (24)

Round 6 :

sc around (24)

Round 7 :

(3 sc, inc) x 6 (30)

Round 8 :

(4 sc, inc) x 6 (36)

Round 9 :

(5 sc, inc) x 6 (42)

Round 10-13 :

sc around (42)

Round 14 :

(5 sc, dec) x 6 (36)

Round 15 :

sc around (36)

Round 16 :

(4 sc, dec) x 6 (30)

Round 17 :

sc around (30)

Round 18 :

(3 sc dec) x 6 (24)

Info :

sl st & FO. Leave a long yarn tail for attaching.

Info :

STUFF

Info :

Attach the body 4 rounds from the center of head and 4 rounds from the bottom of the head. I attach my body right up against the legs.

Assembly Instructions

  • Attach legs to the head during Round 9: 3 sc with first leg going through front and back sts of the leg then through the body (3 sts per leg); repeat until 4 legs attached on the front, then continue to attach remaining legs as written.
  • Stop and secure all leg tails with knots after Round 10 and weave ends inside for a tidy finish.
  • Attach eyes between rows 7-8 above the legs in the 7-st space with 3 sts between the center eyes; place smaller outer eyes 2-3 sts back or optionally between rows 6-7.
  • Attach the fangs on row 8 below the eyes, 1-2 sts apart. Slip the yarn tail through, position the fang to curve into the head, and tie a knot on the inside to secure.
  • Sew the body to the head using the long yarn tail: align the body 4 rounds from the center of the head and 4 rounds from the bottom of the head, and sew right up against the legs for a snug fit.

Important Notes

  • πŸ’‘Use a stitch marker to keep track of the start of each round since the pattern is written in continuous rounds.
  • πŸ’‘Stuff legs and head gradually while working to maintain an even, natural shape and avoid overstuffing.
  • πŸ’‘Leave long yarn tails where indicated for sewing pieces together and weave in ends securely once assembly is complete.

This lovable Low Sew Spider is perfect for gifting or keeping as a soft collectible companion. The plush yarn makes it irresistibly squishy and cozy to hold, while the low-sew design keeps finishing simple. Add it to your amigurumi collection or make multiples in different colors for a charming set. πŸ§ΆπŸ•·οΈ

You ask,

we answer.

FAQs

What size will the finished piece be?

The finished spider measures approximately 8" when using the recommended Parfait chunky plush yarn and the specified hook size.

Can I use different yarn weights for this pattern?

Yes, you can substitute a different plush yarn, but the final size and texture will vary; adjust hook size accordingly (pattern suggests 5 mm for Parfait and 6 mm for Sweet Snuggles Lite).

Do I need prior crochet experience for this pattern?

This pattern is rated intermediate because it uses continuous rounds, increases/decreases, and low-sew assembly; basic knowledge of single crochet, inc, and dec is recommended.

How long does this project typically take to complete?

Most crocheters finish this project in about 5-7 hours, depending on experience and assembly pace.