🧶 Beautiful ✨ Detailed 💝 Adorable

Lovebird and Parrot Amigurumi Pattern

Lovebird and Parrot Amigurumi Pattern
4.2★ Rating
5-7 Hours Time Needed
2.8K Made This
✂️

Intermediate Level

Ideal for those with basic crochet experience, featuring slightly more advanced stitches and techniques to expand your skills.

⏱️

Weekend Treat

Takes 5-7 hours, making it an enjoyable project to finish over a couple of days.

🧸

Cute Companion

An adorable friend to cherish, handcrafted with love to bring comfort and joy for years to come.

About This Lovebird and Parrot Amigurumi Pattern

This pattern shows how to crochet two small stuffed birds: a red-green lovebird and a yellow-grey parrot using plush yarn. You will work separate eye pieces, beak, tail, wings, legs and assemble them for a polished finish. Clear rounds and photos help you place details and sew parts accurately.

Lovebird and Parrot Amigurumi Pattern crochet pattern - detailed view of completed project

Designed for intermediate crocheters, the pattern uses simple increases, decreases and folded pieces for shape. Create one-of-a-kind birds by changing yarn colors and small embellishments.

Why You'll Love This Lovebird and Parrot Amigurumi Pattern

I absolutely love this pattern because it brings two charming bird characters to life with simple, repeatable steps. I enjoy how each small piece — the expressive eyes, the folded wings, the tuft feather — adds so much personality. The design is forgiving and lets me experiment with colors and textures every time. Working with plush yarn gives a cozy, tactile finish that is irresistible to hold and display.

Lovebird and Parrot Amigurumi Pattern step 1 - construction progress Lovebird and Parrot Amigurumi Pattern step 2 - assembly progress Lovebird and Parrot Amigurumi Pattern step 3 - details and accessories Lovebird and Parrot Amigurumi Pattern step 4 - final assembly and finishing

Switch Things Up

I love how easy it is to customize these birds by swapping colors — try pastel palettes for a nursery-friendly set or neon brights for a playful look.

I often change yarn weight and hook size to make mini keychain birds or a larger plush companion; just keep stitch counts consistent for shaping.

I like adding tiny accessories like a crocheted scarf, a felt hat, or embroidered name tags to personalize gifts.

Try different eye styles: embroidered pupils, safety eyes, or felt circles for varied expressions and textures.

For a cuddly toy, use fluffier stuffing and softer yarn; for a display piece, stuff firmer and use more precise stitching for clean lines.

I sometimes add a small wire inside the tail or tuft feather for slight posability so the bird can hold a pose on a shelf.

Mix and match wing shapes — make them longer, rounder, or layered with contrasting edges for a fluffed-out effect.

Embroider small patterns on the chest or back for unique markings: dots, hearts or tiny chevrons work beautifully.

I recommend experimenting with bead or sequin accents for holiday-themed birds to add sparkle and charm.

If you want a more realistic bird, choose natural tones and trim plush yarn after assembly to create feather-like texture.

Common Mistakes & How to Fix Them

✗ Skipping stitch markers during shaping can cause misplaced increases and decreases; mark the start of each round to maintain the stitch count and shape consistently. ✗ Forgetting to switch colors cleanly can leave loose loops at the seam; cut and fasten off neatly then weave in ends or change colors with a tidy join to prevent gaps. ✗ Understuffing or overstuffing the body will distort the silhouette; stuff gradually and check shape frequently until you get a smooth, firm but squishy form. ✗ Sewing parts without pinning can result in misaligned features; pin pieces in place and check placement (eyes 1 sc away from the beak) before stitching permanently. ✗ Not checking stitch counts after increases or decreases causes uneven rounds; count your stitches after every round and before changing shaping to avoid errors.

Lovebird and Parrot Amigurumi Pattern

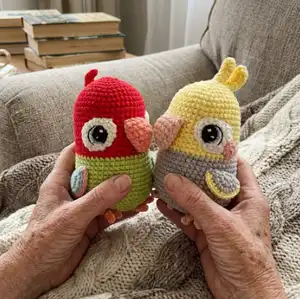
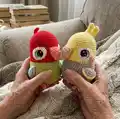
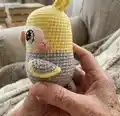
Make two adorable plush birds — a colorful lovebird and a sweet parrot — using soft Himalaya Dolphin Baby yarn. This pattern guides you through crocheting eyes, body, wings, tail, legs and tiny details with clear step-by-step rounds. Perfect for gifting or brightening a shelf, you will enjoy assembling the cute features and personalizing colors.

Intermediate 5-7 Hours

Materials Needed for Lovebird and Parrot Amigurumi Pattern

— Main Fabric

  • 01
    Himalaya Dolphin Baby (plush/boucle) - Lovebird colors: red, green, orange, blue, white (small amounts for details)
  • 02
    Himalaya Dolphin Baby (plush/boucle) - Parrot colors: yellow, grey, beige, white (small amounts for details)
  • 03
    Yarn Art (smooth) in black, white, blue for eye details and pupils
  • 04
    Small amounts of smooth yarn for beak and cheeks (orange/peach)

— Tools Required

  • 01
    Crochet hook size 3.5 mm
  • 02
    Crochet hook size 2.0 mm (for eyes and details)
  • 03
    Toy stuffing (sintepon, holofiber)
  • 04
    Scissors
  • 05
    Large-eye yarn needle for joining parts
  • 06
    Stitch markers
  • 07
    Pins for assembly
  • 08
    Optional: small amount of thin yarn for embroidered eye flares

Progress Tracker

0% Complete

— Eyes :

Left eye - Round 1 :

work in black, 6 sc into MR = 6 sc

Left eye - Round 2 :

(inc)*6t = 12 sc

Left eye - Round 3 :

(1 sc, inc)*6t = 18 sc

Left eye - Round 4 :

work in blue, 2 sc, 3 inc, 2 sc, sl st (11 sts in blue in total), go on working in black, 10 sl st (21 sts)

Left eye - Round 5 :

work in white, 1 sl st, (1 sc, inc)*3t, 1 sc, 3 sl st (14 sts), fasten off.

Left eye - Round 6 :

turn the eye wrong side towards yourself and work 10 sl st in black. Leave 4 sc in white uncrocheted.

Right eye - Round 1 :

work in black, 6 sc into MR = 6 sc

Right eye - Round 2 :

(inc)*6t = 12 sc

Right eye - Round 3 :

(1 sc, inc)*6t = 18 sc

Right eye - Round 4 :

work in blue, 1 sl st, 2 sc, 3 inc, 2 sc, (11 sts in blue in total), go on working in black, 10 sl st

Right eye - Round 5 :

work in white, 3 sl st, 1 sc, (inc, 1 sc)*3t, 1 sl st (14 sts), fasten off.

Right eye - Round 6 :

count the 5th st from the bottom of the round in white and place marker. Turn the eye wrong side towards yourself and work 9 sl st in black from the point you placed marker.

Infos :

Left and right eyes are crocheted different, with Yarn Art Jeans, using 2.0 mm hook. Follow positioning notes in assembly to place eyes 1 sc away from the beak.

— Eye whites :

Round 1 :

chain 6, work from the 2nd st from hook as follows: (3 sc to 1 st, 3 sc)*2t = 12 sc

Round 2 :

(3inc, 3 sc)*2t = 18 sc

Round 3 :

(inc, 1 sc)*3t, 3 sc, 2 sl st, leave a yarn tail for sewing.

— Body :

Round 1 :

chain 2 in red, work 6 sc to the 2nd st from hook

Round 2 :

(inc)*6t = 12 sc

Round 3 :

(3 sc, 3 inc)*2t = 18 sc

Round 4 :

3 sc, (1 sc, inc)*3t, 3 sc, (1sc, inc)*3t = 24 sc

Round 5 :

3 sc, (2 sc, inc)*3t, 3 sc, (2 sc, inc)*3t = 30 sc

Round 6 :

3 sc, (3 sc, inc)*3t, 3 sc, (3sc, inc)*3t = 36 sc

Round 7 :

3 sc, (4 sc, inc)*3t, 3 sc, (4sc, inc)*3t = 42 sc

Round 8 :

3 sc, (5 sc, inc)*3t, 21 sc = 45 sc

Rounds 9-16 :

45 sc

Round 17 :

15 sc, inc, 29 sc = 46 sc

Round 18 :

46 sc

Round 19 :

15 sc, inc, 30 sc = 47 sc

Round 20 :

15 sc in red, continue working in green: 32 sc

Round 21 :

16 sc, inc, 30 sc = 48 sc

Round 22 :

48 sc

Round 23 :

17 sc, inc, 30 sc = 49 sc

Round 24 :

49 sc

Round 25 :

18 sc, inc, 30 sc = 50 sc

Round 26 :

50 sc

Round 27 :

19 sc, inc, 30 sc = 51 sc

Round 28 :

19 sc, inc, 31 sc = 52 sc

Round 29 :

20 sc, inc, 31 sc = 53 sc

Round 30 :

21 sc, inc, 31 sc = 54 sc

Round 31 :

(dec, 7 sc)*6t = 48 sc

Round 32 :

3 sc, (dec, 6 sc)*5t, dec, 3 sc = 42 sc

Round 33 :

(dec, 5 sc)*6t = 36 sc

Round 34 :

2 sc, (dec, 4 sc)*5t, dec, 2 sc = 30 sc

Round 35 :

(dec, 3sc)*6t = 24 sc

Round 36 :

(dec, 2 sc)*6t = 18 sc

Round 37 :

(dec, 1 sc)*6t = 12 sc

Round 38 :

(dec)*6t, or stitch up the hole.

— Tail :

Large piece (P1) - Round 1 :

work in blue: chain 2, 6 sc into the 2nd st from hook

Large piece (P1) - Round 2 :

(inc)*6t = 12 sc

Large piece (P1) - Round 3 :

12 sc

Large piece (P1) - Round 4 :

dec, 10 sc = 11 sc

Large piece (P1) - Round 5 :

dec, 9 sc = 10 sc

Large piece (P1) - Round 6 :

dec, 8 sc = 9 sc

Large piece (P1) - Round 7 :

dec, 7 sc = 8 sc

Large piece (P1) - Round 8 :

dec, 6 sc = 7 sc

Large piece (P1) - Round 9 :

dec, 5 sc = 6 sc

Large piece (P1) - Round 10 :

dec, 4 sc = 5 sc

Large piece (P1) - Round 11 :

dec, 3 sc = 4 sc, leave a yarn tail for sewing.

Small piece (make 2) - Round 1 :

chain 2, 6 sc into the 2nd st from hook

Small piece - Round 2 :

(1 sc, inc)*3t = 9 sc

Small piece - Round 3 :

9 sc

Small piece - Round 4 :

dec, 7 sc = 8 sc

Small piece - Round 5 :

dec, 6 sc = 7 sc

Small piece - Round 6 :

dec, 5 sc = 6 sc

Small piece - Round 7 :

dec, 4 sc = 5 sc

Small piece - Round 8 :

dec, 3 sc = 4 sc, leave a yarn tail for sewing.

— Wings, make 2 :

Round 1 :

work in blue: chain 2, 6 sc into the 2nd st from hook

Round 2 :

(inc)*6t = 12 sc

Round 3 :

(3 sc, 3 inc)*2t = 18 sc

Round 4 :

3 sc, (1 sc, inc)*3t, 3 sc, (1sc, inc)*3t = 24 sc

Info :

Fold the piece in half and slip stitch 12 through both edges in pink. I show in fare color smooth yarn for better demonstration how to fold the wing.

— Legs (in beak color) :

Big toe - Round 1 :

chain 10, starting from the 2nd st from hook work 9 sc, turn your work, turning chain = 9 sc

Big toe - Round 2 :

9 sc

Big toe - Round 3 :

fold lengthwise and work 9 sl st, leave a yarn tail for sewing

Little toes - Round 1 :

chain 8, starting from the 2nd st from hook work 7 sc, turn your work, turning chain = 7 sc

Little toes - Round 2 :

7 sc

Little toes - Round 3 :

fold the piece and work 7 sl st, leave a yarn tail for sewing.

— Tuft feather :

Round 1 :

chain 8 in red, work from the 2nd st from hook as follows: 1 sl st, 1 sc, 3 sc, 1 sc, 1 sl st = 7 sts, leave a yarn tail for sewing.

— Beak :

Round 1 :

chain 2 in orange, 6 sc into the 2nd st from hook

Round 2 :

(1 sc, inc)*3t = 9 sc

Round 3 :

(2 sc, inc)*3t = 12 sc

Round 4 :

(3sc, inc)*3t = 15 sc

Rounds 5-7 :

15 sc

Round 8 :

stuff a little, single crochet 8 through both edges, leave a yarn tail for sewing.

— Toy decoration :

Info :

Sew the beak over rounds 12-18. Use pins to make your work easier.

Info :

Sew eye whites, and then eye pieces. Embroider eye flares in white on black pupil.

Info :

Please mind that eyes should be 1 sc away from the beak.

Info :

Sew on the tail, legs, wings and tuft feather. For the yellow parrot add cheeks and tuft feathers on the head as additional pieces.

Assembly Instructions

  • Sew the beak over rounds 12-18 of the body, using pins to hold it in place and stitch securely with matching yarn.
  • Position and sew eye whites onto the head first, then place and stitch the eye pieces on top; embroider small white flares on the black pupil with smooth yarn for highlights.
  • Attach wings on either side of the body aligning with the green section, fold wings and slip stitch edge before sewing; pin to check symmetry.
  • Sew tail pieces at the base of the body, arranging the large tail and smaller pieces evenly and securely.
  • Attach legs under the body so the bird sits balanced; sew toes in place and reinforce with multiple passes for secure fastening.

Important Notes

  • 💡Use stitch markers to keep track of the beginning of each round and color transitions to maintain accurate shaping.
  • 💡Stuff the body gradually while crocheting the final rounds to achieve a smooth shape; avoid overstuffing to keep seams flat.
  • 💡Pin parts (beak, eyes, wings, tail, legs) in place before sewing to check positioning and symmetry, especially eyes which should be 1 sc away from the beak.
  • 💡Weave in ends as you go and leave long tails for sewing parts for easier finishing and neater joins.

This pattern brings two charming birds to life with plush yarn and joyful color combos. Make a snuggly lovebird or a sunshine parrot, or both — each one is a small handmade treasure. Share them as gifts, shelf companions, or keep one for yourself. 🧶🐦✨

You ask,

we answer.

FAQs

What size will the finished piece be?

The finished amigurumi measures approximately 12-15 cm tall when using Himalaya Dolphin Baby yarn and the recommended hooks, depending on stuffing and tension.

Can I use different yarn weights for this pattern?

Yes, you can use different yarn weights, but this will affect the final size and stitch definition; adjust hook size accordingly and expect a proportional change in finished dimensions.

Do I need prior crochet experience for this pattern?

This pattern is rated intermediate, so basic knowledge of single crochet, increases, decreases and simple assembly is recommended for best results.

How long does this project typically take to complete?

Most crocheters complete this project in 5-7 hours, though time may vary based on experience level, customization and finishing work.