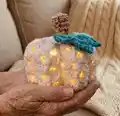
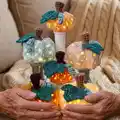
Make cozy, glowing pumpkins in three sizes using simple granny-style clusters and worsted weight yarn. This pattern guides you step-by-step to create Lighted "Granny" Pumpkins perfect for seasonal decor or handmade gifts. You will enjoy working a few rows of textured clusters and finishing with a stem, leaf, and a string of fairy lights for a warm glow.
Progress Tracker
0% Complete
— Materials :
Info :
Suggested hook size: H8/5.00mm. All instructions are suitable for any medium worsted weight yarn. I prefer acrylic for its bold colors and easy care, but cotton would work equally well. For the Large Pumpkins, I used less than 45g (83 yards) for each pumpkin of Caron One Pound in Cream or Red Heart Super Saver in Gold. For the Medium Pumpkins, I used less than 30g (55 yards) for each pumpkin of Caron One Pound in Off White or Pale Green. For the Small Pumpkins, I used less than 15g (28 yards) for each pumpkin of Red Heart Super Saver in Gold or Cornmeal. For stems, leaves, and curly vines, I used odds-and-ends amounts of Red Heart Super Saver in Coffee, Cafe Latte, Warm Brown, Dark Jade, or Caron One Pound in Soft Sage.
— Gauge :
Info :
Gauge is unimportant for this pattern. Although personal thread tension and yarn choice may impact finished size somewhat.
— Size :
Info :
Large Pumpkin: Approximately 4-3/4" (12cm) wide by 5" (12.7cm) high (including stem). About 4" (10cm) high without stem.
Info :
Medium Pumpkin: Approximately 4" (10cm) wide by 4" (10cm) high, including stem. About 3" (7.6cm) high without stem.
Info :
Small Pumpkin: Approximately 3" (7.6cm) wide by 3-1/2" (9cm) high (including stem). About 2" (5cm) high without stem.
— Notions :
Infos :
Yarn needle to weave in ends. Scissors to cut yarn. Pinch of Poly-fill for stuffing the stem. Clear 6 mil mylar craft plastic. (Optional, but highly recommended.) 20-LED string of battery-operated "fairy" lights in warm white for each pumpkin. (Large Pumpkin can support up to 50-LED. Photos show two 20-LED strings used.) CR2032 or appropriate type of replacement batteries (highly recommended).
— Terminology :
Info :
All instructions are in Standard/US terms. Abbreviations used include ch = chain, sc = single crochet, sc2tog = single crochet 2 together, sl st = slip stitch, sk st = skip stitch, hdc = half double crochet, dc = double crochet, FL = front loop of stitch, BL = back loop of stitch. Brackets [ ] indicate repeat across the row and parentheses ( ) indicate repeat in next stitch. Magic Circle explanation: a method to begin the first round of a circular pattern providing a clean, tight circle.
— How to Make a Magic Circle :
Round 1 :
1. Form the yarn into a circle.
Round 2 :
2. Cross the top thread under the circle and pull through as though you're about to create a slip knot, but do not tighten the circle.
Round 3 :
3. Insert hook into the loop.
Round 4 :
4. While pinching the yarn tail and circle firmly together, ch 1. This chain helps secure the yarn, and does not count as a stitch.
Round 5 :
5. Crochet the first row's stitches (ex: 6 sc) into the circle, being sure to crochet over both strands of yarn.
Round 6 :
6. Pinch the yarn tail firmly between your thumb and forefinger, and pull tightly until circle closes.
Round 7 :
7. Finished! The first round of the pattern is now complete with a clean, tight center. Look! No hole! Tip: To make sure everything stays nice and tight, crochet over the tail end of yarn for the first few stitches of the second row.
— Large Pumpkin :
Info :
Hook size: US H8/5.00mm. Yarn: Caron One Pound in Cream or Red Heart Super Saver in Gold. Turning chains do not count as stitches.
Info :
Begin by working ch 14.
Round 1 :
sc in second chain from hook and in next st, 2 sc, sc, [2 sc in next 2 st, sc] 2 times, 2 sc, sc in last 2 st. Ch 1, turn. (19 st) (Fig. L-1)
Round 2 :
sc in first two st, ch 1, sk st, [3 dc in next st, ch 1, sk 2 st] 4 times, 3 dc in next st, ch 1, sk st, sc in last 2 st. Ch 1, turn. (2 sc on each end + 5 granny clusters) (Fig. L-2)
Round 3 :
sc in first two st, ch 1, dc in first ch-1 space, ch 1, [sk 3 st, 3 dc in next ch-1 space, ch 1] 4 times, sk 3 st, dc in last ch-1 space, ch 1, sc in last two st. Ch 1, turn. (2 sc on each end + 4 granny clusters) (Fig. L-3)
Round 4 :
sc in first two st, ch 1, sk first ch and dc st, [3 dc in next ch-1 space, ch 1, sk 3 st] 4 times, 3 dc in next ch-1 space, ch 1, sk last dc and ch-1 space, sc in last 2 st. Ch 1, turn. (2 sc on each end + 5 granny clusters) (Fig. L-4)
Round 5 :
sc in first two st, ch 1, dc in first ch-1 space, ch 1, [sk 3 st, 3 dc in next ch-1 space, ch 1] 4 times, sk 3 st, dc in last ch-1 space, ch 1, sc in last two st. Ch 1, turn. (2 sc on each end + 4 granny clusters) (Fig. L-5)
Round 6 :
— (for this decrease row, do not count ch-1 spaces as stitches; skip over them as though they don't exist) — sc in first 2 st, [sc2tog, sc] 5 times, sc in last st. Ch 1, turn. (13 stitches) (Fig. L-6)
Round 7 :
— working in front loops only — sc in first 2 st, 2 sc, sc, [2 sc in next 2 st, sc] 2 times, 2 sc, sc in last 2 st. Ch 1, turn. (19 st)
Round 8 :
— working in both loops from now on — sc in first two st, ch 1, sk st, [3 dc in next st, ch 1, sk 2 st] 4 times, 3 dc in next st, ch 1, sk st, sc in last 2 st. Ch 1, turn. (2 sc on each end + 5 granny clusters)
Round 9 :
sc in first two st, ch 1, dc in first ch-1 space, ch 1, [sk 3 st, 3 dc in next ch-1 space, ch 1] 4 times, sk 3 st, dc in last ch-1 space, ch 1, sc in last two st. Ch 1, turn. (2 sc on each end + 4 granny clusters)
Round 10 :
sc in first two st, ch 1, sk first ch-1 space and dc st, [3 dc in next ch-1 space, ch 1, sk 3 st] 4 times, 3 dc in next ch-1 space, ch 1, sk last dc and ch-1 space, sc in last 2 st. Ch 1, turn. (2 sc on each end + 5 granny clusters)
Round 11 :
sc in first two st, ch 1, dc in first ch-1 space, ch 1, [sk 3 st, 3 dc in next ch-1 space, ch 1] 4 times, sk 3 st, dc in last ch-1 space, ch 1, sc in last two st. Ch 1, turn. (2 sc on each end + 4 granny clusters)
Round 12 :
— (for this decrease row, do not count ch-1 spaces as stitches; skip over them as though they don't exist) — sc in first 2 st, [sc2tog, sc] 5 times, sc in last st. Ch 1, turn. (13 stitches) (Fig. L-7)
Round 13 :
— working in front loops only — sc in first 2 st, 2 sc, sc, [2 sc in next 2 st, sc] 2 times, 2 sc, sc in last 2 st. Ch 1, turn. (19 st)
Round 14 :
— working in both loops from now on — sc in first two st, ch 1, sk st, [3 dc in next st, ch 1, sk 2 st] 4 times, 3 dc in next st, ch 1, sk st, sc in last 2 st. Ch 1, turn. (2 sc on each end + 5 granny clusters)
Round 15 :
sc in first two st, ch 1, dc in first ch-1 space, ch 1, [sk 3 st, 3 dc in next ch-1 space, ch 1] 4 times, sk 3 st, dc in last ch-1 space, ch 1, sc in last two st. Ch 1, turn. (2 sc on each end + 4 granny clusters)
Round 16 :
sc in first two st, ch 1, sk first ch-1 space and dc st, [3 dc in next ch-1 space, ch 1, sk 3 st] 4 times, 3 dc in next ch-1 space, ch 1, sk last dc and ch-1 space, sc in last 2 st. Ch 1, turn. (2 sc on each end + 5 granny clusters)
Round 17 :
sc in first two st, ch 1, dc in first ch-1 space, ch 1, [sk 3 st, 3 dc in next ch-1 space, ch 1] 4 times, sk 3 st, dc in last ch-1 space, ch 1, sc in last two st. Ch 1, turn. (2 sc on each end + 4 granny clusters)
Round 18 :
— (for this decrease row, do not count ch-1 spaces as stitches; skip over them as though they don't exist) — sc in first 2 st, [sc2tog, sc] 5 times, sc in last st. Ch 1, turn. (13 stitches)
Round 19 :
— working in front loops only — sc in first 2 st, 2 sc, sc, [2 sc in next 2 st, sc] 2 times, 2 sc, sc in last 2 st. Ch 1, turn. (19 st)
Round 20 :
— working in both loops from now on — sc in first two st, ch 1, sk st, [3 dc in next st, ch 1, sk 2 st] 4 times, 3 dc in next st, ch 1, sk st, sc in last 2 st. Ch 1, turn. (2 sc on each end + 5 granny clusters)
Round 21 :
sc in first two st, ch 1, dc in first ch-1 space, ch 1, [sk 3 st, 3 dc in next ch-1 space, ch 1] 4 times, sk 3 st, dc in last ch-1 space, ch 1, sc in last two st. Ch 1, turn. (2 sc on each end + 4 granny clusters)
Round 22 :
sc in first two st, ch 1, sk first ch-1 space and dc st, [3 dc in next ch-1 space, ch 1, sk 3 st] 4 times, 3 dc in next ch-1 space, ch 1, sk last dc and ch-1 space, sc in last 2 st. Ch 1, turn. (2 sc on each end + 5 granny clusters)
Round 23 :
sc in first two st, ch 1, dc in first ch-1 space, ch 1, [sk 3 st, 3 dc in next ch-1 space, ch 1] 4 times, sk 3 st, dc in last ch-1 space, ch 1, sc in last two st. Ch 1, turn. (2 sc on each end + 4 granny clusters)
Round 24 :
— (for this decrease row, do not count ch-1 spaces as stitches; skip over them as though they don't exist) — sc in first 2 st, [sc2tog, sc] 5 times, sc in last st. Ch 1, turn. (13 stitches)
Round 25 :
— working in front loops only — sc in first 2 st, 2 sc, sc, [2 sc in next 2 st, sc] 2 times, 2 sc, sc in last 2 st. Ch 1, turn. (19 st)
Round 26 :
— working in both loops from now on — sc in first two st, ch 1, sk st, [3 dc in next st, ch 1, sk 2 st] 4 times, 3 dc in next st, ch 1, sk st, sc in last 2 st. Ch 1, turn. (2 sc on each end + 5 granny clusters)
Round 27 :
sc in first two st, ch 1, dc in first ch-1 space, ch 1, [sk 3 st, 3 dc in next ch-1 space, ch 1] 4 times, sk 3 st, dc in last ch-1 space, ch 1, sc in last two st. Ch 1, turn. (2 sc on each end + 4 granny clusters)
Round 28 :
sc in first two st, ch 1, sk first ch-1 space and dc st, [3 dc in next ch-1 space, ch 1, sk 3 st] 4 times, 3 dc in next ch-1 space, ch 1, sk last dc and ch-1 space, sc in last 2 st. Ch 1, turn. (2 sc on each end + 5 granny clusters)
Round 29 :
sc in first two st, ch 1, dc in first ch-1 space, ch 1, [sk 3 st, 3 dc in next ch-1 space, ch 1] 4 times, sk 3 st, dc in last ch-1 space, ch 1, sc in last two st. Ch 1, turn. (2 sc on each end + 4 granny clusters)
Round 30 :
— (for this decrease row, do not count ch-1 spaces as stitches; skip over them as though they don't exist) — sc in first 2 st, [sc2tog, sc] 5 times, sc in last st. Ch 1, turn. (13 stitches)
Round 31 :
— working in front loops only — sc in first 2 st, 2 sc, sc, [2 sc in next 2 st, sc] 2 times, 2 sc, sc in last 2 st. Ch 1, turn. (19 st)
Round 32 :
— working in both loops from now on — sc in first two st, ch 1, sk st, [3 dc in next st, ch 1, sk 2 st] 4 times, 3 dc in next st, ch 1, sk st, sc in last 2 st. Ch 1, turn. (2 sc on each end + 5 granny clusters)
Round 33 :
sc in first two st, ch 1, dc in first ch-1 space, ch 1, [sk 3 st, 3 dc in next ch-1 space, ch 1] 4 times, sk 3 st, dc in last ch-1 space, ch 1, sc in last two st. Ch 1, turn. (2 sc on each end + 4 granny clusters)
Round 34 :
sc in first two st, ch 1, sk first ch-1 space and dc st, [3 dc in next ch-1 space, ch 1, sk 3 st] 4 times, 3 dc in next ch-1 space, ch 1, sk last dc and ch-1 space, sc in last 2 st. Ch 1, turn. (2 sc on each end + 5 granny clusters)
Round 35 :
sc in first two st, ch 1, dc in first ch-1 space, ch 1, [sk 3 st, 3 dc in next ch-1 space, ch 1] 4 times, sk 3 st, dc in last ch-1 space, ch 1, sc in last two st. Ch 1, turn. (2 sc on each end + 4 granny clusters)
Round 36 :
— (for this decrease row, do not count ch-1 spaces as stitches; skip over them as though they don't exist) — sc in first 2 st, [sc2tog, sc] 5 times, sc in last st. Ch 1, turn. (13 stitches)
Info :
Finish off, leaving 14" yarn tail. (Fig. L-8 & L-9)
Info :
See assembly instructions beginning on page 27.
— Medium Pumpkin :
Info :
Hook size: US H8/5.00mm. Yarn: Caron One Pound in Off White or Pale Green. Turning chains do not count as stitches.
Info :
Begin by working ch 12.
Round 1 :
sc in second ch from hook and in next st, 2 sc, sc, 2 sc in next 3 st, sc, 2 sc, sc in last 2 st. Ch 1, turn. (16 st) (Fig. M-1)
Round 2 :
sc in first two st, ch 1, sk st, [3 dc in next st, ch 1, sk 2 st] 3 times, 3 dc in next st, ch 1, sk st, sc in last 2 st. Ch 1, turn. (2 sc on each end + 4 granny clusters) (Fig. M-2)
Round 3 :
sc in first two st, ch 1, dc in first ch-1 space, ch 1, [sk 3 st, 3 dc in next ch-1 space, ch 1] 3 times, sk 3 st, dc in last ch-1 space, ch 1, sc in last two st. Ch 1, turn. (2 sc on each end + 3 granny clusters) (Fig. M-3)
Round 4 :
sc in first two st, ch 1, sk first ch and dc st, [3 dc in next ch-1 space, ch 1, sk 3 st] 3 times, 3 dc in next ch-1 space, ch 1, sk last dc and ch-1 space, sc in last 2 st. Ch 1, turn. (2 sc on each end + 4 granny clusters) (Fig. M-4)
Round 5 :
— (for this decrease row, do not count ch-1 spaces as stitches; skip over them as though they don't exist) — sc in first 2 st, sc2tog, sc, sc2tog 3 times, sc, sc2tog, sc in last two st. Ch 1, turn. (11 stitches) (Fig. M-5)
Round 6 :
— working in back loops only — sc in next 2 st, 2 sc, sc, 2 sc in next 3 stitches, sc, 2 sc, sc in last 2 st. Ch 1, turn. (16 st)
Round 7 :
— working in both loops from now on — sc in first two st, ch 1, sk st, [3 dc in next st, ch 1, sk 2 st] 3 times, 3 dc in next st, ch 1, sk st, sc in last 2 st. Ch 1, turn. (2 sc on each end + 4 granny clusters)
Round 8 :
sc in first two st, ch 1, dc in first ch-1 space, ch 1, [sk 3 st, 3 dc in next ch-1 space, ch 1] 3 times, sk 3 st, dc in last ch-1 space, ch 1, sc in last two st. Ch 1, turn. (2 sc on each end + 3 granny clusters)
Round 9 :
sc in first two st, ch 1, sk first ch and dc st, [3 dc in next ch-1 space, ch 1, sk 3 st] 3 times, 3 dc in next ch-1 space, ch 1, sk last dc and ch-1 space, sc in last 2 st. Ch 1, turn. (2 sc on each end + 4 granny clusters)
Round 10 :
— (for this decrease row, do not count ch-1 spaces as stitches; skip over them as though they don't exist) — sc in first 2 st, sc2tog, sc, sc2tog 3 times, sc, sc2tog, sc in last two st. Ch 1, turn. (11 stitches) (Fig. M-6)
Round 11 :
— working in front loops only — sc, 2 sc in next 2 st, sc, 2 sc in next 3 stitches, sc, 2 sc, sc in last 2 st. Ch 1, turn. (16 st)
Round 12 :
— working in both loops from now on — sc in first two st, ch 1, sk st, [3 dc in next st, ch 1, sk 2 st] 3 times, 3 dc in next st, ch 1, sk st, sc in last 2 st. Ch 1, turn. (2 sc on each end + 4 granny clusters)
Round 13 :
sc in first two st, ch 1, dc in first ch-1 space, ch 1, [sk 3 st, 3 dc in next ch-1 space, ch 1] 3 times, sk 3 st, dc in last ch-1 space, ch 1, sc in last two st. Ch 1, turn. (2 sc on each end + 3 granny clusters)
Round 14 :
sc in first two st, ch 1, sk first ch-1 space and dc st, [3 dc in next ch-1 space, ch 1, sk 3 st] 3 times, 3 dc in next ch-1 space, ch 1, sk last dc and ch-1 space, sc in last 2 st. Ch 1, turn. (2 sc on each end + 4 granny clusters)
Round 15 :
(for this decrease row, do not count ch-1 spaces as stitches; skip over them as though they don't exist) — sc in first 2 st, sc2tog, sc, sc2tog 3 times, sc, sc2tog, sc in last two st. Ch 1, turn. (11 stitches)
Round 16 :
— working in back loops only — sc in next 2 st, 2 sc, sc, 2 sc in next 3 stitches, sc, 2 sc, sc in last 2 st. Ch 1, turn. (16 st)
Round 17 :
— working in both loops from now on — sc in first two st, ch 1, sk st, [3 dc in next st, ch 1, sk 2 st] 3 times, 3 dc in next st, ch 1, sk st, sc in last 2 st. Ch 1, turn. (2 sc on each end + 4 granny clusters)
Round 18 :
sc in first two st, ch 1, dc in first ch-1 space, ch 1, [sk 3 st, 3 dc in next ch-1 space, ch 1] 3 times, sk 3 st, dc in last ch-1 space, ch 1, sc in last two st. Ch 1, turn. (2 sc on each end + 3 granny clusters)
Round 19 :
sc in first two st, ch 1, sk first ch and dc st, [3 dc in next ch-1 space, ch 1, sk 3 st] 3 times, 3 dc in next ch-1 space, ch 1, sk last dc and ch-1 space, sc in last 2 st. Ch 1, turn. (2 sc on each end + 4 granny clusters)
Round 20 :
— (for this decrease row, do not count ch-1 spaces as stitches; skip over them as though they don't exist) — sc in first 2 st, sc2tog, sc, sc2tog 3 times, sc, sc2tog, sc in last two st. Ch 1, turn. (11 stitches)
Info :
Finish off, leaving 14" yarn tail. (Fig. M-7)
Info :
See assembly instructions beginning on page 27.
— Small Pumpkin :
Info :
Hook size: US H8/5.00mm. Yarn: Red Heart Super Saver in Gold or Cornmeal. Turning chains do not count as stitches.
Info :
Begin by working ch 8.
Round 1 :
sc in second chain from hook, 2 sc in next 2 st, sc, 2 sc in next 2 st, sc in last st. Ch 1, turn. (11 st) (Fig. S-1)
Round 2 :
sc, ch 1, sk st, [3 hdc in next st, ch 1, sk 2 st] 2 times, 3 hdc in next st, ch 1, sk st, sc in last st. Ch 1, turn. (1 sc in each end + 3 granny clusters) (Fig. S-2)
Round 3 :
sc in first st, ch 1, hdc in first ch-1 space, ch 1, [sk 3 st, 3 hdc in next ch-1 space, ch 1] 2 times, sk 3 st, hdc in last ch-1 space, ch 1, sc in last st. Ch 1, turn. (1 sc on each end + 2 granny clusters) (Fig. S-3)
Round 4 :
sc, ch 1, sk first ch-1 space and hdc, [3 hdc in next ch-1 space, ch 1, sk 3 st] 2 times, 3 hdc in next ch-1 space, ch 1, sk last hdc and ch-1 space, sc in last st. Ch 1, turn. (1 sc in each end + 3 granny clusters) (Fig. S-4)
Round 5 :
— (for this decrease row, do not count ch-1 spaces as stitches; skip over them as though they don't exist) — sc in first st, sc2tog 2 times, sc, sc2tog 2 times, sc in last st. Ch 1, turn. (7 stitches) (Fig. S-5)
Round 6 :
— working in back loops only — sc, 2 sc in next 2 st, sc, 2 sc in next 2 st, sc in last st. Ch 1, turn. (11 st)
Round 7 :
sc, ch 1, sk st, [3 hdc in next st, ch 1, sk 2 st] 2 times, 3 hdc in next st, ch 1, sk st, sc in last st. Ch 1, turn. (1 sc in each end + 3 granny clusters)
Round 8 :
sc in first st, ch 1, hdc in first ch-1 space, ch 1, [sk 3 st, 3 hdc in next ch-1 space, ch 1] 2 times, sk 3 st, hdc in last ch-1 space, ch 1, sc in last st. Ch 1, turn. (1 sc on each end + 2 granny clusters)
Round 9 :
sc, ch 1, sk first ch-1 space and hdc, [3 hdc in next ch-1 space, ch 1, sk 3 st] 2 times, 3 hdc in next ch-1 space, ch 1, sk last hdc and ch-1 space, sc in last st. Ch 1, turn. (1 sc in each end + 3 granny clusters)
Round 10 :
— (for this decrease row, do not count ch-1 spaces as stitches; skip over them as though they don't exist) — sc in first st, sc2tog 2 times, sc, sc2tog 2 times, sc in last st. Ch 1, turn. (7 stitches)
Round 11 :
— working in front loops only — sc, 2 sc in next 2 st, sc, 2 sc in next 2 st, sc in last st. Ch 1, turn. (11 st)
Round 12 :
sc, ch 1, sk st, [3 hdc in next st, ch 1, sk 2 st] 2 times, 3 hdc in next st, ch 1, sk st, sc in last st. Ch 1, turn. (1 sc in each end + 3 granny clusters)
Round 13 :
sc in first st, ch 1, hdc in first ch-1 space, ch 1, [sk 3 st, 3 hdc in next ch-1 space, ch 1] 2 times, sk 3 st, hdc in last ch-1 space, ch 1, sc in last st. Ch 1, turn. (1 sc on each end + 2 granny clusters)
Round 14 :
sc, ch 1, sk first ch-1 space and hdc, [3 hdc in next ch-1 space, ch 1, sk 3 st] 2 times, 3 hdc in next ch-1 space, ch 1, sk last hdc and ch-1 space, sc in last st. Ch 1, turn. (1 sc in each end + 3 granny clusters)
Round 15 :
— (for this decrease row, do not count ch-1 spaces as stitches; skip over them as though they don't exist) — sc in first st, sc2tog 2 times, sc, sc2tog 2 times, sc in last st. Ch 1, turn. (7 stitches)
Round 16 :
— working in back loops only — sc, 2 sc in next 2 st, sc, 2 sc in next 2 st, sc in last st. Ch 1, turn. (11 st)
Round 17 :
sc, ch 1, sk st, [3 hdc in next st, ch 1, sk 2 st] 2 times, 3 hdc in next st, ch 1, sk st, sc in last st. Ch 1, turn. (1 sc in each end + 3 granny clusters)
Round 18 :
sc in first st, ch 1, hdc in first ch-1 space, ch 1, [sk 3 st, 3 hdc in next ch-1 space, ch 1] 2 times, sk 3 st, hdc in last ch-1 space, ch 1, sc in last st. Ch 1, turn. (1 sc on each end + 2 granny clusters)
Round 19 :
sc, ch 1, sk first ch-1 space and hdc, [3 hdc in next ch-1 space, ch 1, sk 3 st] 2 times, 3 hdc in next ch-1 space, ch 1, sk last hdc and ch-1 space, sc in last st. Ch 1, turn. (1 sc in each end + 3 granny clusters)
Round 20 :
— (for this decrease row, do not count ch-1 spaces as stitches; skip over them as though they don't exist) — sc in first st, sc2tog 2 times, sc, sc2tog 2 times, sc in last st. Ch 1, turn. (7 stitches)
Round 21 :
— working in front loops only — sc, 2 sc in next 2 st, sc, 2 sc in next 2 st, sc in last st. Ch 1, turn. (11 st)
Round 22 :
sc, ch 1, sk st, [3 hdc in next st, ch 1, sk 2 st] 2 times, 3 hdc in next st, ch 1, sk st, sc in last st. Ch 1, turn. (1 sc in each end + 3 granny clusters)
Round 23 :
sc in first st, ch 1, hdc in first ch-1 space, ch 1, [sk 3 st, 3 hdc in next ch-1 space, ch 1] 2 times, sk 3 st, hdc in last ch-1 space, ch 1, sc in last st. Ch 1, turn. (1 sc on each end + 2 granny clusters)
Round 24 :
sc, ch 1, sk first ch-1 space and hdc, [3 hdc in next ch-1 space, ch 1, sk 3 st] 2 times, 3 hdc in next ch-1 space, ch 1, sk last hdc and ch-1 space, sc in last st. Ch 1, turn. (1 sc in each end + 3 granny clusters)
Round 25 :
— (for this decrease row, do not count ch-1 spaces as stitches; skip over them as though they don't exist) — sc in first st, sc2tog 2 times, sc, sc2tog 2 times, sc in last st. Ch 1, turn. (7 stitches)
Round 26 :
— working in back loops only — sc, 2 sc in next 2 st, sc, 2 sc in next 2 st, sc in last st. Ch 1, turn. (11 st)
Round 27 :
sc, ch 1, sk st, [3 hdc in next st, ch 1, sk 2 st] 2 times, 3 hdc in next st, ch 1, sk st, sc in last st. Ch 1, turn. (1 sc in each end + 3 granny clusters)
Round 28 :
sc in first st, ch 1, hdc in first ch-1 space, ch 1, [sk 3 st, 3 hdc in next ch-1 space, ch 1] 2 times, sk 3 st, hdc in last ch-1 space, ch 1, sc in last st. Ch 1, turn. (1 sc on each end + 2 granny clusters)
Round 29 :
sc, ch 1, sk first ch-1 space and hdc, [3 hdc in next ch-1 space, ch 1, sk 3 st] 2 times, 3 hdc in next ch-1 space, ch 1, sk last hdc and ch-1 space, sc in last st. Ch 1, turn. (1 sc in each end + 3 granny clusters)
Info :
Finish off, leaving 14" yarn tail. (Fig. S-6 & S-7)
Info :
See assembly instructions beginning on page 27.
These Lighted "Granny" Pumpkins add a handmade, cozy glow to any autumn display or centerpiece. Use scrap yarn to create a set of mixed sizes for a warm, layered tablescape. They make thoughtful seasonal gifts and are quick, satisfying makes to brighten your home. 🧶🍂🎃