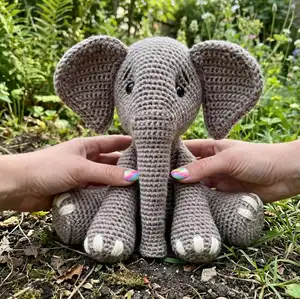
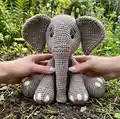
Make your own adorable Bubba the Elephant with this detailed crochet pattern. You'll work the trunk and head in one piece, create expressive eyes and embroidered eyebrows, and assemble soft arms, legs, ears and a brushed tail. The pattern includes step-by-step rounds, helpful photos, and clear finishing instructions so you can create a charming handmade companion for gifting or display.
Progress Tracker
0% Complete
— Trunk - Head :
Info :
With Dark Beige / Grey. The trunk and head are worked in one piece. Starting with the trunk.
— Trunk :
Round 1 :
6 sc in a magic ring (6)
R3 :
[3 sc, 1 inc] x 3 (15)
R4 :
[3 sc, 1 dec] x 3 - WORK THIS ROUND THROUGH BACK LOOPS ONLY (12)
R5-R10 :
12 sc - 6 rounds (12)
Info :
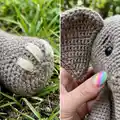
Before continuing, let's shape the trunk. Start stuffing the trunk and keep doing it as you go, but do not push too much the stuffing inside, we do not want the trunk to be stuffed too much, this way it will be a bit flexible. Be careful when stuffing the beginning of the trunk so it remains "sunk" (PICTURE 3).
Continue :
Continue with the trunk:
R11 :
[5 sc, 1 inc] x 2 (14)
R12-R15 :
14 sc - 4 rounds (14)
R16 :
[6 sc, 1 inc] x 2 (16)
R17-R20 :
16 sc - 4 rounds (16)
R21 :
[7 sc, 1 inc] x 2 (18)
R22-R25 :
18 sc - 4 rounds (18)
R26 :
[8 sc, 1 inc] x 2 (20)
R27-R28 :
20 sc - 2 rounds (20)
Info :
Stop here, now we are going to start working for rows (later we will work in a continuous spiral again to make the head's part). Continue on next page.
Info :
From where you stopped on R28, make a chain, turn your piece (PICTURES A & B) and work:
Info :
Stop once you have finished the 12 sc (we leave without working the remain 8 stitches), and continue working for rows:
R2 :
1 ch, turn, 1 dec, 8 sc, 1 dec (10)
R3 :
1 ch, turn, 10 sc (10)
R4 :
1 ch, turn, 1 dec, 6 sc, 1 dec (8)
R6 :
1 ch, turn, 1 dec, 4 sc, 1 dec (6)
Info :
Once here (PICTURE C), we are going to start with the head and working in a continuous spiral again.
— Head :
Info :
We are going to work the first round along the edges of the rows we just made, in the R28 stitches of the trunk we left without working and in the row 6 stitches. Check out the pictures and instructions below.
Round 1 :
24 sc (5 sc along the edges from R6 to R1 (PICTURE 1), 8 sc in the R28 stitches of the trunk we left without working (PICTURE 2), 5 sc along the edges from R1 to R6 (PICTURE 3), 6 sc in the stitches of R6 (PICTURE 4).
Info :
We are going to continue working in a continuous spiral until the head is finished. Remember to start stuffing normally from now on.
R2 :
[3 sc, 1 inc] x 6 (30)
R4 :
2 sc, [1 inc, 4 sc] x 5, 1 inc, 2 sc (36)
R5 :
[5 sc, 1 inc] x 6 (42)
R6 :
3 sc, [1 inc, 6 sc] x 5, 1 inc, 3 sc (48)
R7-R8 :
48 sc - 2 rounds (48)
Info :
Stop here and mark (e.g. with a yarn piece of a different color) the n° 35 stitch you made on R8 (PICTURE A) and continue:
Info :
Stop here and mark the n° 3 stitch you made on R9 (PICTURE B). Bubba's eyes will be placed later in the marked stitches. There will be 15 stitches between the two marked stitches.
R11 :
[7 sc, 1 inc] x 6 (54)
Info :
Stop here and install the safety eyes into the marked stitches (PICTURE C) and continue with the head:
R13-R20 :
54 sc - 8 rounds (54)
R21 :
[7 sc, 1 dec] x 6 (48)
R22 :
3 sc, [1 dec, 6 sc] x 5, 1 dec, 3 sc (42)
R23 :
[5 sc, 1 dec] x 6 (36)
R24 :
2 sc, [1 dec, 4 sc] x 5, 1 dec, 2 sc (30)
R25 :
[3 sc, 1 dec] x 6 (24)
R26 :
1 sc, [1 dec, 2 sc] x 5, 1 dec, 1 sc (18)
R27 :
[1 sc, 1 dec] x 6 (12)
Info :
Cut the yarn, leaving a long tail, and pull the working loop all the way out until the end of the yarn has been pulled through the middle of the last stitch. Thread the yarn end into a yarn needle and bring your needle under the front loop of the next stitch. Repeat the last step for each of the remaining stitches in the last round. Pull the yarn end to tighten and close the hole. Secure it with a knot and insert the yarn needle back into the piece, through the center of the hole and hide the loose end inside the head.
Info :
ADDING EXPRESSION TO BUBBA'S EYES: Cut a long piece of yarn (same color the head is), thread the yarn needle and insert it through the edge of the left eye, between rounds 8 & 9 of the head (PICTURE 1) and push it horizontally towards the same place in the right eye (PICTURE 2). Pull the needle and yarn out until you leave a tail coming out from where you started (PICTURE 3). Wrap the yarn over one stitch up, between rounds 9 & 10 (PICTURE 4), and push the needle horizontally towards the same place in the left side of the head, again above the edge of the eye, pull the yarn all the way out (PICTURES 5/6). Now wrap the yarn over one stitch and repeat what you did in pictures 1/2 and pull the yarns again all the way out (PICTURES 7/8/9). Cut the yarn leaving a tail of similar size to the one placed on the left side of the head (PICTURE 10). Pull both tails out gently at the same time. This will cause the eyes to sink into the head (PICTURE 11). Thread your yarn needle with one of the tails and secure it making 2 knots at the edge of the eye: make a first knot and pull the yarn tail to sink the eye into the head until you are happy with it (you can use your fingers to push and sink the eyes to make the process easier). Then make the 2nd knot to secure it and lose the yarn tail inside the head (PICTURES 12/13). Repeat the process with the other yarn tail. You're done! (PICTURES 14/15/16)
Info :
EMBROIDER BUBBA'S EYEBROWS: The eyebrows will be placed between rounds 11 & 12 of the head. Each one will be embroidered over 4 holes. Cut a long Black yarn piece. Thread your yarn needle and insert it through number 1 hole. Pull out the needle at the opposite side of the head, through number 2 hole (PICTURES 1 & 2). Pull the yarn all the way out until you leave a tail coming out from number 1 hole (PICTURE 3). Now insert your needle through number 3 hole and pull it out through number 1 hole (PICTURES 4 & 5). Pull the yarn all the way out and you will get Bubba's right eyebrow (PICTURES 6 & 7). Now insert your needle through number 4 hole and pull it out through number 1 hole (PICTURE 8). Pull the yarn all the way out and you will get Bubba's left eyebrow (PICTURE 9). Cut the yarn leaving a tail of similar size to the one you left at the beginning (PICTURE 10). Tie the two tails together with 2 knots. Thread your yarn needle with the two tails at the same time, insert the needle through number 1 hole and hide the tails inside the head (PICTURE 11). Done! (PICTURE 12).
— Ears :
Info :
With Dark Beige / Grey. Do not stuff. The ears are worked for rows. Each ear is made of 2 pieces that will be joined later. The process is slightly different for each ear, so follow the steps in order to make them correctly.
— Right Ear :
1st Piece :
Make a foundation chain with 2 ch. Starting in the 2nd chain from the hook:
R2 :
1 ch, turn, 1 inc, 1 sc (3)
R3 :
1 ch, turn, 2 sc, 1 inc (4)
R4 :
1 ch, turn, 1 inc, 3 sc (5)
R5 :
1 ch, turn, 4 sc, 1 inc (6)
R6 :
1 ch, turn, 1 inc, 5 sc (7)
R7 :
1 ch, turn, 6 sc, 1 inc (8)
R8 :
1 ch, turn, 1 inc, 7 sc (9)
R9 :
1 ch, turn, 8 sc, 1 inc (10)
R10 :
1 ch, turn, 10 sc (10)
R11 :
1 ch, turn, 9 sc, 1 inc (11)
R12-R13 :
1 ch, turn, 11 sc - 2 rows (11)
Continue :
Continue on next page.
R14 :
1 ch, turn, 1 dec, 8 sc, 1 inc (11)
R15 :
1 ch, turn, 11 sc (11)
R16 :
1 ch, turn, 1 dec, 8 sc, 1 inc (11)
R17 :
1 ch, turn, 1 inc, 8 sc, 1 dec (11)
R18 :
1 ch, turn, 1 dec, 7 sc - LEAVE WITHOUT WORKING THE 2 REMAINING STITCHES (PICTURE A) (8)
R19 :
1 ch, turn, 1 dec, 4 sc, 1 dec (6)
R20 :
1 ch, turn, 1 dec, 4 sc + 1 sc + 2 sc (8)
Info :
Once here, do not fasten off, we are going to continue working around the ear's shape. Before starting, mark with a stitch marker the last stitch you made on R20, you will make the last stitch of the shape's round into that marked stitch. Shape: 17 sc, 1 inc, 19 sc, 8 sc (46)
Info :
Once you have finished, cut the yarn leaving a tail and pull it out through the last stitch (PICTURE A). We are going to finish with an invisible join. Once the invisible join is done, mark with a stitch marker the last stitch you made on the shape's round (this marked stitch will guide you later for joining pieces together).
2nd piece :
Make another piece just like the 1st one until R20 (included) (PICTURE 1). Stop before start working the shape, here is where the process is slightly different: Shape: 8 sc, 19 sc, 1 inc, 17 sc (46)
Info :
If you look closely, the process is the same as for the 1st piece but the other way around. First, turn your work without making a chain (PICTURE 2), and continue working in the 8 sc of R20 (PICTURE 3), then 19 sc (PICTURE 4), then 1 inc (PICTURE 5), and finally 17 sc (PICTURES 6 & 7). Stop here and DO NOT FASTEN OFF (PICTURE 8). You will start joining pieces from here.
Joining 1st and 2nd pieces together (right ear) :
Place the second piece on top of the first one. Right sides of both pieces facing out (PICTURE 1). We are going to join the 46 stitches of both pieces with a slip stitch round. You will use back loops only from both pieces stitches (the loops that are closer to each other) (PICTURE 2). You will start in the next stitch from where you stopped on the 2nd piece and in the marked stitch on the 1st piece (PICTURE 2). Remove the stitch marker and make your first slip stitch. Now place the stitch marker into that first sl, so you will know where to finish the round (PICTURE 3). Continue making sl the same way around (PICTURE 4) until complete the round and reach the marked stitch. Once finished, remove the stitch marker and fasten off making another sl in the first sl of the round (the one that was marked). Cut the yarn leaving a long tail for sewing. Done! (PICTURES 5 & 6).
Info :
Follow joining pictures as a guide to create the right ear assembled piece.
— Left Ear :
1st piece :
To make the left ear, repeat the same instructions we did with the right ear until R20 (included), and stop before working the piece's shape. The process to work the left ear 1st piece's shape is the same process we did to work the right ear 2nd piece's shape (that is, once R20 is finished, turn your work without making a chain, and start working the shape). Bear in mind: once R20 is finished, before turning your work, mark with a stitch marker the next hole from where you stopped (the same hole where you inserted your hook to make the R20 last stitch). Now turn your work and continue with the shape: Shape: 8 sc, 19 sc, 1 inc, 17 sc (46)
Info :
Once you reach the stitch marker, remove it, and make the last stitch of the shape's round here (PICTURES 5 & 6). Once here, cut the yarn leaving a tail and pull it out through the last stitch (PICTURE 7). We are going to finish with an invisible join (PICTURE 8). Once the invisible join is done, mark with a stitch marker the "false" stitch. This stitch will guide you later for joining both left ear pieces together (PICTURE 9). Done!.
2nd piece :
To make the 2nd piece, repeat the same instructions until R20 (included), and stop before working the piece's shape. The process to work the shape is the same one we did to work the right ear 1st piece's shape (check page 8 if you have doubts): Shape: 17 sc, 1 inc, 19 sc, 8 sc (46). Once you have finished, DO NOT FASTEN OFF, you are going to join pieces together straight away.
Joining 1st and 2nd pieces together (left ear) :
As we did with the right ear, we are going to join the 46 stitches of both pieces with a slip stitch round. Remember to use back loops only from both pieces stitches. Place the 2nd piece on top of the 1st piece. You will start in the 2nd piece next stitch and in the 1st piece marked stitch. Remove the stitch marker/s, make your first slip stitch and once is done, mark it, so you will know where to finish the round. Once you have completed the shape's round and reach the marked stitch, remove the stitch marker and fasten off making another sl into the first sl of the round. Cut the yarn leaving a long tail for sewing. Done!
— Body :
Info :
With Dark Beige / Grey.
Round 1 :
6 sc in a magic ring (6)
R3 :
[1 sc, 1 inc] x 6 (18)
R4 :
1 sc, [1 inc, 2 sc] x 5, 1 inc, 1 sc (24)
R5 :
[3 sc, 1 inc] x 6 (30)
R6 :
2 sc, [1 inc, 4 sc] x 5, 1 inc, 2 sc (36)
R7 :
[5 sc, 1 inc] x 6 (42)
R8 :
3 sc, [1 inc, 6 sc] x 5, 1 inc, 3 sc (48)
R9 :
[7 sc, 1 inc] x 6 (54)
R10-R15 :
54 sc - 6 rounds (54)
R16 :
[7 sc, 1 dec] x 6 (48)
R17-R19 :
48 sc - 3 rounds (48)
R20 :
3 sc, [1 dec, 6 sc] x 5, 1 dec, 3 sc (42)
R21-R23 :
42 sc - 3 rounds (42)
R24 :
[5 sc, 1 dec] x 6 (36)
R25-R27 :
36 sc - 3 rounds - Start stuffing (36)
R28 :
2 sc, [1 dec, 4 sc] x 5, 1 dec, 2 sc (30)
R29-R30 :
30 sc - 2 rounds (30)
R31 :
[3 sc, 1 dec] x 6 (24)
Info :
Finish with a sl and cut the yarn leaving a long tail for sewing.
— Arms :
Info :
With Dark Beige / Grey. Make two.
Round 1 :
6 sc in a magic ring (6)
R3 :
[1 sc, 1 inc] x 6 (18)
R4 :
1 sc, [1 inc, 2 sc] x 5, 1 inc, 1 sc (24)
R5 :
24 sc - WORK THIS ROUND THROUGH BACK LOOPS ONLY (24)
R6-R10 :
24 sc - 5 rounds (24)
R11 :
[6 sc, 1 dec] x 3 (21)
R12-R15 :
21 sc - 4 rounds - Start stuffing (21)
R16 :
[5 sc, 1 dec] x 3 (18)
R17-R20 :
18 sc - 4 rounds (18)
R21 :
[4 sc, 1 dec] x 3 (15)
R22-R27 :
15 sc - 6 rounds - Stop stuffing at R25 approx (15)
R28 :
[3 sc, 1 dec] x 3 (12)
Info :
Once here, you are going to close the arm, make sure you did not stuff the last rounds. To close the arm, fold it in half, and from where you stopped in R29, crochet 6 sc through the stitches of both parts (PICTURES A & B). Fasten off and cut the yarn leaving a tail for sewing.
— Legs :
Info :
With Dark Beige / Grey. Make two.
Round 1 :
6 sc in a magic ring (6)
R3 :
[1 sc, 1 inc] x 6 (18)
R4 :
1 sc, [1 inc, 2 sc] x 5, 1 inc, 1 sc (24)
R5 :
[3 sc, 1 inc] x 6 (30)
R6 :
2 sc, [1 inc, 4 sc] x 5, 1 inc, 2 sc (36)
R7 :
36 sc - WORK THIS ROUND THROUGH BACK LOOPS ONLY (36)
R8-R9 :
36 sc - 2 rounds (36)
R10 :
5 sc, [1 dec, 10 sc] x 2, 1 dec, 5 sc (33)
R12 :
[9 sc, 1 dec] x 3 (30)
R14 :
4 sc, [1 dec, 8 sc] x 2, 1 dec, 4 sc (27)
R16 :
[7 sc, 1 dec] x 3 (24)
R17-R18 :
24 sc - 2 rounds (24)
R19 :
[3 sc, 1 inc] x 6 (30)
R20-R22 :
30 sc - 3 rounds (30)
Info :
Fasten off and cut the yarn leaving a long tail for sewing. Stuff the legs.
— Tail :
Info :
With Dark Beige / Grey. Do not stuff.
Round 1 :
6 sc in a magic ring (6)
R2-R9 :
6 sc - 8 rounds (6)
R10 :
[2 sc, 1 inc] x 2 (8)
R12 :
[3 sc, 1 inc] x 2 (10)
Info :
Now we are going to close the tail the same way we did with the arms. Fold it in half and from where you stopped at R13 crochet 5 sc through the stitches of both parts.
Info :
Brushing Bubba's tail: There are several ways to do it. The most common tool to do it is with a wire pet brush, or you can use a hook-and-loop (VELCRO) 'hook' part. Brush carefully until fluffy and trim any extra long fibers if necessary. If you used cotton, you can tie cotton pieces at the tail bottom and trim to shape.
— Assembly :
Info :
Let's start sewing the ears onto the head. The ears will be sewn in the row of holes n° 7 counting from where the eyes are (PICTURE 1). There will be 9 stitches between them approx. Use something to mark the beginning hole where you will start sewing each ear (I used two yarn needles). Notice that the marked holes are aligned one "row" above the eyebrows.
Info :
Start sewing Bubba's right ear. We are going to sew the ears through 12 stitches. From the right ear, start at the stitch where we made the fasten off 'knot' (just the previous stitch from where the fasten off 'knot' is, SEE PICTURE A). From the head we will use the marked holes' row, starting in the marked hole (PICTURE B).
Info :
Thread your yarn needle with the yarn tail and insert it through the ear n° 1 stitch. Then place the ear on top of the head and start sewing the ear 12 stitches through the head holes (PICTURE 2). Once you have finished, fasten off and hide the yarn tail inside the head. Done! (PICTURES 3 & 4).
Info :
To sew the left ear, the process is the same; the ear's first stitch we will sew is where we made the fasten off knot, but this time, because of the way we made the left ear, this stitch is the next one from where the knot is (PICTURE A). Sew the left ear through 12 stitches starting at the head's marked hole, the same way you did with the right ear.
Info :
Bubba's head is now completed.
This Bubba the Elephant pattern guides you step-by-step to create a cuddly and expressive amigurumi elephant with charming details. The trunk and head are shaped cleverly to keep a soft flexible look, and the ear construction gives a natural flop. Perfect for handmade gifts, nursery decor, or a special keepsake to cherish. 🧶🧵