About This Lemon gnome Amigurumi Pattern
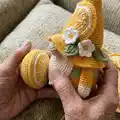
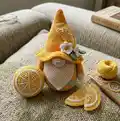
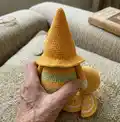
This pattern creates a sweet lemon-themed gnome amigurumi complete with a pointed hat, beard, nose, hands and charming lemon slice decorations. It uses cotton yarn and small hookwork to achieve neat, tight stitches for crisp details. The pattern includes step-by-step rounds and clear assembly instructions so you can recreate the finished gnome exactly as pictured.
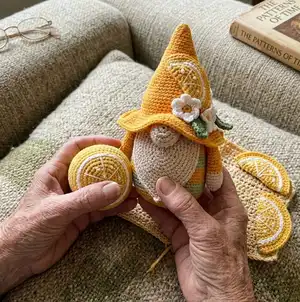
You'll make decorative flowers, leaves and a lemon slice to dress the hat and add personality. The PDF includes full round-by-round instructions and helpful photos to guide placement and finishing.
Why You'll Love This Lemon gnome Amigurumi Pattern
I absolutely love this pattern because it blends classic amigurumi shaping with playful citrus details that really make the design pop. I enjoy how the small accessories — the flowers, leaves and lemon slice — let me add custom color accents and personality. The shape of the hat and the striped body give endless opportunities for color play, and sewing everything together is very satisfying. I also love that the finished gnome is compact and makes a delightful handmade gift or a bright piece of home decor.
Switch Things Up
I love experimenting with colorways; try pastel lemons like soft peach and mint green for a sweeter look that changes the character vibe.
To make a larger gnome, I switch to a bulkier cotton or acrylic yarn and increase hook size accordingly for a chunky, cozy version.
I sometimes add metallic thread for the lemon segment lines to give a subtle shimmer that catches light on display.
I often replace the paper/plastic base with a small wooden disc for extra weight and stability if I plan to display the gnome on shelves.
For holiday variations, I change the hat trims and flower colors — red and green for Christmas or oranges and browns for autumn vibes.
I like to embroider tiny freckles or smile lines on the nose to add personality without adding more pieces to sew.
Try swapping the cotton for soft acrylic to make a plush, squeezable gnome perfect for kids, but note the size and feel will change.
If you want a posable gnome, I sometimes insert thin wire into the hands before folding and sewing to create subtle arm poses.
Make a set by altering stripe widths and hat height; small changes in rounds create a family of gnomes that look cohesive but unique.
I also enjoy adding tiny props—like a crocheted lemon wedge or a miniature banner—for seasonal displays and gift-ready finishing touches.
Common Mistakes & How to Fix Them
✗ Skipping stitch markers at the start of rounds causes you to lose track of the beginning; place a marker at the first stitch of every round and move it up as you crochet to stay aligned.
✗ Forgetting to stuff as you go leads to irregular shaping and lumps; add small amounts of stuffing progressively and shape each section before closing.
✗ Changing colors without fastening off neatly creates loose strands and messy joins; weave in tails or carry yarn where appropriate and secure color changes with a tidy knot or needle join.
✗ Not crocheting the specified back loop row (R10) will prevent looped detail from forming correctly; follow the instruction 'crochet this row for the back wall of the loops' exactly at round 10.
✗ Overstuffing the body before closing can distort the silhouette and make sewing difficult; leave room to shape the top, add the plastic/paper base, then finish stuffing evenly.
✗ Counting errors during increases or decreases will change stitch counts dramatically; count your stitches after every increase/decrease round to ensure the counts match the pattern.